Table of Contents
Advertisement
Owner's manual
Read this manual for complete instructions
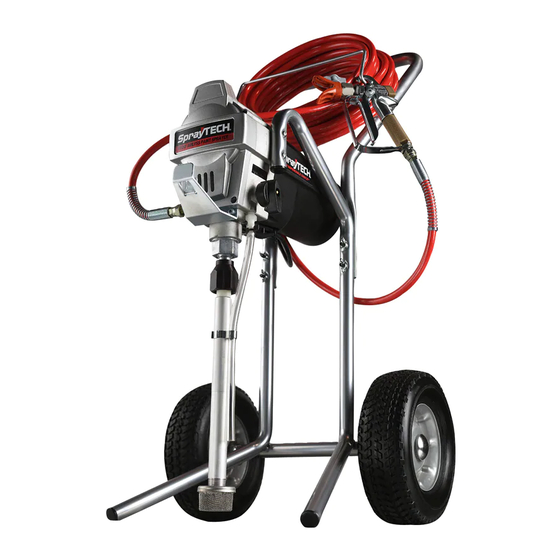
This pump is available in a stand model (1420) and cart models
(1620, 1720 and 1920). All information given for the stand model
applies to the cart models except where indicated.
1-800-686-8525
Wagner Technical Service
http://www.wagnerspraytech.com
1770 Fernbrook Lane, Plymouth, MN 55447
Technical service hours: Monday through Friday, 8:00 am to 7:00 pm Central Time
Form No. 0523800A
0607 •
Visit us on the world wide web!
Saturday, 9:00 am to 3:30 Central Time
2
2
Table of Contents
Safety . . . . . . . . . . . . . . . . . . . . . . . . . . . . . . . . . . . .2-3
Components and Description . . . . . . . . . . . . . . . . . .4-5
Assembly . . . . . . . . . . . . . . . . . . . . . . . . . . . . . . . . . . .6
Before You Begin . . . . . . . . . . . . . . . . . . . . . . . . . . . . .7
Locking the Spray Gun . . . . . . . . . . . . . . . . . . .7
Plugging in the Sprayer . . . . . . . . . . . . . . . . . . .7
Pressure Relief Procedure . . . . . . . . . . . . . . . .7
Purging and Priming the Sprayer . . . . . . . . . . . . . . . . .8
Purging and Priming the Spray Hose . . . . . . . . . . . . . .9
Practice / Spraying Technique . . . . . . . . . . . . . . . . . .10
Spraying Troubleshooting . . . . . . . . . . . . . . . . . . .11-12
Unclogging the Spray Tip . . . . . . . . . . . . . . . .11
Cleaning the Spray Gun Filter . . . . . . . . . . . . .12
Cleaning the Inlet Filter . . . . . . . . . . . . . . . . . .12
Cleanup . . . . . . . . . . . . . . . . . . . . . . . . . . . . . . . . .13-17
Cleanup for Latex materials . . . . . . . . . . . .13-14
Cleanup for Oil-based materials . . . . . . . . . . .15
Cleaning the Suction Set . . . . . . . . . . . . . . . . .16
Cleaning the Spray Gun Components . . . . . .17
Short-Term Storage . . . . . . . . . . . . . . . . . . . . . . . . . .18
Long-Term Storage . . . . . . . . . . . . . . . . . . . . . . . . . . .19
Cleaning the Inlet Valve . . . . . . . . . . . . . . . . . . . . . . .20
Fluid Section . . . . . . . . . . . . . . . . . . . . . . . . . . . . . . . .21
Troubleshooting / Maintenance . . . . . . . . . . . . . . . . .22
Español . . . . . . . . . . . . . . . . . . . . . . . . . . . . . . . . . . . .23
Parts List . . . . . . . . . . . . . . . . . . . . . . . . . . . . . . . .46-49
Accessories . . . . . . . . . . . . . . . . . . . . . . . . . . . . . . . .50
Warranty . . . . . . . . . . . . . . . . . . . . . . . . . . . . . . . . . . .52
Need Help? Call us first for answers
fast.
Call Wagner Spray Tech toll-free if you
have any comments or problems with this product.
English
Advertisement
Table of Contents
Troubleshooting

Related Manuals for SprayTECH 1620


Summary of Contents for SprayTECH 1620
-
Page 1: Table Of Contents
Warranty ........52 (1620, 1720 and 1920). All information given for the stand model applies to the cart models except where indicated. -
Page 2: Important Safety Information
Important Safety Information • Read all safety information before operating the equipment. Save these instructions To reduce the risks of fire or explosion, electrical shock and the injury to persons, read and understand all instructions included in this manual. Be familiar with the controls and proper usage of the equipment. Indicates a hazardous situation which, if not avoided, could result in death or serious injury. -
Page 3: Grounding Instructions
Save these instructions HAZARD: GENERAL NOTICE Can cause severe injury or property damage. THE 1420 AND 1620 SERIES UNITS ARE PROVIDED WITH A NON- RESETABLE THERMAL OVERLOAD. THE 1720 AND 1920 SERIES PREVENTION: UNITS ARE PROVIDED WITH A REPLACEABLE FUSE. -
Page 4: Safety
Pressure Control Dial ..The pressure control dial regulates the amount of force the pump uses to push the fluid. Oiler ....(1620, 1720, 1920 only) The oiler is designed to provide lubrication to the fluid section of the pump. - Page 5 Components and Description This pump is available in a stand model (1420) and cart models (1620, 1720 shown below, and 1920). All information given for the stand model applies to the cart models except where indicated. Important Some of the graphics in this manual may not exactly match your sprayer and spray gun. All information and instructions given in this manual applies to all models except where noted.
-
Page 6: Assembly
Information (page 3). • 3/16” Allen wrench If you have one of the cart models (1620, 1720 or 1920), follow these assembly instructions. If you have the model 1420 sprayer, skip to item 4, below. 1. Twist the knobs on either side of the 2. -
Page 7: Before You Begin
Before you begin - This section contains instructions that will be repeated throughout this manual. Locking the Spray Gun: Always lock the trigger off when attaching the spray tip or when the spray gun is not in use. Model GX-05 and GX-07 Spray Gun Model GX-08 Spray Gun The gun is locked when the trigger lock is at a 90º... -
Page 8: Purging And Priming The Sprayer
Whether your sprayer is new or if you have already used it, this fluid must be purged and thoroughly cleaned out of the system prior to use. Follow the steps below. 1620, 1720 and 1920 only. 1. Remove oiler cap using a straight-slot 2. -
Page 9: Purging And Priming The Spray Hose
Purging and Priming the Spray Hose 2. PULL the trigger and aim the spray gun at the side wall of 1. Unlock the spray gun and turn the PRIME/SPRAY knob to a waste container. If using oil-based materials, the PRIME. spray gun must be grounded while purging (see warning below). -
Page 10: Practice / Spraying Technique
Practice / Spraying Technique NOTE - Be sure that the paint hose is free of kinks and clear of objects with sharp cutting edges. 2. When motor shuts off, unlock the spray gun and spray a 1. Switch the pump ON (l). Turn the PRIME/SPRAY knob to test area to check the spray pattern. -
Page 11: Spraying Troubleshooting
Spraying Troubleshooting - Unclogging the Spray Tip If the spray pattern becomes distorted or stops completely while the gun is triggered, follow these steps. Do not attempt to unclog or clean the tip with your finger. NOTE - Do not use a needle or other sharp pointed instrument to clean the tip. The hard tungsten carbide can chip. Gun locked (see page 7) 1. -
Page 12: Cleaning The Spray Gun Filter
Spraying Troubleshooting - Cleaning the Spray Gun Filter The filter must be cleaned every time you use your sprayer. When using thicker spray materials, the filter might need to be cleaned more often. Spray gun model GX-07 1. Perform Pressure Relief Procedure, page 7. Tapered 2a. -
Page 13: Cleanup
Important Cleaning Notes - Read before cleanup Follow these steps whenever cleaning with • When using latex materials, clean your sprayer and mineral spirits: components with water. When using oil-based materials, use mineral spirits. • Always flush spray gun at least one hose length •... - Page 14 Cleanup - Latex materials (continued) 6. Turn water supply on. Turn pump ON (l). Water will go 5. Unclip the return tube from the suction tube and place it into the suction tube and out through the return tube. Let into the waste container.
-
Page 15: Cleanup For Oil-Based Materials
Cleanup - Oil-based materials 2. Place a waste container next to the original material 1. Lock the gun and remove spray tip assembly. Submerge container. Aim the spray gun into the side of the original suction set into a bucket with appropriate cleaning material container and hold the trigger. -
Page 16: Cleaning The Suction Set
Cleanup - Cleaning the Suction Set 2. Remove the suction hose and return tube and clean it 1. Lock the gun and turn the pump OFF (O). using the appropriate cleaning solution. You should also wipe the threads of the inlet nut (a) and remove and clean the suction set inlet filter. -
Page 17: Cleaning The Spray Gun Components
Cleanup - Cleaning the Spray Gun Components 1. Make sure the pump is switched OFF (O). Make sure the 2. Remove spray gun from the paint hose using adjustable PRIME/SPRAY knob is turned to PRIME. Unplug the wrenches. sprayer. 3. Remove filter from spray gun (refer to Cleaning the 4. -
Page 18: Short-Term Storage
Short-Term Storage (up to 16 hours) Follow these steps when using latex materials only. If using materials that are oil-based, follow the Cleanup and Long- Term Storage steps. Shutdown 1. Lock the spray gun off. GX-05 GX-08 GX-07 2. Turn the PRIME/SPRAY knob to PRIME. Switch the pump 3. -
Page 19: Long-Term Storage
Replace the high pressure hose to the paint hose port. If you have a cart model (1620, 1720, 1920), you can collapse the cart handle for easier storage. 1. Twist the knobs on either side 2. Slide the handle into the cart. -
Page 20: Cleaning The Inlet Valve
4. Replace suction set and hand-tighten. valve assembly by screwing it into the sprayer. Torque to 23-27 ft lbs (1420, 1620) or 32-38 ft lbs (1720, 1920). If priming problems persist, you may need to replace the inlet valve assembly. Call Customer Service to order new inlet valve assembly (1-800-686-8525). -
Page 21: Fluid Section
4. Using a pliers, pull the dowel pin out. 7. Install the dowel pin to connect the yoke to the piston. The 5a. For models 1420 and 1620, rotate the pump shaft so the piston may have to be moved up or down to do this. -
Page 22: Troubleshooting / Maintenance
Description Some pump parts eventually wear out from use and must be replaced. The 0512221A Fluid Section Seal Kit (1420, 1620) following list indicates the available repair kits for the parts replaced by 0516725 Fluid Section Seal Kit (1720, 1920) each kit. -
Page 23: Español
Part No. Quantity Articulo Pieza No. Description Descripción Cantidad 0512180 Complete gun assembly (1620) Ensamblaje de la pistola (1620) 0515274 Complete gun assembly (1720) Ensamblaje de la pistola (1720) 0501011 Guard assembly Ensamblaje de protección 0501415 Spray tip, 415 (1620) - Page 24 Parts List • Lista de piezas Title Model GX-08 spray gun Modelo de pistola GX-08 English - Español - Item Part No. Quantity Articulo Pieza No. Description Descripción Cantidad 0501517 Spray tip, 517 Boquilla, 517 0501011 Guard assembly Ensamblaje de la protección 0296404 Diffuser, 7/8”...
- Page 25 Parts List • Lista de piezas Title Suction Set Juego de succión English - Español - Item Part No. Quantity Articulo Pieza No. Description Descripción Cantidad 0516127 Suction set (1420 only) Ensamblaje del juego de succión (1420 solamente) 0516198 Suction set Ensamblaje del juego de succión 0512371 Return tube (1420 only)
- Page 26 Stand assembly (1420 only) Ensamblaje de soporte (1420 solamente) 0523320 Hose bracket Soporte de manguera 0523207A Cart assembly (1620) Ensamblaje de carrito (1620) 0523206A Cart assembly (1720) Ensamblaje de carrito (1720) 0523205A Cart assembly (1920) Ensamblaje de carrito (1920) 0516581...
-
Page 27: Accessories
Accessories • Accesorios Title English - Español - Part No. Pieza No. Description Descripción 0516915 Separating oil Lubricante de empaques 0270192 Hose, Wireless, 25’ x 1/4" Manguera 25’ x 1/4" 0515265 Hose, Wireless, 50’ x 1/4" Manguera 50’ x 1/4" 0279667 Hose Connector, 1/4”... -
Page 29: Warranty
Warranty • Garantia LIMITED WARRANTY AIRLESS PAINT SPRAY EQUIPMENT This product, manufactured by Wagner Spray Tech (Wagner), is warranted to the original retail purchaser against defects in material and workmanship for one year from date of purchase. This warranty does not cover damage resulting from improper use, accidents, user's negligence or normal wear. This warranty does not cover any defects or damages caused by service or repair performed by anyone other than a Wagner Authorized Service Center. - Page 30 Warranty • Garantia LIMITED WARRANTY AIRLESS PAINT SPRAY EQUIPMENT This product, manufactured by Wagner Spray Tech (Wagner), is warranted to the original retail purchaser against defects in material and workmanship for one year from date of purchase. This warranty does not cover damage resulting from improper use, accidents, user's negligence or normal wear. This warranty does not cover any defects or damages caused by service or repair performed by anyone other than a Wagner Authorized Service Center.
Need help?
Do you have a question about the 1620 and is the answer not in the manual?
Questions and answers
I have a 10 20 model are there parts for it ,I need a suction hose with strainer
Yes, the SprayTECH 1620 model includes a suction set, which functions as the suction hose with strainer. The part number for the suction set is 0516198.
This answer is automatically generated