Table of Contents
Advertisement
Available languages
Available languages
Owner's manual
Read this manual for complete instructions
This pump is available in a stand model (1420) and cart models
(1620, 1720 and 1920). All information given for the stand model
applies to the cart models except where indicated.
1-800-686-8525
Wagner Technical Service
http://www.wagnerspraytech.com
1770 Fernbrook Lane, Plymouth, MN 55447
Technical service hours: Monday through Friday, 8:00 am to 7:00 pm Central Time
Form No. 0523813A
0607 •
Visit us on the world wide web!
Saturday, 9:00 am to 3:30 Central Time
2
2
Table of Contents
Safety . . . . . . . . . . . . . . . . . . . . . . . . . . . . . . . . . . . .2-3
Components and Description . . . . . . . . . . . . . . . . . .4-5
Assembly . . . . . . . . . . . . . . . . . . . . . . . . . . . . . . . . . . .6
Before You Begin . . . . . . . . . . . . . . . . . . . . . . . . . . . . .7
Locking the Spray Gun . . . . . . . . . . . . . . . . . . .7
Plugging in the Sprayer . . . . . . . . . . . . . . . . . . .7
Pressure Relief Procedure . . . . . . . . . . . . . . . .7
Purging and Priming the Sprayer . . . . . . . . . . . . . . . . .8
Purging and Priming the Spray Hose . . . . . . . . . . . . . .9
Practice / Spraying Technique . . . . . . . . . . . . . . . . . .10
Spraying Troubleshooting . . . . . . . . . . . . . . . . . . .11-12
Unclogging the Spray Tip . . . . . . . . . . . . . . . .11
Cleaning the Spray Gun Filter . . . . . . . . . . . . .12
Cleaning the Inlet Filter . . . . . . . . . . . . . . . . . .12
Cleanup . . . . . . . . . . . . . . . . . . . . . . . . . . . . . . . . .13-17
Cleanup for Latex materials . . . . . . . . . . . .13-14
Cleanup for Oil-based materials . . . . . . . . . . .15
Cleaning the Suction Set . . . . . . . . . . . . . . . . .16
Cleaning the Spray Gun Components . . . . . .17
Short-Term Storage . . . . . . . . . . . . . . . . . . . . . . . . . .18
Long-Term Storage . . . . . . . . . . . . . . . . . . . . . . . . . . .19
Cleaning the Inlet Valve . . . . . . . . . . . . . . . . . . . . . . .20
Fluid Section . . . . . . . . . . . . . . . . . . . . . . . . . . . . . . . .21
Troubleshooting / Maintenance . . . . . . . . . . . . . . . . .22
Français . . . . . . . . . . . . . . . . . . . . . . . . . . . . . . . . . . .23
Parts List . . . . . . . . . . . . . . . . . . . . . . . . . . . . . . . .46-49
Accessories . . . . . . . . . . . . . . . . . . . . . . . . . . . . . . . .50
Warranty . . . . . . . . . . . . . . . . . . . . . . . . . . . . . . . . . . .52
Need Help? Call us first for answers
fast.
Call Wagner Spray Tech toll-free if you
have any comments or problems with this product.
English
Advertisement
Table of Contents
Troubleshooting

Related Manuals for SprayTECH 1420


Summary of Contents for SprayTECH 1420
- Page 1 Accessories ....... .50 This pump is available in a stand model (1420) and cart models Warranty .
-
Page 2: Important Safety Information
Important Safety Information • Read all safety information before operating the equipment. Save these instructions To reduce the risks of fire or explosion, electrical shock and the injury to persons, read and understand all instructions included in this manual. Be familiar with the controls and proper usage of the equipment. Indicates a hazardous situation which, if not avoided, could result in death or serious injury. -
Page 3: Grounding Instructions
Save these instructions HAZARD: GENERAL NOTICE Can cause severe injury or property damage. THE 1420 AND 1620 SERIES UNITS ARE PROVIDED WITH A NON- RESETABLE THERMAL OVERLOAD. THE 1720 AND 1920 SERIES PREVENTION: UNITS ARE PROVIDED WITH A REPLACEABLE FUSE. -
Page 4: Specifications
• Spray tip assembly (see chart on next page) • Pail bracket (all cart units) • 25’ (1420, 1620) or 50’ (1720, 1920), 1/4” diameter pressure hose Controls and Functions ON/OFF Switch... The ON/OFF switch turns the power to the sprayer on and off (O=OFF, l=ON). -
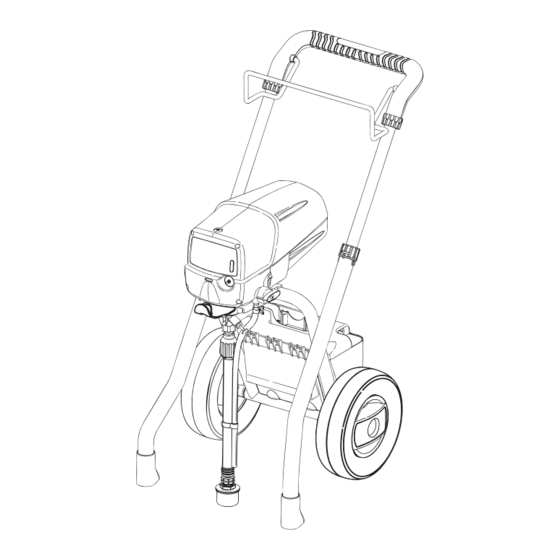
Page 5: Components And Description
Components and Description This pump is available in a stand model (1420) and cart models (1620, 1720 shown below, and 1920). All information given for the stand model applies to the cart models except where indicated. Important Some of the graphics in this manual may not exactly match your sprayer and spray gun. All information and instructions given in this manual applies to all models except where noted. -
Page 6: Assembly
Information (page 3). • 3/16” Allen wrench If you have one of the cart models (1620, 1720 or 1920), follow these assembly instructions. If you have the model 1420 sprayer, skip to item 4, below. 1. Twist the knobs on either side of the 2. -
Page 7: Before You Begin
Before you begin - This section contains instructions that will be repeated throughout this manual. Locking the Spray Gun: Always lock the trigger off when attaching the spray tip or when the spray gun is not in use. Model GX-05 and GX-07 Spray Gun Model GX-08 Spray Gun The gun is locked when the trigger lock is at a 90º... -
Page 8: Purging And Priming The Sprayer
Purging and Priming the Sprayer All new units are performance-tested at the factory and are shipped with test fluid in the fluid section to prevent corrosion during shipment and storage. If you have already used your pump, some water or solvent used in cleaning may remain in the fluid section. -
Page 9: Purging And Priming The Spray Hose
Purging and Priming the Spray Hose 2. PULL the trigger and aim the spray gun at the side wall of 1. Unlock the spray gun and turn the PRIME/SPRAY knob to a waste container. If using oil-based materials, the PRIME. spray gun must be grounded while purging (see warning below). -
Page 10: Practice / Spraying Technique
Practice / Spraying Technique NOTE - Be sure that the paint hose is free of kinks and clear of objects with sharp cutting edges. 2. When motor shuts off, unlock the spray gun and spray a 1. Switch the pump ON (l). Turn the PRIME/SPRAY knob to test area to check the spray pattern. -
Page 11: Spraying Troubleshooting
Spraying Troubleshooting - Unclogging the Spray Tip If the spray pattern becomes distorted or stops completely while the gun is triggered, follow these steps. Do not attempt to unclog or clean the tip with your finger. NOTE - Do not use a needle or other sharp pointed instrument to clean the tip. The hard tungsten carbide can chip. Gun locked (see page 7) 1. -
Page 12: Cleaning The Spray Gun Filter
Spraying Troubleshooting - Cleaning the Spray Gun Filter The filter must be cleaned every time you use your sprayer. When using thicker spray materials, the filter might need to be cleaned more often. Spray gun model GX-07 1. Perform Pressure Relief Procedure, page 7. Tapered 2a. -
Page 13: Cleanup
Important Cleaning Notes - Read before cleanup Follow these steps whenever cleaning with • When using latex materials, clean your sprayer and mineral spirits: components with water. When using oil-based materials, use mineral spirits. • Always flush spray gun at least one hose length •... - Page 14 Cleanup - Latex materials (continued) 6. Turn water supply on. Turn pump ON (l). Water will go 5. Unclip the return tube from the suction tube and place it into the suction tube and out through the return tube. Let into the waste container.
- Page 15 Cleanup - Oil-based materials 2. Place a waste container next to the original material 1. Lock the gun and remove spray tip assembly. Submerge container. Aim the spray gun into the side of the original suction set into a bucket with appropriate cleaning material container and hold the trigger.
-
Page 16: Cleaning The Suction Set
Cleanup - Cleaning the Suction Set 2. Remove the suction hose and return tube and clean it 1. Lock the gun and turn the pump OFF (O). using the appropriate cleaning solution. You should also wipe the threads of the inlet nut (a) and remove and clean the suction set inlet filter. -
Page 17: Cleaning The Spray Gun Components
Cleanup - Cleaning the Spray Gun Components 1. Make sure the pump is switched OFF (O). Make sure the 2. Remove spray gun from the paint hose using adjustable PRIME/SPRAY knob is turned to PRIME. Unplug the wrenches. sprayer. 3. Remove filter from spray gun (refer to Cleaning the 4. -
Page 18: Short-Term Storage
Short-Term Storage (up to 16 hours) Follow these steps when using latex materials only. If using materials that are oil-based, follow the Cleanup and Long- Term Storage steps. Shutdown 1. Lock the spray gun off. GX-05 GX-08 GX-07 2. Turn the PRIME/SPRAY knob to PRIME. Switch the pump 3. -
Page 19: Long-Term Storage
Long-Term Storage Follow these instructions only after all cleanup steps have been performed. 1. Fill a cup or other container with separating oil (approximately 2 ounces) supplied with the unit and submerge the inlet valve into the oil. Separating oil 2. -
Page 20: Cleaning The Inlet Valve
4. Replace suction set and hand-tighten. valve assembly by screwing it into the sprayer. Torque to 23-27 ft lbs (1420, 1620) or 32-38 ft lbs (1720, 1920). If priming problems persist, you may need to replace the inlet valve assembly. Call Customer Service to order new inlet valve assembly (1-800-686-8525). -
Page 21: Fluid Section
4. Using a pliers, pull the dowel pin out. 7. Install the dowel pin to connect the yoke to the piston. The 5a. For models 1420 and 1620, rotate the pump shaft so the piston may have to be moved up or down to do this. -
Page 22: Troubleshooting / Maintenance
Description Some pump parts eventually wear out from use and must be replaced. The 0512221A Fluid Section Seal Kit (1420, 1620) following list indicates the available repair kits for the parts replaced by 0516725 Fluid Section Seal Kit (1720, 1920) each kit. -
Page 23: Table Of Contents
Liste de pièces ......46-49 Cette pompe est offerte en le modèle sur support (1420) et le modèles sur Accessoires . - Page 24 Consignes de securité important • Lire toutes ces consignes avant d’utiliser l’appareil. Garder ces consignes. Pour réduire les risques d’incendie ou d’explosion, de choc électrique et de blessure, vous devez lire et comprendre les directives figurant dans ce manuel. Familiarisez-vous avec les commandes et l’utilisation adéquate de l’équipement. Indique une situation à...
- Page 25 Garder ces consignes. DANGER : GÉNÉRALITÉS ATTENTION D’autres dangers peuvent entraîner des dommages matériels ou des LE MODÈLES 1420 ET 1620 EST MUNI D’UN DISPOSITIF blessures graves. THERMIQUE NON RÉCLENCHABLE DE PROTECTION CONTRE MESURES PRÉVENTIVES : LES SURCHARGES, TANDIS QUE LES MODÈLES 1720 ET 1920 •...
-
Page 26: Sécurité
• un dispositif d’aspiration et un tube de retour; • un flexible haute pression d’un diamètre de 0,6 centimètre, long de 7,1 mètres (1420 et 1620) ou 15,2 mètres (1720 et 1920); • un adaptateur de nettoyage de pompe; • de l’huile séparatrice;... - Page 27 Composants et description Cette pompe est offerte en le modèle sur support (1420) et le modèles sur chariot (1620, 1720 ci-dessus, et 1920) . Toutes les données fournies pour le modèle sur support s’appliquent au modèles sur chariot, sauf indication contraire.
-
Page 28: Assemblage
• Un clé hexagonale (0,475 cm) Si vous disposez d'un chariot du modèle 1620, 1720 ou 1920, suivez les directives d’assemblage ci-après. Si vous possédez un pulvérisateur du modèle 1420, passez à l’étape no 4 ci-après. 1. Tournez le bouton qui se trouve d’un 2. -
Page 29: Avant De Commencer
Avant de commencer - La section ci-dessous contient des renseignements qui seront répétes plus loin dans le manuel. Verrouillage du pistolet de pulvérisation : La détente doit toujours être verrouillée quand on fixe l’embout ou quand le pistolet n’est pas utilisé. Modèles GX-05 et GX-07 Modèle GX-08 Le pistolet est bloqué... -
Page 30: Purge Et Amorçage De La Pompe
Purge et amorçage de la pompe Les appareils neufs sont soumis à des essais de performance en usine; le fluide utilisé pendant ces essais demeure dans la section du fluide afin de prévenir la corrosion pendant l’expédition et l’entreposage. Si vous avez déjà utilisé votre pompe, il peut rester un peu d’eau ou de solvant utilisé... -
Page 31: Purge Et Amorçage Du Flexible De Pulvérisation
Purge et amorçage du flexible de pulvérisation 2. Déclenchez la gâchette et orientez le pistolet de 1. Déverrouiller le pistolet et régler le bouton PRIME/SPRAY pulvérisation vers la paroi latérale d’un récipient à à PRIME. déchets. Lorsqu’on utilise un produit à base d’huile, le pistolet de pulvérisation doit être mis à... -
Page 32: Essais / Techniques De Pulvérisation
Essais / Techniques de pulvérisation REMARQUE - S’assurer que le flexible n’est ni plié ni en contact avec des arêtes coupantes. 2. Une fois le moteur arrêté, déverrouiller le pistolet et 1. Mettre l’interrupteur à la position MARCHE (l). Régler le pulvériser le produit sur une surface d’essai afin de bouton PRIME/SPRAY à... -
Page 33: Problèmes Potentiels
Problèmes potentiels - Nettoyage de l’embout de pulvérisation Si le jet se déforme ou s’arrête complètement alors qu’on serre la détente, suivre les étapes suivantes : Ne pas tenter de débloquer ou de nettoyer l’embout avec le doigt. REMARQUE - Ne pas utiliser une aiguille ou un instrument pointu pour nettoyer l’embout;... -
Page 34: Nettoyage Du Filtre De Pistolet
Problèmes potentiels - Nettoyage du filtre de pistolet On doit nettoyer ce filtre chaque fois qu’on utilise le pulvérisateur (si le produit dont on se sert est plus épais, il pourrait s’avérer nécessaire de le nettoyer plus souvent). Modèle du pistolet 1. -
Page 35: Nettoyage
Remarques importantes au sujet du nettoyage! Lire les remarques et mises in garde suivantes avant de nettoyer le pulvérisateur! • En présence de produits à base de latex, on doit se Directives spéciales pour le nettoyage au servir d’eau pour nettoyer le pulvérisateur et ses moyen d’essence minérale : composants. - Page 36 Nettoyage - Produits à base de latex 5. Enlevez le collier et détachez le tuyau de retour du tuyau 6. Ouvrez l’arrivée d’eau. Placez l’interrupteur de la pompe à MARCHE (l). L’eau passe dans le tuyau d’aspiration et d’aspiration, puis placez-le dans le récipient à déchets. Placez le bouton PRIME/SPRAY à...
-
Page 37: Nettoyage Du Produits À Base D'huile
Nettoyage - Produits à base d’huile 2. Placez un récipient à déchets près du récipient du produit 1. Verrouillez le pistolet et retirez la buse de pulvérisation. original. Orientez le pistolet de pulvérisation vers le côté Immergez les pièces d’aspiration dans un seau rempli du récipient du produit original et maintenez la d’une solution de nettoyage appropriée. -
Page 38: Nettoyage Du Dispositif D'aspiration
Nettoyage - Nettoyage du dispositif d’aspiration 2. Retirer les tubes d’aspiration et de retour et les nettoyer 1. Verrouiller le pistolet et mettre l’interrupteur à la position au moyen de la solution appropriée. On recommande ARRÊT (O). également d’essuyer les filets de la écrou d’entrée (a) et de retirer et nettoyer la filtre d’entrée. -
Page 39: Nettoyage De Ses Composants De Pistolet
Title Nettoyage - Nettoyage de ses composants de pistolet 1. S’assurer que l’interrupteur est à la position ARRÊT (O). 2. Détacher le pistolet du flexible de pulvérisation au moyen S’assurer que le bouton prime/spray est réglé à PRIME. de clés à molette. Débrancher le pulvérisateur. -
Page 40: Rangement À Court Terme
Rangement à court terme (jusqu’à 16 heurs) Suivre les étapes de cette section pour les peintures au latex seulement; en présence de peintures à base d’huile, se conformer plutôt à celles de la sections Nettoyage et Rangement à long terme. Préparation pour le rangement 1. -
Page 41: Rangement À Long Terme
Title Rangement à long terme Suivez ces consignes seulement après que toutes les étapes de nettoyage aient été exécutées. 1. Mettre environ 50 ml d’huile séparatice (fournie avec l’appareil) dans un godet ou un autre contenant et y immerger la soupape d’entrée. D’huile séparatice 2. -
Page 42: Nettoyage De La Soupape D'entree
Nettoyage de la soupape d’entrée En cas de difficulté d’amorçage de l’appareil, il peut être nécessaire de nettoyer ou de réparer le soupape d’entrée. Il est possible de résoudre un problème d’amorçage en nettoyant correctement le pulvérisateur et en exécutant les étapes Rangement à... -
Page 43: Tronçon D'acheminement
4. Retirer la goupille à l’aide d’une pince. est insérée. 5a. En présence du modèles 1420 et 1620, pousser sur la chape 7. Insérer la goupille de positionnement qui relie la chape au pour faire pivoter l’axe de la pompe de manière à orienter le piston (pour ce faire, il pourrait s’avérer nécessaire de déplacer... -
Page 44: Dépannage / Entretien
Entretien à long terme - Nº de pièce Description Certaines pièces 0512221A Jeu de joints pour tronçon d’acheminement (1420 s’usent avec le temps et doivent être remplacées. La liste suivante et 1620) énumère les trousses de réparation offertes, de même que les 0516725 Jeu de joints pour tronçon d’acheminement (1720... -
Page 46: Liste De Pièces
Parts List • Liste de pièces Title Model GX-05 spray gun Modèle du pistolet GX-05 English - Français - Item Part No. Quantity Article Nº de piéce Description Description Quantite 0501011 Guard assembly Protège-embout et ses composants 0501415 Spray tip, 415 Embout, 415 0521902 Complete gun assembly... - Page 47 Parts List • Liste de pièces Title Model GX-08 spray gun Modèle du pistolet GX-08 English - Français - Item Part No. Quantity Article Nº de piéce Description Description Quantite 0501517 Spray tip, 517 Embout, 517 0501011 Guard assembly Protège-embout 0296404 Diffuser, 7/8”...
- Page 48 Quantite 0516127 Suction set (1420 only) Dispositif d’aspiration (1420 seulement) 0516198 Suction set Dispositif d’aspiration 0512371 Return tube (1420 only) Tube de retour (1420 seulement) 0512389 Return tube Tube de retour 0512390 Clip Agrafe 0516697 Inlet filter Filtre filtre d’entrée...
- Page 49 Part No. Quantity Article Nº de piéce Description Description Quantite 0523204A Stand assembly (1420 only) Ensamble de suppport (1420 seulement) 0523320 Hose bracket Support de flexible 0523207A Cart assembly (1620) Ensamble de chariot (1620) 0523206A Cart assembly (1720) Ensamble de chariot (1720)
-
Page 50: Accessories
Accessories • Accessoires Title English - Français - Part No. Nº de piéce Description Description 0516915 Separating oil Huile séparatrice 0270192 Hose, Wireless, 25’ x 1/4" Flexible, 7,6 m x 0,6 cm 0515265 Hose, Wireless, 50’ x 1/4" Flexible, 15,2 m x 0,6 cm 0279667 Hose Connector, 1/4”... -
Page 52: Accessoires
Warranty • Garantié LIMITED WARRANTY AIRLESS PAINT SPRAY EQUIPMENT This product, manufactured by Wagner Spray Tech (Wagner), is warranted to the original retail purchaser against defects in material and workmanship for one year from date of purchase. This warranty does not cover damage resulting from improper use, accidents, user's negligence or normal wear. This warranty does not cover any defects or damages caused by service or repair performed by anyone other than a Wagner Authorized Service Center.
Need help?
Do you have a question about the 1420 and is the answer not in the manual?
Questions and answers