Table of Contents
Advertisement
Available languages
Available languages
Advertisement
Chapters
Table of Contents
Troubleshooting

Related Manuals for Hughes & Kettner TRIAMP MK II


Summary of Contents for Hughes & Kettner TRIAMP MK II
- Page 1 BEDIENUNGSANLEITUNG 100 WATT TUBE AMPLIFIER...
- Page 2 TRIAMP MK II - MANUAL IMPORTANT: Before powering up please read the Important Safety Instructions on page 29 - 31! WICHTIG: Bitte lesen Sie vor der Inbetriebnahme unbedingt die Sicherheitshinweise auf Seite 29 - 31!
- Page 3 TRIAMP MK II - MANUAL THANK YOU FOR CHOOSING THE TRIAMP When the first TriAmp ® debuted in 1995, it wasn’t long until it garnered a reputation as the Holy Grail of amplifiers. And with good reason, for it was the...
-
Page 4: Table Of Contents
TRIAMP MK II - MANUAL CONTENTS ® 1.0 TRIAMP MK II: THE THREE AMPS ... 4 2.0 CONNECTIONS AND CONTROL FEATURES . . . 6 2.1 AC POWER AND THE GLOBAL CURRENT ADAPTER . - Page 5 TRIAMP MK II - MANUAL AMP 1 – CHUNKY CLEAN + FAT DRIVE CLEAN The first amp is dedicated to delivering classic clean sounds. CHANNEL A sounds full and expansive in the great American tradition. It’s forte is classy clean tone that remains unadulterated by distortion even at high gain settings.
-
Page 6: Connections And Control Features
TRIAMP MK II - MANUAL AMP 3 – MODERN GAIN 'Truth in distortion' is a major consideration when buying an amp. An absolute prerequisite for any top amp is that it preserves the guitar's own characteristic sound - rather than making all... -
Page 7: Overview Of Control Features
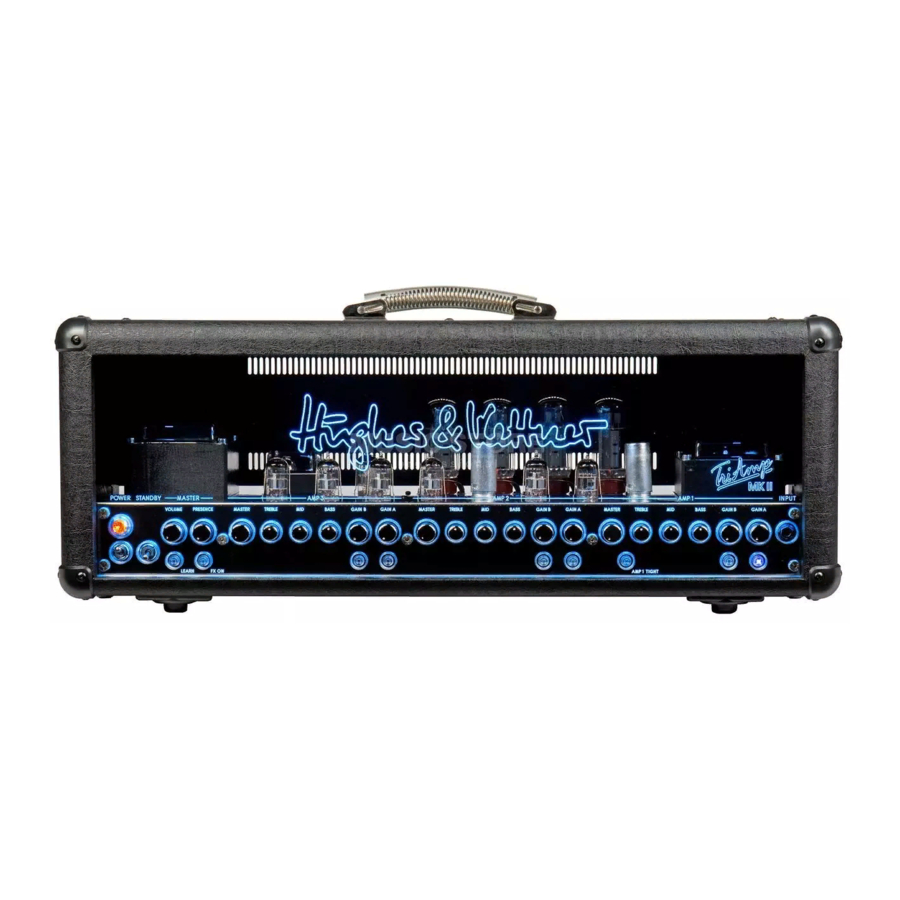
TRIAMP MK II - MANUAL 2.2 OVERVIEW OF CONTROL FEATURES FRONT INPUT: Input jack for guitars. PREAMP SECTION: The three preamps’ controls are largely compar- able. The functions of their knobs are explained in the following using AMP 1 as an example. - Page 8 TRIAMP MK II - MANUAL REAR MAINS IN: Socket for the included Euromains power cable. Before plugging into the wall socket, make certain the amp's voltage rating as dis- played in the VOLTAGE SELECTOR window matches your local AC voltage rating.
-
Page 9: Standard Setup/Cable Connections
TRIAMP MK II - MANUAL 3.0 STANDARD SETUP/CABLE CONNECTIONS 4.0 TRIAMP MK II OPERATION 4.1 CHANNEL SELECTION The TriAmp ® MK II’s six fundamental sounds may be accessed via the channel selector buttons on the front panel or the TriAmp ®... -
Page 10: Red Box ® Di Out
TRIAMP MK II - MANUAL Connecting signal processors: • Connect the device's INPUT to the FX LOOP SEND jack and its OUTPUT to the RETURN jack. • Activate the FX LOOP via the FX ON button on the front panel or the Stageboard. -
Page 11: Triamp Mk Ii And Midi
TRIAMP MK II - MANUAL 4.4 TRIAMP ® MK II AND MIDI With the MSM-1 MIDI Module installed, you can use your multieffects processor to sel- ect TriAmp ® MK II channels and turn the FX LOOP on or off via MIDI. -
Page 12: Replacing Tubes, Service And Preventive Maintenance
TRIAMP MK II - MANUAL 5.0 REPLACING TUBES, SERVICE AND PREVENTIVE MAINTENANCE The TriAmp ® MK II ships with EL34 and 12AX7 tubes. Once they’ve been burned in (initial continuous operation under a load), these undergo an indepth selection process where their electrical values and mechanical status (microphonics) are checked. - Page 13 TRIAMP MK II - MANUAL If, on the other hand, you install a new set with characteristics that deviate from the old set, you definitely should re-bias the amp. Again, biasing an amp is not a DIY task. It takes...
-
Page 14: Troubleshooting
TRIAMP MK II - MANUAL 6.0 TROUBLESHOOTING TriAmp ® MK II is not getting any power: • Check the mains cable to see if it is connected properly. • The mains fuse is defective. Replace the fuse with another identical fuse. - Page 15 TRIAMP MK II - MANUAL WIR FREUEN UNS, DASS SIE SICH FÜR DEN TRIAMP MK II ENTSCHIEDEN HABEN. ® Als 1995 der erste TriAmp auf dem Markt erschien, gelangte er schnell in den Ruf des „Holy Grail of Amplifiers“. Zum ersten Mal bot sich dem Röhrenpuristen eine Konzeption, die drei völlig...
-
Page 16: Vor Der Inbetriebnahme
TRIAMP MK II - MANUAL INHALT 1.0 DREIZEHN RÖHREN FÜR DEN GUTEN TON . . . 16 2.0 ANSCHLÜSSE UND BEDIENELEMENTE ..18 2.1 NETZANSCHLUSS UND WELTSPANNUNGSADAPTION ..18 2.2 ÜBERSICHT DER BEDIENELEMENTE . - Page 17 TRIAMP MK II - MANUAL AMP 1 – CHUNKY CLEAN + FAT DRIVE CLEAN Klassische Cleansounds sind die Hauptaufgabe des ersten Amps. CHANNEL A klingt voll und rund in bester amerikanischer Manier. Er übersteuert auch bei hohen Gain Einstellungen kaum und bietet den begehrten „Twang“...
-
Page 18: Anschlüsse Und Bedienelemente
TRIAMP MK II - MANUAL AMP 3 – MODERN GAIN Präzise Distortionsounds spielen bei der Ent- scheidung für einen Verstärker eine besonders große Rolle. Ein verbindliches Kriterium für Top- Class-Gitarrenverstärker: selbst bei extremen GAIN- Einstellungen sollte der Gitarrencharakter hörbar und der Ton definiert bleiben. Nur wenige Verstärker können diesen Anspruch erfüllen. -
Page 19: Übersicht Der Bedienelemente
TRIAMP MK II - MANUAL 2.2 ÜBERSICHT DER BEDIENELEMENTE VORDERSEITE: INPUT: Eingang zum Anschluss der Gitarre. PREAMP SEKTION: Die Bediensektionen der 3 Preamps sind miteinander vergleichbar . Die Funktionen der Regler werden hier anhand von AMP 1 beispielhaft erläutert. KANAL SCHALTER: Wählt direkt den gewünschten Grundsound (Kanal A oder B) an. - Page 20 TRIAMP MK II - MANUAL RÜCKSEITE: MAINS IN: Netzbuchse für das mitgelieferte Euronetzkabel. Bevor der Netzstecker eingesteckt wird, vergewissern Sie sich bitte, dass die vorhandene Netzspannung mit dem im Fenster des VOLTAGE SELECTORS angegebenem Wert übereinstimmt. VOLTAGE SELECTOR: Steckeinsatz zur Anpassung des TriAmp ®...
-
Page 21: Der Triamp ® Mk Ii Mit Effektgeräten
TRIAMP MK II - MANUAL 3.0 STANDARD SET UP/VERKABELUNG 4.0 BEDIENUNG DES TRIAMP 4.1 DAS ANWÄHLEN DER KANÄLE Die sechs Grundsounds des TriAmp mit den Kanal Schaltern auf der Frontplatte oder am TriAmp ® MK II Stageboard abgerufen werden. Weiterhin besteht die Möglichkeit, die Sound- umschaltung vom MSM-1 MIDI Modul ausführen zu... -
Page 22: Red Box Di Out - Vollröhre Am Mischpult
TRIAMP MK II - MANUAL ANSCHLUSS DES EFFEKTGERÄTES: • Verbinden Sie die SEND Buchse mit dem INPUT und die RETURN Buchse mit dem OUTPUT des Effektgerätes. • Aktivieren Sie den Effektweg mittels des FX ON Schalters auf der Frontplatte oder dem Stageboard. -
Page 23: Der Triamp ® Mk Ii Und Midi
TRIAMP MK II - MANUAL TRIAMP MK II - MANUAL TRIAMP MK II - MANUAL TRIAMP MK II - MANUAL TRIAMP MK II - MANUAL TRIAMP MK II - MANUAL TRIAMP MK II - MANUAL TRIAMP MK II - MANUAL... -
Page 24: Röhrentausch, Wartung Und Pflege
TRIAMP MK II - MANUAL TRIAMP MK II - MANUAL TRIAMP MK II - MANUAL TRIAMP MK II - MANUAL TRIAMP MK II - MANUAL TRIAMP MK II - MANUAL TRIAMP MK II - MANUAL TRIAMP MK II - MANUAL... - Page 25 TRIAMP MK II - MANUAL TRIAMP MK II - MANUAL TRIAMP MK II - MANUAL TRIAMP MK II - MANUAL TRIAMP MK II - MANUAL TRIAMP MK II - MANUAL TRIAMP MK II - MANUAL TRIAMP MK II - MANUAL...
-
Page 26: Fehlerbeseitigung/Troubleshooting
TRIAMP MK II - MANUAL TRIAMP MK II - MANUAL TRIAMP MK II - MANUAL TRIAMP MK II - MANUAL TRIAMP MK II - MANUAL TRIAMP MK II - MANUAL TRIAMP MK II - MANUAL TRIAMP MK II - MANUAL... -
Page 27: Technical Specifications
TRIAMP MK II - MANUAL TRIAMP MK II - MANUAL TRIAMP MK II - MANUAL TRIAMP MK II - MANUAL TRIAMP MK II - MANUAL TRIAMP MK II - MANUAL TRIAMP MK II - MANUAL TRIAMP MK II - MANUAL... - Page 28 TRIAMP MK II - MANUAL This is to certify that HUGHES & KETTNER TRIAMP MK II complies with the provisions of the Directive of the Council of the European Communities on the approximation of the laws of the Member States rela- ting to electromagnetic compatibility (EMC Directive 89/336/EEC) and the low voltage Directive (73/23/EEC).
-
Page 29: Important Safety Instructions
united states IMPORTANT SAFETY INSTRUCTIONS BEFORE CONNECTING, READ INSTRUCTIONS • Read all of these instructions! • Save these instructions for later use! • Follow all warnings and instructions marked on the product! • Do not use this product near water, i.e. bathtub, sink, swimming pool, wet basement, etc. •... - Page 30 english IMPORTANT ADVICE ON SAFETY! PLEASE READ BEFORE USE AND KEEP FOR LATER USE! • The unit has been built by Hughes & Kettner in accordance with IEC 60065 and left the factory in safe working order. To maintain this condition and ensure non-risk operation, the user must follow the advice and warning comments found in the operating instructions.
- Page 31 italiano IMPORTANTI AVVERTIMENTI DI SICUREZZA! LEGGERE ATTENTAMENTE PRIMA DELL’USO E CONSERVARE PER UN UTILIZZO SUCCESSIVO • L’apparecchio è stato costruito dalla Hughes & Kettner secondo la normativa europea IEC 60065 ed ha lasciato il nostro stabilimento in stato ineccepibile. Per garantire il mantenimento di tale stato e un utilizzo assolutamente privo di rischi l’utente è...
- Page 32 To find a local distributor please visit: www.hughes-and-kettner.com Hughes & Kettner • Postfach 1509 • 66595 St. Wendel • Tel. 0 68 51 - 905 0 • FAX 0 68 51 - 905 103 ® International Inquiries: Fax +49 - 68 51 - 905 200 • E-Mail: international@musicandsales.com Technische Änderungen vorbehalten Details subject to change without notice Copyright 2006 Music &...
Need help?
Do you have a question about the TRIAMP MK II and is the answer not in the manual?
Questions and answers
Здравствуйте, мне нужно знать в какой последовательности включаются оконечные пары ламп в цепь, (1-3,2-4 или 1-4,2-3 и т д)и по лампам предварительного усиления, какая цепь ламп включается при переключении всех 6 режимов по очереди начиная с первого чистого. Спасибо