
Related Manuals for R-Tech PLASMA I-CUT100P


Summary of Contents for R-Tech PLASMA I-CUT100P
- Page 1 Tel: 01452 733933 Fax 01452 733939 PLASMA I-CUT100P INVERTER PLASMA CUTTER OPERATION INSTRUCTIONS Version 2014-1...
- Page 3 This product is covered by 2 years collect and return UK warranty, R-Tech will cover cost of collection, repair and return of item to UK mainland (other areas are RTB). External items, torch, earth lead etc are covered by 3 months warranty.
-
Page 4: Technical Specifications
Introduction The R-Tech PLASMA I-CUT 100P is a member of our field acclaimed family of welding products. Premium features include: 1. Inverter power source - more efficient to operate, provides smoother weld characteristics. 2. Infinite cutting power adjustment, allows fine tuning of cut characteristics 3. -
Page 5: Safety Precautions
Safety Precautions Read entire section before starting installation WARNING! Electric Shock can kill Only qualified personnel should perform this installation. Turn off input power at the fuse box before working on this equipment. Do not touch electrically live parts. Always connect the machine to an earthed mains supply as per national recommended standards. -
Page 6: Electrical Installation
Electrical Installation WARNING! ELECTRIC SHOCK CAN KILL Machine grounding and High Frequency Interference Protection This plasma cutter must be grounded to earth. See national electrical codes fro proper grounding methods. The high frequency generator being similar to a radio transmitter may cause interference to radio, TV and other electronic equipment. - Page 7 Turn the input power OFF at the mains switch & fuse box before working on this equipment. Have a qualified electrician install & service this equipment. Allow machine to sit for 5 minutes minimum to allow the power capacitors to discharge before working inside this equipment. Do not touch electrically live parts The PLASMA I-CUT 100P Plasma Cutters require a 415V 50/60Hz 3-Phase supply.
- Page 8 Connections for PLASMA I-CUT 100P Front machine connections Fig 2 1. Earth / Work piece connector Connect the earth lead to this connector. Insert male connector into socket and twist clockwise until tight. Secure other end of earth lead to work piece via the earth clamp. 2.
-
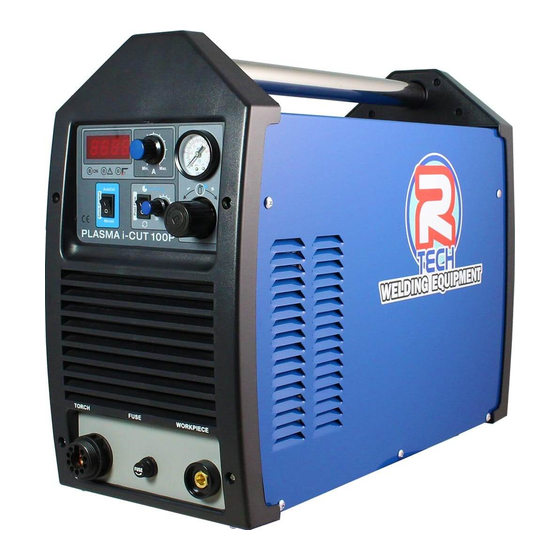
Page 9: Controls And Settings
Controls and Settings Fig 1 1. Air pressure gauge This shows the air pressure as set by regulator at rear of machine. This should be set to 70PSI when the test gas button is activated. 2. Amperage control knob This adjusts the amperage (cutting power) from 20 to 100 amps 3. -
Page 10: Operating Machine
This regulates the air pressure as displayed in gauge on front of machine. To adjust pressure pull knob outwards and turn to adjust pressure, once correct pressure is obtained press knob inwards to secure. Operating machine SAFETY PRECAUTIONS WARNING! ELECTRIC SHOCK CAN KILL Do not touch electrically live parts or electrode with skin or wet clothing. - Page 11 Operating Machine Please ensure all torch consumables are tight before use Ensure machine has been setup as previously stated Turn on the machine and the power light indicates and cooling fan is running Set the function switch in the test gas position, air will flow from torch head, now set the air pressure in gauge using adjuster on regulator on rear of machine to 50PSI, Once the correct air pressure has been set press down the adjuster on air regulator and set the function switch to the cutting position...
- Page 12 Replacing torch consumables WARNING! ELECTRIC SHOCK CAN KILL Please ensure machine is turned off before changing consumables If cutting performance is poor you probably need to check / change the torch consumables. To change the plasma cutting consumables carry out the following procedure Switch off machine Ensure torch has cooled down to avoid burns Unscrew the white ceramic shield cup...
-
Page 13: Routine And Periodic Maintenance
Maintenance Routine and periodic maintenance WARNING! ELECTRIC SHOCK CAN KILL Turn the input power OFF at the mains switch & fuse box and remove mains plug from socket before working on this equipment. Have a qualified electrician install & service this Plasma cutting equipment. Allow machine to sit for 5 minutes minimum after disconnection from mains power to allow the power capacitors to discharge before working inside this equipment. - Page 14 HF PCB Failure –Contact R-Tech for repair Machine keeps overheating - Warning light is lit on machine Check if fan is running if not contact R-Tech for repair Check the cooling vents for obstruction; blow out machine with clean dry low pressure air supply.
- Page 15 Plasma Torch Consumables parts list R-Tech Torch Spares Plasma I-CUT 100P Part No. Electrode P100i-EL Cutting Tip 1.1mm 50A P100i-CT11 Cutting Tip 1.35mm 80A P100i-CT13 Cutting Tip 1.6mm 100A P100i-CT16 Retaining Nozzle P100i-RN Spacer Spring P100i-SS Gas diffuser P100i-GD Torch Head -Hand Held...
Need help?
Do you have a question about the PLASMA I-CUT100P and is the answer not in the manual?
Questions and answers