Table of Contents
Advertisement
Quick Links
Advertisement
Table of Contents

Related Manuals for R-Tech I-MIG160 MIG


Summary of Contents for R-Tech I-MIG160 MIG
- Page 1 I-MIG160 MIG/MMA WELDER OPERATION INSTRUCTIONS...
- Page 3 Thank you for selecting the R-Tech I-MIG160 Portable Inverter MIG/MMA Welder. The I-MIG160 has many benefits over traditional transformer MIG welders, including infinite power control, adjustable arc force and a compact wire feed mechanism to provide very smooth wire feed and weld characteristics We want you to take pride in operating our I-MIG160 as much pride as we have taken in making this product for you.
-
Page 4: Technical Specifications
Welding Capability – Duty Cycle The R-Tech IMIG 160 is rated at 160 Amps at 35% and 110 Amps @ 60% duty cycle on a ten minute basis. If the duty cycle is exceeded a thermal protector will shut the machine off until it cools. -
Page 5: Safety Precautions
Rated Output Current 130Amps Max Generator required KVA 4.8KVA Duty Cycle @ 130 AMPS º 35% @ 40 Duty Cycle @ 100 AMPS º 60% @ 40 Duty Cycle @ 75 AMPS º 100% @ 40 Output current Range 30-130 AMPS No Load Voltage 55-75V Gross Weight... -
Page 6: Electrical Installation
WARNING! Falling Equipment can cause injury. Never lift welder with gas bottle attached. Never lift above personnel. Tilting Machine must be placed on a secure level surface or on a recommended undercarriage/trolley. This machine may topple over if this procedure is not followed. Environmental Rating The welding power source carries the IP21S rating. - Page 7 1. Keep the welder input power lines as short as possible and enclose as much of them as possible in metal conduit or equivalent shielding. There should be a good electrical contact between this conduit and ground (Earth). 2. Keep the work and electrode leads as short as possible. Tape the leads together where practical.
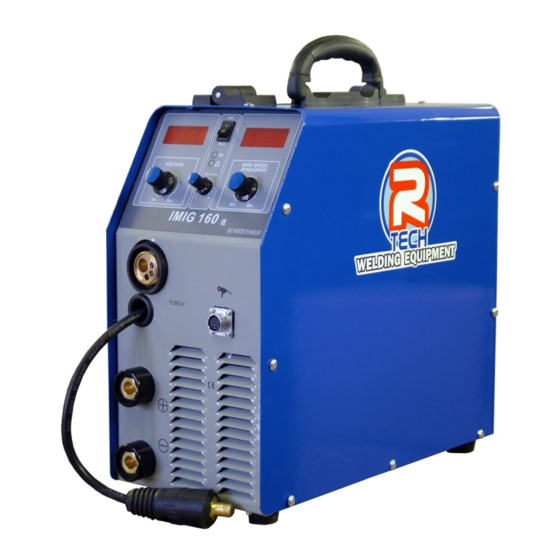
- Page 8 Connections for IMIG 160 Setup machine as per two diagrams below: Fig 1 Fig 2 1. Earth / Workpiece connector Connect the earth lead (negative -) to this connector. Insert male connector into socket and twist clockwise until tight. Secure other end of earth lead to Workpiece via the earth clamp.
-
Page 9: Controls And Settings
Controls and Settings Fig 3 1. Welding Voltage This adjusts the welding voltage (weld power) from 0 to 10. Adjust knob for power output required by job, preset welding voltage is shown in LED (Fig3.4) 2. Wire Speed This adjusts the wire feed speed from 0-100% Adjust the wire speed to suit welding voltage (Fig3.1) and job requirements When adjusting the wire feed speed a value is shown in the amperage LED (Fig3.5) This feature allows you to record this value along with the preset welding voltage for easy setup to specific job when several different... - Page 10 Wire Spool Fitment 1. Wire reel retainer Push and twist in, to retain wire roll adaptor onto wire reel 2. Roller tensioner Do not over tighten wire feed pressure roller as this can cause premature motor and roller failure. Correct way to adjust tensioner is to slacken off pressure so that MIG welding wire does not feed, slowly adjust pressure until wire feeds smoothly, you should be able to stop wire feeding by holding wire and it should slip on rollers.
-
Page 11: Operating The Machine
Operating the Machine SAFETY PRECAUTIONS WARNING! ELECTRIC SHOCK CAN KILL Do not touch electrically live parts or electrode with skin or wet clothing. Insulate yourself from work and ground Always wear dry insulating gloves WARNING! FUMES AND GASES can be dangerous Keep your head out of fumes &... - Page 12 Operating the Machine in MIG mode Once you have set machine up as per above instructions. 1. Select welding voltage (power) required on front panel 2. Select wire feed speed required on ‘wire speed’ knob 3. Set ARC force switch to middle position for medium weld inductance (know as choke on traditional welding power sources) Low setting = Soft ARC (less splatter &...
- Page 13 Operating the Machine in MMA mode Connect the following: 1. Negative welding power connector Connect the earth cable dinse plug into here and twist to secure 2. Positive welding power connector Connect the electrode holder cable dinse plug into here and twist to secure Most popular rods have a positive welding electrode and negative earth.
-
Page 14: Routine And Periodic Maintenance
Maintenance Routine and periodic maintenance WARNING! ELECTRIC SHOCK CAN KILL Turn the input power OFF at the mains switch & fuse box and remove mains plug from socket before working on this equipment. Have a qualified electrician install & service this equipment. Allow machine to sit for 5 minutes minimum after disconnection from mains power to allow the power capacitors to discharge before working inside this equipment. -
Page 15: Troubleshooting
Machine keeps overheating - Warning light is lit on machine Check if fan is running – if not contact R-Tech. Check the cooling vents for obstruction, blow out machine with clean dry low pressure air supply. Check for adequate ventilation around machine Porosity in weld –...
Need help?
Do you have a question about the I-MIG160 MIG and is the answer not in the manual?
Questions and answers