
Related Manuals for LDG RT-100


Summary of Contents for LDG RT-100
- Page 1 RT-100 OPERATIONS MANUAL MANUAL REV A LDG RT-100 100-Watt Remote Automatic Tuner LDG Electronics 1445 Parran Road St. Leonard MD 20685-2903 USA Phone: 410-586-2177 Fax: 410-586-8475 ldg@ldgelectronics.com www.ldgelectronics.com PAGE 1...
-
Page 2: Table Of Contents
Getting to know your RT-100 RT-100 Connections Installation Connections Installing Into An Existing Outdoor Antenna Installation Tips for Outdoor Installation Securing the RT-100 to a Mast Bias Tee Information Operation Basic Tuning Operation Fully Automatic Memory Tuning Force a Full Tuning Cycle... -
Page 3: Introduction
The RT-100 is similar to previous LDG tuners, but is powered over coax, so that the tuner element may be placed as near to the antenna as possible. The tuner element is powered over the coax feedline by means of a built-in bias tee, so no additional cables are required in order to place the tuner at the antenna end of the feedline. -
Page 4: Specifications
• Weight: 1 lb, 0 oz. AN IMPORTANT WORD ABOUT POWER LEVELS The RT-100 is rated at 125 watts maximum power input at most. Many ham transmitters and transceivers, and virtually all amplifiers, are capable of transmitting well over 125 watts. Power levels that significantly exceed specifications will definitely damage or destroy your RT-100. -
Page 5: Getting To Know Your Rt-100
RF energy and DC power. An on-board bias tee separates the RF from the DC power. In order to power the RT-100, a separate bias tee must be used to inject DC power at the feed end of the coax. Alternately, the optional RC-100 Controller unit may be used. -
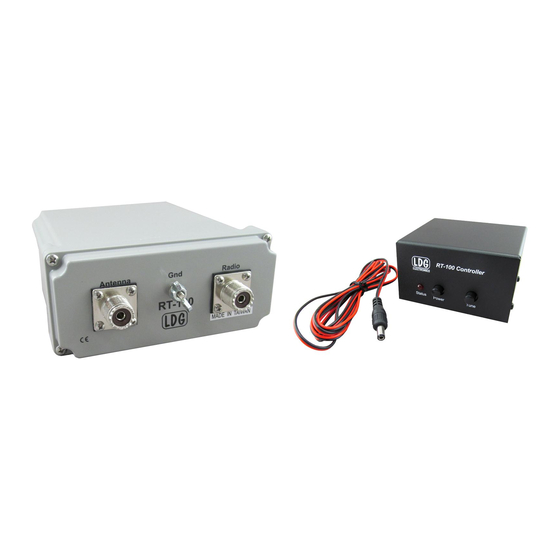
Page 6: Rt-100 Connections
RT-100 Connections The RT-100 has three connectors: • ANT SO-239: Output to the antenna. Connect the antenna to this SO-239. • GND (wingnut): Connect to antenna system ground. • Radio SO-239: Connect to the feedline which comes from the optional RC-100 or bias tee. -
Page 7: Installation
Connections To install the RT-100 system, place the a bias tee in a convenient position near the transceiver’s operating position. Connect a 50-ohm coax jumper from the transceiver’s Antenna jack to the bias tee’s RF jack. -
Page 8: Installing Into An Existing Outdoor Antenna Installation
Simply unhook the existing antenna from the antenna end of the feedline, and connect that end of the feedline to the RT-100’s RADIO jack. Now connect a short coax jumper from the RT-100’s ANT jack to the antenna. - Page 9 RT-100 to it, with the bracket facing up, and the connectors facing down. In order to prevent rain water from running down the feedline cables and into the connectors, all connections should be wrapped with self-sealing coax sealing tape, such as Coax Seal™...
-
Page 10: Securing The Rt-100 To A Mast
SO-239 connectors facing downward, to prevent rain from entering the connectors. LDG supplies a U-bolt that permits securing the RT-100 to a mast. To secure the RT-100, first remove the nuts and clamp from the U-bolt. Place the U-shaped threaded bolt around the mast, then slide the clamp over the threaded ends of the U-bolt, so that the flat edge of the clamp faces away from the mast. -
Page 11: Bias Tee Information
BIAS TEE INFORMATION The LDG Electronics RT-100 does not come with a bias tee; it must be supplied by the customer. While the LDG Electronics RC-100 is a perfect companion to the RT-100, and includes a built-in bias tee designed specifically for use with the RT-100, some hams may want to use their own bias tee. -
Page 12: Operation
In some instances, you may wish to force the RT-100 to begin a full tuning cycle instead of just the usual memory cycle. In order to do this, turn off power to the RT-100 (do this by switching off power to the bias tee), begin transmitting a carrier, and while still keying the radio, turn on power to the bias tee. -
Page 13: Re-Tuning Prohibition
This allows the RT-100 to handle loads that are either greater than or less than 50 ohms. All relays are sized to carry 100 watts continuously. -
Page 14: A Word About Tuning Etiquette
LDG products our website also has complete product specifications and photographs you can use to help make your purchase decision. Don’t forget the links to all of the quality LDG Dealers also ready to help you make that purchase decision. -
Page 15: Out Of Warranty Service
Ask your shipper for a tracking number or a delivery verification receipt. This way you know the product arrived safely at LDG. Be sure to give us your email address so our shipper can alert you online when your product is en-route back to you. Please be assured that our staff makes every effort to complete repairs ahead of our published wait time.
Need help?
Do you have a question about the RT-100 and is the answer not in the manual?
Questions and answers