Table of Contents
Advertisement
Advertisement
Table of Contents

Related Manuals for Osaki OS-1000


Summary of Contents for Osaki OS-1000
- Page 1 Instruction Manual OS-1000...
-
Page 2: Table Of Contents
Thank you for purchasing the OS-1000 Massage Chair. Before using your massage chair, please read the contents of the instruction manual to refer to it when needed. Table of Contents Features ..............2 Safety Instructions ........... 3-4 Chair Components ........... 5-6 Chair Installation &... -
Page 3: Features
Features - 12 Intelligent Massage Program and Operation Function Synchronal massage of Kneading and Tapping Unique synchronal massage of kneading and tapping can effectively remove tiredness, relax muscle strains and activate blood circulation, improve spirit system, enhance whole-body enginery and help muscle recover softness and elasticity rapidly. Kneading massage Kneading massage with driving power force on the body points can effectively improve skin softness and elasticity. -
Page 4: Safety Instructions
Safety Instructions When using the massage chair, basic precaution should always be followed to reduce the risk of electric shock, burns, fire, or injury to persons. Read thoroughly the following details before using. ● Be sure to insert massage chair plug into the proper electrical outlet. ●... - Page 5 ● The following persons are requested to consult a doctor prior to use in order to reduce the risk of user feeling sick or suffering from injury » Those who have malignant tumor » Those who suffer from heart disease »...
-
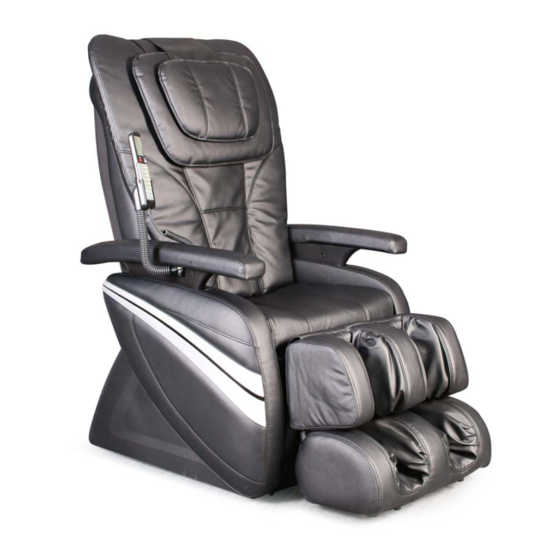
Page 6: Chair Components
Chair Components Double Pillow upholstery Remote Controller Backrest Armrest Seatrest Side Panel Footrest Wheel... - Page 7 MASSAGE POSITION Roller...
-
Page 8: Chair Installation & Moving
Chair Installation Step 1: Ensure sufficient spaces around massage chair, please leave 24” of spaces behind the backrest and 24” of spaces at the front of massage chair when recline backrest and elevate leg rest. (PIC 1) at least 24” at least 24”... - Page 9 Attached the connecting rod and the fork of the reclining actuator with a flat head rivet, and secure with a split pin as demonstrated in below PIC 3 & PIC 4. A. Connecting rod(on the backrest) B. Fork of reclining actuator (on the seat) C.
- Page 10 Step 4: Unfold the backrest until you hear a “Click” sound. (PIC 6) PIC 6 Step 5: Attach the backrest pad and the pillow pad. (PIC 7) A) Attach the backrest pad with the zipper. B) Attach the pillow pad using the hook and look fasteners. PIC 7 Right Step 6:...
- Page 11 Step 7: Connect the wire plugs as shown PIC 9. PIC 9 Step 8: Back Massage Strength-Control Pad. (PIC 10) Back Massage Strength-Control Pad has been inserted stick onto the Backrest Cover. If strong massage is desired, remove the Back Massage Strength-Control Pad from the back with stickers of cover of back pad (as shown in picture).
-
Page 12: Moving The Chair
Moving the Chair ● Elevate the Calves Rest. ● Then recline the chair to approx. 45° to easily move the chair around the house with a slight pull or push. Note: 1. Always fully return the leg rest to its original length before moving the chair. Otherwise, it may result injury due to the leg rest during movement. -
Page 13: Grounding Instructions
Grounding Instructions Fully insert the plug into an appropriate outlet. An improper equipment-grounding conductor may result in electric shock. Contact a qualified electrician if you are not sure that the product is properly grounded. Do not modify the plug that is included with the massage chair. If you plug does not fit the outlet, contact a qualified electrician to install an outlet to fit the massage chair plug. -
Page 14: Operation Guide
Operation Guide(Controller) - Page 15 Operation Guide Insert the power cord plug into an electrical outlet. Turn the power switch to the “l” position for idle mode. Four functions are available in idle mode: ON/OFF, BACK LIGHT, Recline/Raise Backrest, Elevate/Recline Footrest. “ON/OFF, BACK LIGHT, Recline/Raise Backrest, Elevate /Recline Footrest.”...
- Page 16 VIBRATING(CALVES) Calves Vibration Control Button Press this button to activate the calves vibration function. Press the button again to stop the calves vibration function. AUTO PROGRAM Six pre-programmed massage sessions are activated by pressing the following buttons: HEALTH CARE, FULL BODY RELAX, THERAPY, NECK/SHOULDER, BACK/LUMBAR, SEAT/CALVES.
- Page 17 ROLLING Rolling Function Start/Stop Control Button – 3 levels of width (narrow, medium, wide) ROLLING Press this button once to activate the rolling function for a full back massage at medium width and speed. Press the button again to stop the rolling massage function. Press the WIDTH button to adjust the rolling width while the rolling function is activated.
- Page 18 SPOT Spot Back Massage Press this button to select a spot massage for any part of the back. SPOT Press this button once to activate the massage rollers. Press the button again to stop the spot massage function and to resume the full back massage function.
-
Page 19: Troubleshooting
Troubleshooting This massage chair is controller by microcomputer and is susceptible to power surge even by +10% or -15%. The massage chair will show the following strange circumstance. Situation Solution The Massage Chair cannot operate 1) Check where the plug is well even though it has been connected connected and working well. - Page 20 www.osakimassagechair.com...
Need help?
Do you have a question about the OS-1000 and is the answer not in the manual?
Questions and answers