Advertisement
Quick Links
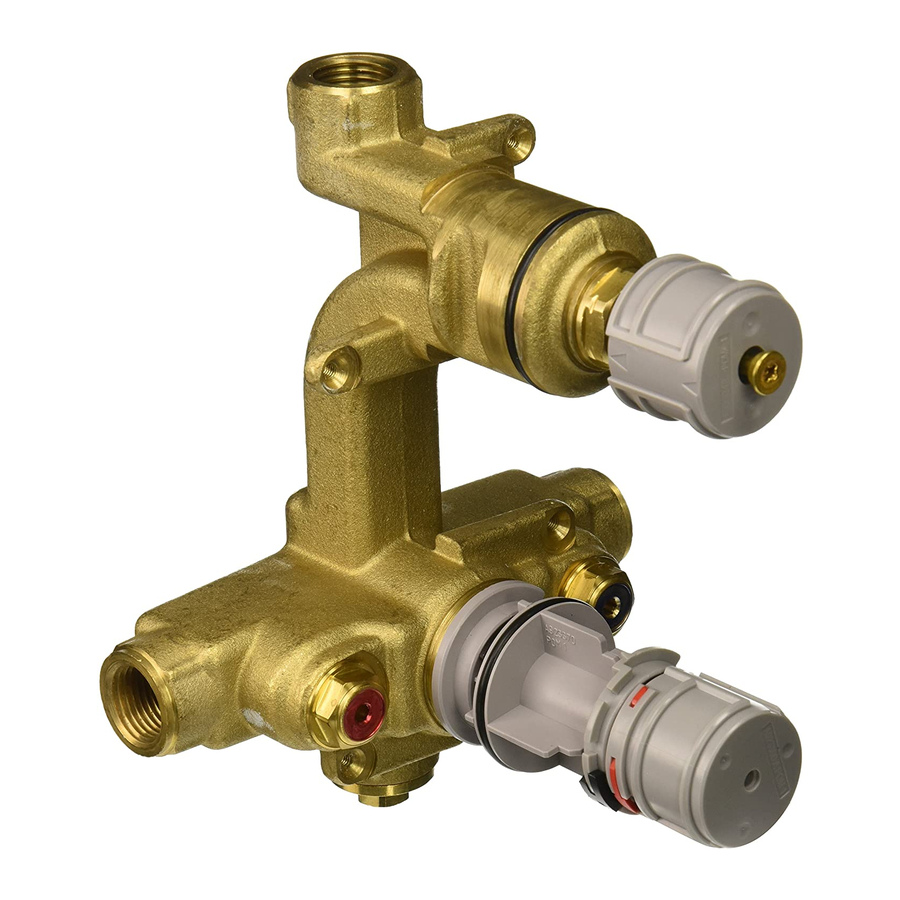
3/4" CENTRAL THERMOSTAT
WITH VOLUME CONTROL
Thank you for selecting American-Standard...the benchmark
of fine quality for over 100 years.
To ensure that your installation proceeds smoothly--please
read these instructions carefully before you begin.
ROUGHING-IN DIMENSIONS
CONNECTIONS ARE: 3/4" NPT
3-15/16
3/4" NPT
INLET
THERMOSTATIC BATH/
SHOWER INSTALLATION
USING A TWIN ELL, DIVERTER
SPOUT AND FIXED SHOWER
C/L
80"-86"
18"
TUB PORT
(OPTIONAL)
MUST BE
PLUGGED
4"
TWIN
ELL
TOP OF TUB RIM
BOTTOM OF TUB
IMPORTANT: WHEN NOT USING A
DIVERTER SPOUT A SEPARATE
DIVERTER VALVE MUST BE USED.
Instructions
3/4" NPT
SHOWER
3-5/8
3/4" NPT
3/4" NPT
INLET
TUB
5-7/8
THERMOSTATIC SHOWER INSTALLATION
USING A DIVERTER VALVE, FIXED
SHOWER HEAD AND ADJUSTABLE HAND
HELD SHOWER
DIVERTER
VALVE
HOT
3/4"
TUB PORT MUST
BE PLUGGED
Installation
R540
7
1-5/8 - 2-1/2
THERMOSTATIC SHOWER INSTALLATION USING A
DIVERTER VALVE, FIXED SHOWER HEAD, ADJUSTABLE
HAND HELD SHOWER, ON/OFF VALVE AND TWO
BODY SPRAYS
COLD
3/4"
TUB PORT MUST
BE PLUGGED
NOTE: MINIMUM FLOWING PRESSURE REQUIRED FOR
THIS SYSTEM OPERATING WITH ONE SHOWER HEAD
AND 2 BODY SPRAYS IS 40 PSI
Certified to comply with ANSI A112.18.1M
ASSE 1016
6-1/4
DIVERTER
VALVE
ON/OFF
VALVE
COLD
HOT
3/4"
3/4"
M 9 6 8 4 8 0
Advertisement

Subscribe to Our Youtube Channel
Related Manuals for American Standard Ceratherm R540


Summary of Contents for American Standard Ceratherm R540
- Page 1 DIVERTER VALVE COLD 3/4" 3/4" TUB PORT MUST BE PLUGGED R540 Certified to comply with ANSI A112.18.1M ASSE 1016 6-1/4 1-5/8 - 2-1/2 THERMOSTATIC SHOWER INSTALLATION USING A DIVERTER VALVE, FIXED SHOWER HEAD, ADJUSTABLE HAND HELD SHOWER, ON/OFF VALVE AND TWO...
- Page 2 ROUGHING-IN THE VALVE Prepare water supplies per ROUGHING-IN DIMENSIONS. Make sure the finished wall is between the minimum and maximum rough dimension. Install VALVE at indicated height and depth. Make sure the "TOP" marking on the PLASTER GUARD is up. Connect the hot and cold water supplies.
- Page 3 912647-0070A O-RING A953971-0070A CHECK STOP (COLD BLUE) A994352-0070A CARTRIDGE 923348-0070A HANDLE ADAPTER 954040-0070A THERMOSTAT CARTRIDGE 912647-0070A O-RING WITH VOLUME CONTROL MODEL NUMBER R540 918428-0070A CARTRIDGE SCREW 953963-0070A HANDLE EXTENSION 953957-0070A TEMPERATURE CALIBRATION UNIT M 9 6 8 4 8 0...
Need help?
Do you have a question about the Ceratherm R540 and is the answer not in the manual?
Questions and answers