Table of Contents
Advertisement
Quick Links
Download this manual
See also:
Installation Manual
Advertisement
Table of Contents

Related Manuals for Advent ADV10PS2


Summary of Contents for Advent ADV10PS2
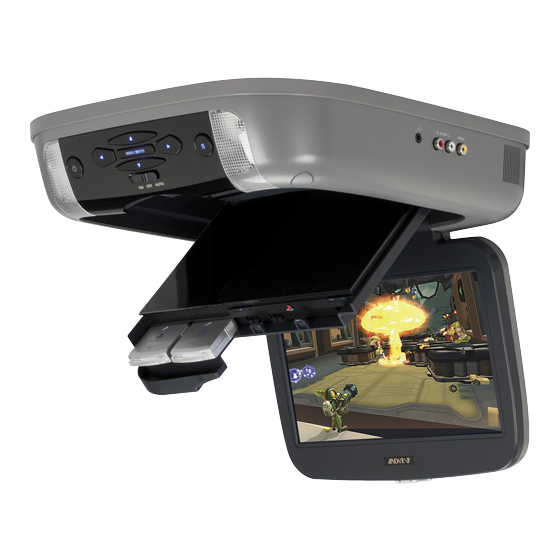
- Page 1 ADV10PS2 10.2" OVERHEAD LCD MONITOR WITH SONY PS2 PLAYER MENU / ENTER OPERATION MANUAL 128-8669A...
- Page 2 Important Notice nstallation of overhead products requires careful planning and preparation. Be extremely careful when working on a vehicle with side curtain air bags. Do not route wires near any portion of the side curtain air bag assemblies. This includes any anchor points in A, B, C or D pillars of the vehicle.
-
Page 3: Safety Precaution
• 10.2” TFT (Thin Film Transistor) Active Matrix LCD (Liquid Crystal Display) Monitor ADV10PS2 Player with Drop-Down Video / Monitor. The ADV10PS2 has been designed to give you and your family • Built-in SONY PlayStation2 game console many years of video entertainment in the mobile •... - Page 4 8. Return the PlayStation2 to its docked position. 9. Turn the ADV10PS2 on by pressing the power button. NOTE: If a blue screen is present, press the green RESET key on the remote control or the PlayStation2.
- Page 5 QUICK START GUIDE (Cont) 11. When using the wireless headphones install the batteries in each headphone. Turn the volume to minimum before turning them on. Once they are turned on, place them on your head (pay attention to R/L earpieces) and slowly adjust the volume to a comfortable listening level.
- Page 6 QUICK START GUIDE (Cont) sing the Control Panel To access the Control Panel press the dark gray DISPLAY or dark gray SELECT button. The Control Panel (Below) can be used to navigate the DVD disc. Refer to figure below: Pressing the dark gray DISPLAY or dark gray SELECT button again will cause the Control Panel to change its position on the screen.
-
Page 7: Controls And Indicators Diagram
CONTROLS AND INDICATORS DIAGRAM (FRONT VIEW) 1. SOURCE Button (S) Use to select the sources: PS2, AV1 and AUX. pqt u 2. CURSOR Buttons ( Use these buttons to access menu selections on the screen. 3. MENU/ENTER Button Use this button to access SYSTEM MENU and select system MENU / ENTER menu items. -
Page 8: Headphone Jack
CONTROL FUNCTION DESCRIPTION 11. LCD Panel (SIDE VIEW) 12. Screen Release Press to release the screen. 13. LCD Cut Off Switch Used to turn off the LCD backlit when the LCD is in the closed AUDIO L VIDEO position. 14. OPEN PlayStation2 Push to open the tray. -
Page 9: Remote Control Operation
REMOTE CONTROL OPERATION MAIN FUNCTION OPERATION Back View OPEN/ CLOSE RESET AUDIO SHUFFLE ANGLE PROGRAM SUBTITLE REPEAT SLOW CLEAR TIME SCAN PREV NEXT PLAY PAUSE STOP DISPLAY TOP MENU MENU RETURN Battery Cover ENTER Battery Installation SELECT START Before attempting to operate your Remote Control, install the MUTE SOURCE DISPLAY... -
Page 10: Remote Control Functions
REMOTE CONTROL FUNCTIONS The remote control is divided into two sections, Dark Gray buttons on the top, which control the built-in PlayStaion2 and Light Gray buttons on the bottom of the remote control, that control the other functions of the unit. PLAYSTATION CONTROLS (P1-P37) (Dark Gray Buttons) NOTE: PlayStation2 controls (refer to the SONY PlayStation2 manual for details). - Page 11 P8. SLOW ( Changes to slow-motion playback. (Forward or Reverse) P9. SCAN ( Fast forwards or fast reverses playback on the screen to locate a particular scene. P10. PLAY Starts playback. P11. DISPLAY Displays the Control Panel of the PlayStation2. P12.
- Page 12 P18. L1 BUTTON Previous ( ), press to return to the previous chapter or track. P19. L2 BUTTON Search ( ) using fast reverse or fast forward playback. P20. SELECT Displays the control panel of the PlayStation2. P21. START Press to Play/Pause disc playback. P22.
- Page 13 P29. PAUSE Pauses and resumes playback. P30. STOP Stops playback. P31. PREVIOUS ( / NEXT ( Returns to the beginning of the current or previous chapter/Skips to the beginning of the next chapter. P32. A-B REPEAT Specifies a scene for playback and starts playback of the scene that has been set. P33.
- Page 14 M2. MUTE Press this button to mute the audio. Pressing the button again restores the sound to the previously set level. M3. FMM ON/OFF Turns the wireless FM Modulator ON or OFF. M4. FMM SELECT Select the FM Modulator Frequency. M5.
-
Page 15: How To Use
WIRELESS CONTROLLER (2.4GHz) Carefully read the information before use. For detailed connection and usage methods, refer to the Owner’s Manual for the PIayStation2 system. HOW TO USE Battery Installation: The wireless controller uses two “AA” batteries. 1. Turn your controller upside down and remove the lid on the bottom by pressing against the lip and pulling the lid away. - Page 16 Sleep Mode: START button Your controller will automatically go into Sleep Mode after approximately three minutes if not used. The MODE LED indicator will go off. To reactivate the controller, you have a choice to press the START button or press down on one of the joy sticks on the controller. Your controller will automatically synchronize with the receiver in the PS 2 unit Turning Off the Controller: Place the ON/OFF switch on the controller to OFF if it will not be used for...
- Page 17 SYSTEM MENU ADJUSTMENT The System Menu contains features and options that let you customize your system to change the screen mode display, OSD language and source default. 1) Press the MENU/ENTER button on unit to enter System Menu, the main page of the system menu will appear on screen. 2) Use the cursor buttons to select the desired item in the main page and press the MENU/ENTER button to select.
- Page 18 4) Use light gray buttons to change the picture control setting. 5) To change another picture control setting press the SYSTEM MENU button and select another picture control using the light gray buttons. Repeat step 4 to change the picture control setting. 6) To reset the picture control settings to the factory default settings, enter the picture control menu and use the light gray button to highlight RESET and press the light gray ENTER button.
- Page 19 3) Press the light gray ENTER button on the remote control and the following screen will appear: 4) Use the light gray (up) or (down) arrow on the remote control to highlight FMM ON and press the light gray ENTER button to turn the FM Modulator on.
-
Page 20: Osd Language
OSD LANGUAGE This allows the user to select the language for the on-screen display. The user can either select English, Spanish, French, German for the OSD language. SYSTEM MENU OSD LANGUAGE ENGLISH PICTURE CONTROL SPANISH OSD LANGUAGE FRENCH SOURCE DEFAULT PS2 GERMAN SCREEN MODE SOURCE DEFAULT PS2... -
Page 21: Turning The Unit On Or Off
TURNING THE UNIT ON OR OFF 1. Pushing in the Screen Release button will unlock the LCD screen and it will drop down slightly. Pivot the screen downward until a comfortable viewing angle is reached. The hinge friction will hold the screen in position while the system is in use. 2. -
Page 22: Overhead Dome Lights
OVERHEAD DOME LIGHTS The Dome Lights integrated into the unit are controlled by a three position slide switch. Sliding the switch to the ON position will turn the lights ON. The OFF position will prevent the lights from turning ON with the vehicle's interior lighting, and the auto position will allow the lights to turn ON and OFF with the vehicle's interior lighting. -
Page 23: Source Feature
SOURCE FEATURE The AV1 input may be connected to a external video source, video game system, or other audio / video devices. To access the audio / video inputs, turn the unit on and press the S (source) button or the Source button on the remote control until "AV1" is displayed on the screen. -
Page 24: Troubleshooting
TROUBLESHOOTING PROBLEM SOLUTION IR remote inoperative Verify that the batteries in the remote are fresh. Verify that the remote sensor eye is not obstructed. Insert a disc with the label side facing up. Disc won't play Check the type of disc you put into disc tray. This PS2 only plays PS2 GAMES, DVDs, audio CDs. - Page 25 This part of the movie is often programmed to prohibit skipping through it. Service and Repair Warranty on all components in this system ( ADV10PS2, Remote Control, Game Controllers and built-in Sony PlayStation2) is handled by Audiovox Electronics Corporation. For service call 1-800-225-6074.
-
Page 26: Replacement Parts
REPLACEMENT PARTS SPECIFICATIONS Remote Control 136-4926 LCD Backlighting Resolution 800 (RGB) x 480 Pixels 1,152,000 Operation Temperature 32 ~131º F (0 ~ 50º C) Storage Temperature -4 ~ 158º F (-20 ~ 70º C) Backlit life 10,000 Hours Video Display System NTSC / PAL Headphone Audio Output 0.03W @ 32 ohms... - Page 27 If your new vehicle’s radio, CD/DVD player is covered by the manufacturer’s warranty for a period of 48 months as set forth in the OEM Warranty Booklet, the company will extend the Advent Mobile Video product warranty for the same period of time. This is not applicable to extended warranty purchases beyond the original manufacturer’s warranty.
- Page 28 © 20 0 ADVENT,150 Marcus Blvd. Hauppauge, NY 11788 128-8669A...
Need help?
Do you have a question about the ADV10PS2 and is the answer not in the manual?
Questions and answers