Table of Contents
Advertisement
Advertisement
Table of Contents

Related Manuals for Advent OVERHEAD LED BACKLIT LCD MONITOR


Summary of Contents for Advent OVERHEAD LED BACKLIT LCD MONITOR
- Page 1 ADVDLX 9" OVERHEAD LED BACKLIT LCD MONITOR WITH DVD PLAYER OWNER'S MANUAL...
- Page 2 FCC Statement This device complies with Part 15 of the FCC Rules. Operation is subject to the following two conditions: (1) This device may not cause harmful interference, and (2) this device must accept any interference received, including interference that may cause undesired operation. This equipment has been tested and found to comply with the limits for a Class B digital device, pursuant to Part 15 of the FCC Rules.
-
Page 3: Important Notice
Important Notice Installation of overhead products requires careful planning and preparation. Be extremely careful when working on a vehicle with side curtain air bags. Do not route wires near any portion of the side curtain air bag assemblies. This includes any anchor points in A, B, C or D pillars of the vehicle. Routing wires in these areas or running wires by the side curtain air bags can prevent the side curtain air bag from fully deploying which can result in personal injury to vehicle occupants. -
Page 4: Safety Precaution
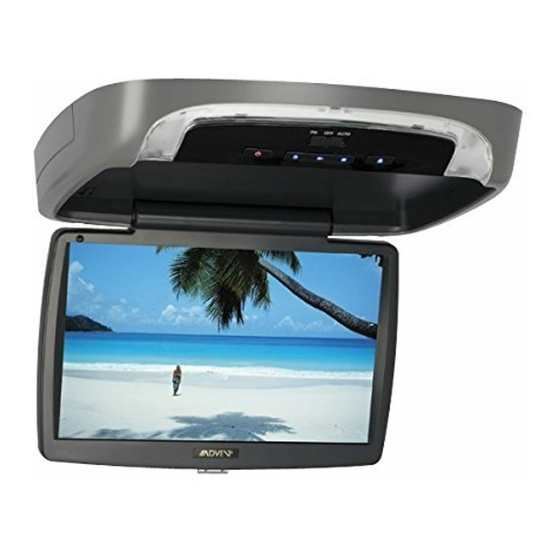
FEATURES Congratulations • 9” TFT (Thin Film Transistor) Active Matrix LCD (Liquid Crystal Display) Congratulations on your purchase of the ADVENT ADVDLX9 DVD Player Monitor with drop-down video / monitor. The ADVDLX9 has been designed to give you and your family many years of video entertainment in the mobile •... -
Page 5: Controls And Indicators Diagram (Front View)
CONTROLS AND INDICATORS DIAGRAM (FRONT VIEW) 4. PLAY (u) Button This button is used to start playback of a disc. 5. STOP (n) Button -Press the STOP button once: Stops playback. - Pressing the PLAY button again will resume normal playback from where movie was stopped. -
Page 6: Controls And Indicators Diagram Side Views
CONTROLS AND INDICATORS DIAGRAM Note: Use 2-channel IR headphones set to CH B when the monitor is set to M2 mode. SIDE VIEWS Note: M1 will appear on the screen for 4~5 seconds. Selecting a Monitor Code (M1 or M2) 1. -
Page 7: Remote Control Operation
REMOTE CONTROL OPERATION REMOTE CONTROL FUNCTIONS Initial Use When purchased, the remote control has a battery installed with a Pull Tab to prevent battery discharge. Remove the Pull Tab before attempting to use the remote control. CR2025 Battery Replacement 1. Remove the battery holder. 2. - Page 8 Function control is available on the unit and the Remote Control. ** Function not available in this model. 1. POWER* Press this button to turn the unit ON and OFF. 2. SOURCE* Each time the button is pressed, the unit will cycle through modes DVD/USB, AV, AUX. 3.
- Page 9 10. SYSTEM MENU Allows the user to access the system menu when the unit has been placed in TV mode. Press the cursor buttons (pq) to select FM MODULATOR, OSD LANGUAGE, DEFAULT DVD ON/OFF, SCREEN MODE, MONITOR MODE. Note: Press once to access the System Menu, press twice to exit the System Menu. 11.
- Page 10 18. NUMBERS Allows the user to enter the numbers 0-9 for selection of the tracks, titles, chapters or password setting. 19. ZOOM Press this button to enlarge the picture when playing a DVD disc. Press ZOOM button DVD player Once Q1- Enlarges the picture twice the original size Twice Q2- Enlarges the picture 3 times the original size...
- Page 11 24. PIX ( Picture Select ) Each time this button is pressed, the OSD picture adjustment displays the “Adjustment Bar” for BRIGHTNESS, CONTRAST, COLOR, TINT (For NTSC only) or RESET. Once the desired adjustment bar is displayed, use the VOLUME +/ VOLUME – buttons to adjust the setting. The display will automatically turn off if no adjustments are made within 6 seconds.
-
Page 12: Turning The Unit On Or Off
TURNING THE UNIT ON OR OFF 1. Push in the Screen Release button to unlock the LCD screen. The screen will drop down slightly. 2. Pivot the screen downward until a comfortable viewing angle is reached. The hinge friction will hold the screen in position while the system is in use. 3. -
Page 13: Picture Control Select
PICTURE CONTROL SELECT When watching a program, the picture quality can be adjusted to the user’s preferences. 1. Press the Picture (PIX) button on the remote control and the on screen picture adjustment displays the “adjustment bar” for BRIGHTNESS, CONTRAST, COLOR, TINT (for NTSC only) or RESET. - Page 14 FM MODULATOR The FM Modulator allows the user to listen to audio through the vehicle’s radio. - Turns the wireless FM Modulator on if audio playback through your vehicle’s radio is preferred. - Turns the wireless FM Modulator off. FM CHANNEL - Allows the user to select the wireless FM Modulator frequency. The unit has a 100 channel built-in wireless FM Modulator. The FM Modulator can be set from 88.1 to 107.9 in 0.2 MHz steps, i.e.
-
Page 15: Osd Language
OSD LANGUAGE This function allows the user to select the on-screen display language. SYSTEM MENU OSD LANGUAGE The user can select English, Spanish, French or German for the OSD language. ENGLISH FM MODULATOR 1. Press the System Menu button. SPANISH OSD LANGUAGE 2. -
Page 16: Monitor Mode
MONITOR MODE SYSTEM MENU WARNING This allows the user to set the system monitor code M1/M2. FM MODULATOR SETTING THE MONITOR TO THE M2 MODE WILL 1. Press the System Menu button. REQUIRE USING 2-CHANNEL HEADPHONES. OSD LANGUAGE USE THE DOWN KEY ON THE REMOTE CONTROL 2. -
Page 17: Dvd Subtitle Setup
DVD SUBTITLE SETUP The Subtitle Menu allows the user to select the language for the on-screen display subtitles. 1. Press the SETUP button on the remote to enter the Setup Menu. Language Language English French 2. Use the p or q cursor buttons to select the Language menu option. Video Subtitle Spanish... -
Page 18: Dvd Tv Display
Misc Chinese Japanese Language Language Thai English Video Subtitle French DVD TV DISPLAY Spanish Rating Audio The TV display setup allows the user to set the screen aspect ratio. German Language TV display - This displays the wide picture with black bands on the upper and lower portions of the screen. Italian Misc Chinese... -
Page 19: Dvd Rating Setup
DVD RATING SETUP Parental This feature allows the user to limit the content of movie playback from G to Adult. The lower the value, the Language Parental : 6.Adult more strict the control. Video Change Password 1. G Rating 2. PG Misc 3. - Page 20 Load Factory Language Load Factory This option allows the user to reset all options to factory settings. 1. Press the SETUP button on the remote to enter the Setup Menu. Video Screen Saver : On 2. Use the p or q cursor buttons to select the Misc menu option. Rating 3.
-
Page 21: Playing Dvds
PLAYING DVDS 1. Press the DISPLAY button on the remote control to display the status banner. The banner includes title, chapter, angle, audio, subtitle, and time. 2. Title Selection Press the numeric (0~9) buttons to initiate a change of title selection. Then press OK to implement the selection. 3. - Page 22 Repeat: play repetitively 00:00:01 The Repeat function has four playing options: Off, Single, Folder, and All. Move the cursor to the Repeat function 1/12 and press OK. Each time OK is pressed the unit will cycle through the available options. Off/Single/Folder/All are Flat Mode Repeat : O displayed in that order.
- Page 23 DVD Basics To get the optimum use out of the DVD Player, make sure this section is read completely. DVD Region Code The DVD player is preset to a region code at the factory depending on where the DVD player is sold. A DVD from a different region cannot be played in this unit and the unit will display "WRONG REGION”.
- Page 24 Types of Discs the DVD System will play The ADVDLX9 DVD system will play the following types of discs: • DVD* disc - DVD discs which contain video. • Audio disc - Audio CDs contain musical or sound content only. •...
-
Page 25: Overhead Dome Lights
OVERHEAD DOME LIGHTS The Dome Lights integrated into the unit are controlled by a three position slide switch. Sliding the switch to the ON position will turn the lights ON. The OFF position will prevent the lights from turning ON with the vehicle's interior lighting. The AUTO position will allow the lights to turn ON and OFF with the vehicle's interior lighting. -
Page 26: Troubleshooting
TROUBLESHOOTING Problem Solution IR remote is inoperative. • Verify that the batteries in the remote are fresh. • Verify that the remote sensor eye is not obstructed. • If the monitor is set to M1, press the M1 button on the remote control. If the monitor is set to M2, press the M2 button on the remote control. - Page 27 Problem Solution Picture is distorted. • The disc might be damaged, try another disc. • It is normal for some distortion to appear during forward or reverse scan. No forward or reverse scan. • Some discs have sections that prohibit rapid scanning or title and chapter skip. •...
-
Page 28: Replacement Parts
REPLACEMENT PARTS SPECIFICATIONS LCD Backlighting Remote Control 136-5326 Resolution 800 (RGB) x 480 AV Adapter Pigtail 112B3227 Pixels 1,152,000 Operation Temperature 32 ~131º F (0 ~ 55º C) Storage Temperature -4 ~ 158º F (-20 ~ 70º C) Back Light Life 20,000 Hours Video Display System NTSC / PAL... -
Page 29: Limited Warranty
If your new vehicleÕs radio, CD/DVD player is covered by the manufacturerÕs warranty for a period of 48 months as set forth in the OEM Warranty Booklet, the company will extend the Advent Mobile Video product warranty for the same period of time. This is not applicable to extended warranty purchases beyond the original manufacturerÕs warranty. - Page 30 NOTES...
- Page 32 © 2014 VOXX ELECTRONICS CORP., 150 Marcus Blvd. Hauppauge, NY 11788 128-9219B...
Need help?
Do you have a question about the OVERHEAD LED BACKLIT LCD MONITOR and is the answer not in the manual?
Questions and answers