
Subscribe to Our Youtube Channel
Related Manuals for AIRLESSCO SL 6250


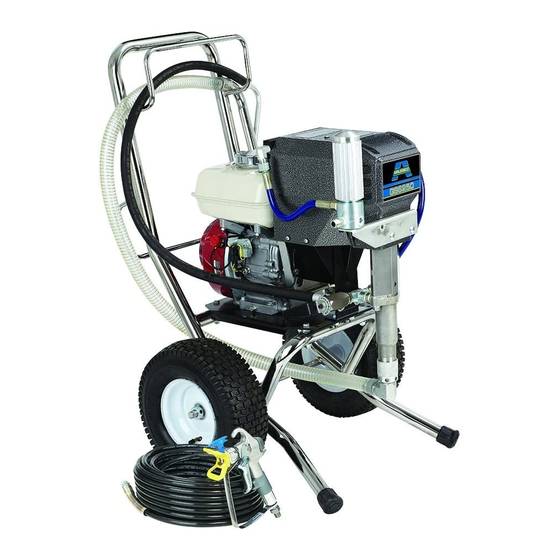
Summary of Contents for AIRLESSCO SL 6250
- Page 1 ® Sprayer IRLESS AINT ERVICE PERATION ANUAL AIRLESSCO SL 6250 001-809 APR 09...
-
Page 2: Table Of Contents
29. Engine Assembly ........25 Suction Assembly .......... 27 30. Power Unit Assembly ......26 Notes ............. 28 31. Frame Assembly........27 Airlessco Accessories........30 32. Suction Assembly ........27 Airlessco 5397 N. Commerce Ave, Moorpark, CA 93021 www.airlessco.com • (805) 523-0211... -
Page 3: Introduction
NOTE - Identifies essential procedures or extra information. All Service Procedures to be performed by an Authorized Airlessco Service Center ONLY. NO MODIFICATIONS or alterations of any AIRLESSCO Equipment or part is allowed. -
Page 4: Safety Warnings
WARNINGS NOTE TO PHYSICIAN: Injection in the skin is a traumatic MEDICAL ALERT - Airless Spray Wounds injury. It is important to treat the injury surgically as soon as If any fluid appears to penetrate your skin, get EMERGENCY possible. DO NOT DELAY treatment to research toxicity. Tox- MEDICAL CARE AT ONCE. - Page 5 WARNINGS - CONTINUED GROUNDING ALWAYS INSPECT SPRAYING AREA Keep clear of moving parts when starting or operating Ground the sprayer and other components in the system the sprayer. Do not put your fingers into any openings to reduce the risk of static sparking, fire or explosion which to avoid amputation by moving parts or burns on hot can result in serious bodily injury and property damage.
- Page 6 WARNINGS - CONTINUED AVOID COMPONENT RUPTURE PREVENT STATIC SPARKED FIRE/ EXPLOSIONS This sprayer operates at 3000 psi (205 bar). ALWAYS be ALWAYS be sure all equipment and objects being sprayed sure that all components and accessories have a maximum are properly grounded. ALWAYS ground sprayer, paint working pressure of at least 3000 psi to avoid rupture bucket and object being sprayed.
-
Page 7: Setting Up
2. FILL THE PACKING NUT/WET CUP to spill any fuel. a. Close the fuel shutoff valve. Fill the Packing Nut/Wet Cup 1/3 full with Airlessco Throat b. Use only clean, fresh, well-known brands of unleaded Seal Oil (TSO). FIG 1 BELOW. -
Page 8: How To Flush
HOW TO FLUSH 1. Be sure the gun safety latch is engaged and there FIG. 2 is no spray tip in the gun. Refer to Fig. 2. Refer to your separate instruction manual provided with your gun on its PRIME VALVE safety features and how to engage safety latch. -
Page 9: Starting Up
STARTING UP 1. LEARN THE CONTROLS WARNING If you spray into the paint bucket, always use the lowest spray PRESSURE CONTROL KNOB - used to adjust pressure and maintain firm metal to metal contact between pressure only. Turn clockwise to increase pressure and gun and container. - Page 10 STARTING UP CONTINUED 7. CLEANING A CLOGGED TIP 8. WHEN SHUTTING OFF SPRAYER a. Whenever you stop spraying, even for a short break, a. Follow PRESSURE RELIEF PROCEDURE on page 9. follow the "PRESSURE RELIEF PROCEDURE ". b. Clean the front of the tip frequently (with toothbrush only) b.
-
Page 11: Pressure Relief Procedure
GROUNDED METAL PAIL. USE MINIMUM PRESSURE ! DAILY MAINTENANCE 1. Keep the displacement pump packing nut/wet cup lubricated with Airlessco TSO (Throat Seal Oil) at all times. The TSO helps protect the rod and the packings. 2. Inspect the packing nut daily. Your pump has a patented Triple Life Packing System. Packing life will be extended a minimum of three times if the following "Packing Adjustment"... -
Page 12: Airless Spray Gun Operation
AIRLESS SPRAY GUN OPERATION SPRAY FIG. 7 Attach spray gun to airless unit and tighten fittings securely. GUN SAFETY LATCH GUN SAFETY IN LOCKED POSITION LATCH Set the gun safety latch. (Also may be called gun safety lock, or trigger lock) * The gun safety latch should always be set when the gun is not being triggered. -
Page 13: Airless Spray Gun
AIRLESS SPRAY GUN FIG. 11 PARTS LIST FIGURE 5 Item No. Part No. Description 120-530 Gun Seat Assembly 120-535 Gasket-Seat 120-520 Needle Assembly 120-529 Gun Seat Adapter 120-562 Trigger Guard 119-055 Screw 119-054 120-109 Gun Head 120-540 Actuator Pin (2) 120-536 Gun Plate 120-038... -
Page 14: Airless Spray Troubleshooting
AIRLESS SPRAY TROUBLESHOOTING DEFECTS CAUSE CORRECTION Coarse spray Low pressure Increase the pressure Excessive fogging High pressure Reduce the pressure to satisfactory pattern distrabution (overspray) Material too thin Use less thinner Patten too wide Spray angle too large Use smaller spray angle tip Pattern too narrow Spray angle too small use larger spray angle tip ( if coverage is OK, try tip in same... -
Page 15: Tip Selection
TIP SELECTION GUIDE Spray tip selection is based on paint viscosity, paint type, & job needs. For light viscosities (thin paints), use a smaller tip; heavier (thicker paints), use a larger tip size. Spray tip size is based on how many gallons of paint per minute can be sprayed through the tip. -
Page 16: Oil And Lubrication
2. Keep the displacement pump packing nut/wet cup 1/3 full of Airlessco Throat Seal Oil at all times. The TSO helps protect the packings and rod. 3. Lubricate Connecting Rod Pin every 3 months. -
Page 17: Field Troubleshooting
FIELD TROUBLESHOOTING PROBLEM CAUSE SOLUTION There is spitting from The fluid supply is low or empty. Refill the supply container. the gun. Air entrapped in the fluid pump or Check for loose connections on the hose. siphon assembly, tighten, then reprime pump. Paint leaks into the The packing nut/wet cup is loose. -
Page 18: Servicing The Fluid Pump
SERVICING THE FLUID PUMP NOTE: CHECK EVERYTHING IN THE TROUBLESHOOTING CHART BEFORE DISASSEMBLING THE SPRAYER. FIG. 14 FLUID PUMP REINSTALL FLUID PUMP DISCONNECT 1. Loosen the packing nut & extend piston rod to fully up position. 1. Flush out the material you are See figure 14. -
Page 19: Servicing The Inlet Valve
SERVICING INLET & OUTLET VALVES FIG. 19 DISASSEMBLY OF THE OUTLET VALVE 1. Using the rod collar tool (189-211) , screw the suction nut, containing intake seat support, off of the fluid body. See Fig. 19. 2. Remove the inlet seat, O-ring, inlet ball and inlet retainer with O-ring. -
Page 20: Packing Replacement Procedures
PACKING REPLACEMENT PROCEDURES 11. Take the upper female gland & place on top of your DISASSEMBLY OF THE FLUID PUMP assembled upper packings with the inverted side 1. Unscrew & remove the packing nut. down. 2. Push the piston rod down through the packings & out of 12. -
Page 21: V-Packing
PACKING REPLACEMENT PROCEDURES FIG. 21 FIG. 22 PARTS LIST FIGURE 21 & 22 PARTS LIST FIGURE 21 & 22 CONT Item No. Part No. Description Item No. Part No. Description 187-330-99 Piston Rod 187-059 Packing Leather 187-046 Packing Nut 187-037 Male Gland 187-313 Fluid Body... -
Page 22: Paint System Assembly
PAINT SYSTEM ASSEMBLY FIG. 23 SEE FIGURE 22 PARTS LIST FIGURE 23 PARTS LIST FIGURE 23 CONT Item No. Part No. Description Item No. Part No. Description 120-504 Pro Light Gun (Optional) 301-253 Manifold 100-011 Hose (Optional) 100-317 Nut (2) 100-109 Nipple 100-345... -
Page 23: Prime Valve
PRIME VALVE (119-083) FIG. 24 PARTS LIST FIGURE 24 Item No. Part No. Description 115-303 Handle with Label 117-046 Screw 115-063 Washer 115-072 Spacer 115-064 Belleville Spring (3) 115-065 Retaining Ring 115-067 Washer 115-071 Valve Stem 115-068 O-Ring Black 115-069 Ball 115-029 Valve Seat... -
Page 24: Replacement Of Electrical Control Board
REPLACEMENT OF ELECTRICAL CONTROL BOARD 1. Remove electrical cover. 5. Using a 1/2" nutdriver or 1/2" deep socket, remove nut 2. Disconnect sensor lead from Electrical Board. from pressure control shaft. This will allow removal of 3. Disconnect two clutch leads on Electrical Board from electrical control board from frame. -
Page 25: Clutch Troubleshooting
ELECTRICAL TROUBLESHOOTING - Clutch Does Not Engage STEP 1: Ensure that the pressure control knob (POT) is in the maximum (CW) position. STEP 2: Remove the upper and lower clutch and electrical covers. STEP 3: Check all electrical connections between the engine magneto, sensor, control board and clutch for loose connections or damaged leads. -
Page 26: Belt Tensioning
CLUTCH REPLACEMENT INSPECTING THE CLUTCH BELT TENSIONING 1. Inspect clutch and belt, replace as neccessary. 13. Slightly loosen the two horizontal screws (Fig 30, items 19-22) that connect the top and bottom supports (Fig 30, INSTALLING THE CLUTCH items 24 & 25). 14. -
Page 27: Clutch Assembly
CLUTCH ASSEMBLY (301-284) FIG. 28 PARTS LIST FIGURE 28 Item No. Part No. Description 112-041 Differential Screw 112-054 Coupling Nut Assy 301-284-99 Replacement Clutch 301-037 Bearing (2) 301-274 Spacer (2) 100-333 Retaining Ring (2) 1/16” 301-413 Removable Spacer 301-412 Spacer 136-068 Spring 301-316... -
Page 28: Power Unit Assembly
POWER UNIT ASSEMBLY (301-593) FIG. 30 FIGURE 26 FIGURE 23 32, 33, 34 17, 18 28, 29, 30 20, 21 FIGURE 22 20, 21, 22, 23 FIGURE 28 FIGURE 32 21, 22, 23, 24 FIGURE 29 PARTS LIST FIGURE 30 PARTS LIST FIGURE 30 CONT Item No. -
Page 29: Frame Assembly
FRAME ASSEMBLY (301-273) FIG. 31 PARTS LIST FIGURE 31 Item No. Part No. Description 301-201 Frame 301-202 Motor Bracket 4,5,6 301-165 Wheel (2) 136-126 Screw (4) 140-029 Washer (12) 100-317 Nut (4) 331-048 Rubber Boot (2) 305-039 Spacer (2) 143-029 Set Collar (2) 331-342 Screw (2) -
Page 30: Notes
®... - Page 31 Stadium/Sports Field Management Material Usage in Galons per Week □ □ □ □ □ □ 0-25 26-50 51-100 101-250 250-500 500+ Copyright 2008, Airlessco. All rights reserved. Replacement wear parts program subject to change without notice. FORM # 001-043 OCT08...
-
Page 32: Airlessco Accessories
Airlessco Distributor to the original purchaser. Airlessco will, for the period of twenty four months from the date of sale, repair or replace any part of the equipment proven defective.
Need help?
Do you have a question about the SL 6250 and is the answer not in the manual?
Questions and answers