Table of Contents
Advertisement
Quick Links
Advertisement
Table of Contents

Subscribe to Our Youtube Channel
Related Manuals for Telstra T165i


Summary of Contents for Telstra T165i
- Page 1 Telstra T165i HSDPA Multi band 3G Mobile Phone User Manual...
-
Page 2: Warnings And Safety Notices
PC Software Requirements Join Me PC Software included supports Microsoft Vista (only 32 bit), Windows 2000 with Service Pack 4 or Windows XP with Service Pack 2 only. A limited version of Join Me is provided that supports MAC. 64 Bit systems are NOT supported. - Page 3 RF Safety Information The handset has an external antenna located at the top of the phone. For optimum performance with minimum power consumption always extend the antenna during a call and do not cover the antenna area with your hand. Hold the handset between thumb and finger in the middle of the device. Covering the antenna affects call quality, may cause the handset to operate at higher power level than needed, and may shorten talk and idle times.
-
Page 4: Table Of Contents
Contents Welcome How to use the manual Handset Overview Keypad Functions Information Bar Icons Menu Quick Reference Guide Getting Started How do I insert the USIM Card? How do I insert the Battery? How do I switch the phone On or Off? How do I connect the charger? Tips about charging and battery life How do I set the time and date? - Page 5 How do I set Speed Dial numbers? How do I make a call using Speed Dial? How do I update an existing Contact? 4.10 Advanced Contact Options Calls How do I make a Voice Call? How do I make a Voice Call from my Contacts? How do I view and make a Voice Call from my Call History? Call options during an active Voice Call How do I activate Speakerphone?
- Page 6 Special Characters and SMS Message Length How do I send a Multimedia Message (MMS)? How do I receive a Multimedia Message (MMS)? MMS Settings WAP Push Messages 6.10 How do I send an Email? 6.11 How do I receive an Email? 6.12 How do I set up automatic Email Retrieval? 6.13...
- Page 7 Access the T-Flash card (microSD) using File Manager File Manager and T-Flash Options Table Alarms and Appointments Set Alarms Set Appointments using the Calendar Imaging - Pictures and Videos 10.1 How to use the Camera 10.2 How to use the Video Camera 10.3 Viewing pictures and videos Music...
- Page 8 13.13 Synchronize with a network server (SyncML) Other Facilities 14.1 Browser 14.2 Stopwatch 14.3 Calculator 14.4 World Time 14.5 Currency Conversion 14.6 PocketNews 14.7 Games and Applications 14.8 Voice Recorder 14.9 Slide Show 14.10 Streaming URL 14.11 Connections 14.12 Access Point Settings 14.13 Restore default settings 14.14...
-
Page 9: Welcome
Welcome Congratulations on choosing the Telstra T165i handset. Please take a few minutes to read the user guide to help you get the most from your new mobile phone Operation Quick Reference Handset overview, keypad and information bar Section 1 – Introduction Making a call Section 2 –... -
Page 10: How To Use The Manual
How to use the manual The following conventions are used in the manual: Instruction Description Left Arrow ◄ Press the Press the left directional key on the four way controller Press Press the key in the centre of the four way controller Press the Right Soft Key Press the... -
Page 11: Handset Overview
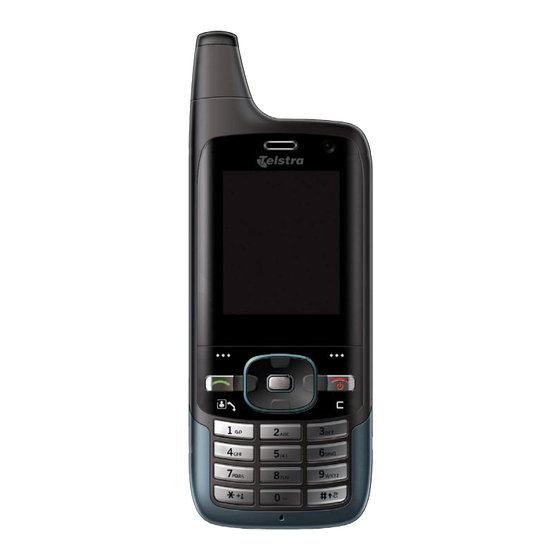
Handset Overview 1. Extendable Antenna Earpiece Four way controller - Arrow Keys(◄►▲▼) Left Soft Key (LSK) Call Key, show Call History Video Call Key Keypad Microphone Clear Key * End / Exit / Power Key Right Soft Key (RSK) OK Key Camera for video calling * The C key... - Page 12 Handset Overview External Antenna port Camera (must be open for car-kit insertion) Volume keys Speaker microSD Port Charger / USB / Headset port (Slide to open) Camera key Rear Left Right...
-
Page 13: Keypad Functions
Keypad Functions Corresponding Functions Corresponding Functions 1 | punctuation marks | voicemail Long press for keylock Special characters in text modes 2 | abc | ABC Press twice for the international prefix ‘+’ 3 | def | DEF Press three times for the pause character ‘P’ 4 | ghi | GHI 5 | jkl | JKL Toggle text modes. -
Page 14: Information Bar Icons
Information Bar Icons 3G Signal Strength Battery Level Indicator GSM Signal Strength Alarm is set Signal Strength of the EDGE Network Missed Call New SMS or MMS Message Missed Video Call SMS or MMS Memory is Full Silent Mode New E-mail Vibrate mode enabled E-mail Memory is Full Call Forward is Active... -
Page 15: Menu Quick Reference Guide
Menu Quick Reference Guide 1) BigPond 2) Messages 3) Calls 1 New Message A. Call log > E-mail 2 Inbox (0/0) 1 All calls 1 New Email 3 Outbox (0) 2 Missed calls 2 Inbox (0/0) 4 Drafts (0) 3 Received calls 3 Outbox (0) 5 Sent (0) 4 Dialled calls... - Page 16 8) Contacts 9) Tools *)Calendar 0) File Manager 1 Browser Photos 2 Alarm > USIM View appointments. Audios 3 Stopwatch > Family Add a Videos 4 Calculator > Friends Meeting Others 5 World Time > Work Memo or 6 Bluetooth >...
-
Page 17: Getting Started
Getting Started How do I insert the USIM Card? The USIM card (UMTS Subscriber Interface Module) is the small plastic smart-card with gold contacts. It holds personal information such as names and phone numbers. It can be moved between different phones if required. -
Page 18: How Do I Insert The Battery
How do I insert the Battery? Insert the battery as shown with the contacts located against the gold springs. The battery will only fit one way. Close the case by locating the plastic cover horizontally into the grooves and sliding the cover up to close it. -
Page 19: How Do I Switch The Phone On Or Off
How do I switch the phone On or Off? Press and hold the key for two seconds to switch the phone ON or OFF. The start up screen below is referred to throughout the manual as the Idle Screen: The Information bar The Idle Screen How do I connect the charger? Slide the charger port to open. -
Page 20: Tips About Charging And Battery Life
to switch it back on. Tips about charging and battery life • Only use the AC charger and USB lead supplied. • Insert the charger lead carefully with the arrow facing the top of the phone. • Normal charge time is 2-3 hours. Do not leave on charge for more than 24hrs •... -
Page 21: Basic Operation
Basic Operation How do I make a voice call? • Enter the number on the keypad and press the key to make the call. • Press to activate Handsfree (speakerphone) mode • Press the key to end the call. How do I answer an incoming call? •... -
Page 22: How Do I Navigate The Menus
How do I navigate the Menus? The Main Menu is a grid of icons that are used to access key features on the phone. ▲▼◄► From the Idle Screen press OK to access the Main Menu. Use the Arrow Keys to move to the desired icon. -
Page 23: Contacts
Contacts How do I enter my Contacts? • From the Idle Screen enter the phone number on the keypad, press the Left Soft Key to Save. • Press ▼to to create a New Contact or press the Down Arrow Update existing contact •... -
Page 24: How Do I Add A Contact From A Received Call Number
How do I add a Contact from a received call number? After receiving a call you can add the caller’s number to the Contacts list: • Press the key to display All Calls • The last call received will be at the top of the list •... -
Page 25: How Do I Set Speed Dial Numbers
How do I set Speed Dial numbers? Having Speed Dials set makes it quicker to call selected contacts. > Options > Scroll down ▼ > Set Speed Dial > Setup Menu > Contacts > Select the Contact • Assign the chosen contact to the next available number •... -
Page 26: Advanced Contact Options
Advanced Contact Options 4.10 Menu > Contacts > Options Option Description or subsequent options Call Make a Voice Call or Video Call to the selected contact Send Send an SMS, MMS or E-mail to the selected contact New Contact Create a new contact Edit Contact Edit the selected contact Delete... -
Page 27: Calls
Calls How do I make a Voice Call? • Enter the number on the keypad and press the key to make a voice call. • Press to activate Handsfree or Speakerphone (Loudsp.) • Press the key to end the call. How do I make a Voice Call from my Contacts? •... -
Page 28: Call Options During An Active Voice Call
Call options during an active Voice Call Press the Left Soft Key Options during a voice call. Use the End key to return to the call menu Hold: Puts the current call on hold End call: End the call Record: Record the current call. -
Page 29: How Do I Answer A Call
How do I answer a Call? When you receive an incoming call: • The phone will light up, the call alert will sound and the phone will vibrate depending on the current profile setting. • You will receive an incoming call notification displayed on the screen •... -
Page 30: Call Options During An Active Video Call
Call options during an active Video Call Press the Left Soft Key for the following Options during a video call: Hold / Retrieve Send a still picture instead of your own image and the voice is muted Start recording video Record video from the other party (i.e. -
Page 31: How Do I Make Emergency Calls
How do I make Emergency Calls? 5.10 To make an emergency call during normal use • Ensure that the handset is switched on and in service. • Press the key repeatedly to return to the Idle Screen. • Enter the emergency number for the present location using the keypad, (eg 000). •... -
Page 32: Videophone Setting
Advanced Call Settings Videophone Setting 5.11 Menu > Settings > tab right to Call > Videophone settings All the fields are preset by your Service Provider. If you change Service Providers you may need to update these settings. Contact your Service Provider for more details. Call Divert 5.12 Menu >... -
Page 33: Call Barring
Call Barring 5.14 Menu > Settings > tab right to Call > Call barring Call barring is a network feature. The barring password is provided by your service provider. The service needs to be enabled on your account. To obtain your PIN number contact your Service Provider. Bar all outgoing calls: Calls cannot be made. -
Page 34: Missed Calls Alert
Missed Calls Alert 5.16 Menu > Settings > tab right to Handset > Missed calls alert After missing a call, the missed call icon will be displayed on the information bar. When the Missed call alert is set the reminder tones will sound at your specified interval for 5 times or until the on screen message is acknowledged. -
Page 35: Messages And Emails
Messages and Emails How do I send a Text Message (SMS)? Right Arrow ►New Message > Text Message Menu > Messages > New Message > Text Message • Press the OK Key to select from Contacts (Cont.) or enter the number manually. •... -
Page 36: How Do I Use Predictive Text
How do I use Predictive Text? Predictive text allows words to be entered more efficiently using a single keypress for each letter, as opposed to multiple keypresses in multi-tap text mode. Compare how to write the word ‘the’: Traditional multi-tap text mode (ABC, abc) Predictive Text Mode (En) Press 8 (tuv) once to select ‘t’... -
Page 37: How Do I Add Words To The Built In Dictionary (My Words)
How do I add words to the built in Dictionary (My Words)? • From predictive text mode enter words directly by choosing Spell Word? • From the text entry screen press the Options key and select My Words • The first time you use My Words press a new word... -
Page 38: How Do I Send A Multimedia Message (Mms)
How do I send a Multimedia Message (MMS)? Use a Multimedia Message to send pictures, music or video files to your friends. Menu > Messages > New Message > Multimedia Message • Enter the phone number or press Contacts to select a number •... -
Page 39: Wap Push Messages
WAP Push Messages Menu > Messages > ▼ Settings > Mul. Msg Settings > Push Messages – Accept or Reject A WAP push message is a formatted SMS that displays a message to the user, giving the option of connecting directly to a particular URL via the mobile phone’s WAP browser. •... -
Page 40: How Do I Receive An Email
How do I receive an Email? 6.11 Configure the Email Client with your personal settings to enable receiving Emails. Menu > Messages > tab right to Email > Settings > Mailbox Settings > Options > Edit • The default Email client is configured for BigPond •... -
Page 41: How To Personalise The Phone
How to Personalise the Phone There are many ways to customise the handset such as changing the profiles, wallpaper, ringtones, setting up shortcuts etc. Change the Profiles Menu > Settings > tab right to Profiles > Edit the required Profile From the idle screen long press the to engage Meeting Mode... -
Page 42: Change The Shortcut Keys (Arrow Keys)
Change the Shortcut Keys (Arrow keys) The four arrow keys (▲▼◄►) can be customised to launch preferred features quickly from the idle screen. Menu > Settings > tab right to Handset > Shortcut Keys > OK • Set each key in turn to the preferred setting •... -
Page 43: Change The Default Ringtones
Change the default Ringtones Menu > Settings > tab right to Profiles > Edit • Edit the current profile to change the default Ringtones for all incoming calls • Press Modify the Voicecall ringtone (scroll down to select Videocall ringtone) •... -
Page 44: Change The Screen Brightness
Change the Screen Brightness Menu > Settings > Set Brightness • Use the Up and Down ▲▼ keys to set the desired level. Change the Display Backlighting Menu > Settings > Display backlighting • Screen full-light is the main screen lighting. After the set time the screen goes to half light •... -
Page 45: What Is The Pin Code
What is the PIN Code? 7.12 Menu > Settings > Security > Activate Security Codes > Pin Code • The PIN code is stored on the USIM card and protects your account against unwanted use • Select and enter the PIN number to confirm. The original PIN number is provided by your service provider but can be changed if required •... -
Page 46: File Manager And External Memory
File Manager and External Memory All user files and downloaded content are stored in the File Manager. File Manager Menu > Tools > File Manager The file manager is separated into four folders, Photos, Audios, Videos and Others as shown: Contents Description Folder... -
Page 47: Installing Additional Memory - Microsd Card
Installing Additional Memory - microSD card Handset memory can be increased by inserting a microSDHC card up to 4GB. microSD cards up to 2GB are supported (FAT 16 format) microSDHC (high capacity) cards up to 4GB are supported (FAT 32 format). •... -
Page 48: Access The T-Flash Card (Microsd) Using File Manager
Access the T-Flash card (microSD) using File Manager Menu > Tools > File Manager > tab right to T-Flash Card • All the folders and files that are stored on the card are displayed File Manager and T-Flash Options Table Depending on your location within File Manager, there are different Options (Left soft key) available as... -
Page 49: Alarms And Appointments
Alarms and Appointments Set Alarms Menu > Tools > Alarm > Add Configure the alarm as required using the Alarm Setup Screen: • Daily Alarm goes off every day • Workday Alarm goes off Mon – Fri only (Rest days can be set under Options) •... -
Page 50: Set Appointments Using The Calendar
Set Appointments using the Calendar Menu > Tools > Calendar > Add • Add a Meeting, Memo Reminder. The memo function does not include an alarm • Use the Meeting function to set repeat events such as Weekly Meetings and Anniversaries •... -
Page 51: Imaging - Pictures And Videos
Imaging - Pictures and Videos How to use the Camera 10.1 Menu > Multimedia > Camera Shortcuts: Press and hold the side camera key to activate the camera. The camera key activates the shutter and if pressed again will Save the image. -
Page 52: How To Use The Video Camera
How to use the Video Camera 10.2 Menu > Multimedia > Video Camera Shortcut: Press and hold the side camera key to activate the camera, press ►to switch to video mode. From Video mode press the ◄to change to Still mode as shown by the icon in the top right hand corner. -
Page 53: Viewing Pictures And Videos
Viewing pictures and videos 10.3 1. View the file directly from file manager Menu > Tools > File Manager > Photos > My Pictures Menu > Tools > File Manager > Videos > My Videos Scroll down the list to your chosen picture, Press Open to view the image. -
Page 54: Music
Music To import music files onto the handset see the following sections: • Import music files from your computer using JoinME (See Connectivity) • Import music files from your computer or other device using Bluetooth (See Connectivity) • Download music from BigPond Music: Menu >... -
Page 55: Create A New Playlist
Create a new Playlist 11.3 Method 1: Create a Playlist from File Manager Menu > Tool > File Manager > Audios > My Audios • Scroll through the files and press Options > Mark Mark all files) to select files then Press •... -
Page 56: Assisted-Gps
Assisted-GPS A-GPS is an advanced positioning system developed for mobile phone applications. The complex calculations performed by a GPS receiver are carried out on an external server. Assistance information is sent to the handset over the cellular system and is dependant on cellular coverage. The handset contains an antenna and receiver specifically for A-GPS signals and this enables the handset to calculate its position in terms of longitude, latitude and altitude. -
Page 57: Connectivity
Connectivity Use Join Me to connect the phone to a computer 13.1 Join Me is a program to connect the phone to a computer. After installation Join Me is used to manage contacts, messages and calendar functions. It is also used to connect to the internet and transfer music / picture files. -
Page 58: Installing Join Me
Installing Join Me 13.2 Please install the Join Me CD before connecting the phone to the computer. • Insert the CD provided into the computer • The CD will auto-start after a few seconds • If auto run does not start then run Setup.exe from the CD •... -
Page 59: Use Join Me To Copy Photos To Your Computer
Use Join Me to copy photos to your computer 13.3 Transfer photos from the handset to your computer using Join Me: • Make sure the phone is switched on, connected to the computer and Join Me has been installed. • The PC Connection on the handset needs to be set to USB Menu >... - Page 60 Copy files (eg Photos) from the phone to the computer using JoinME 1. Select the Media Tab 2. Select My Pictures folder on My Phone 3. Drag the picture from My Pictures to a folder on the PC 4. Alternatively right click on the file and use Copy and Paste from the menu Files can only be copied into Folders...
-
Page 61: Use Join Me To Transfer Music From A Computer
Use Join Me to transfer music from a computer 13.4 Music files can be transferred onto the phone using Join Me. • Make sure the phone is switched on, connected to the computer and Join Me has been installed. • The PC Connection on the handset needs to be set to USB Menu >... - Page 62 Copy files (eg Music) from the Computer to the handset using JoinME Use drag and drop to copy the selected file from the computer to the My Audios folder on the handset. Alternatively select the file, right click to Copy the file, select the destination folder (on the handset) and choose Paste.
-
Page 63: Enter Contacts Using Join Me
Enter Contacts using Join Me 13.5 Use Join Me to enter new contacts into the phone. On the phonebook tab enter contacts directly using the PC. Select “New Contact” then complete the required fields. Select the Save Position; Local, Phone ,(U)SIM or All. The save position ‘Local’... -
Page 64: Copy Contacts From The Phone To The Computer
Copy Contacts from the phone to the computer 13.6 2. ‘Select all’ by checking the box at the top of the list. 3. Drag and drop the complete list to Local. This will copy all the USIM contacts to the PC (Local) also select individual contact to copy it in... -
Page 65: Import Contacts From Microsoft Outlook
Import Contacts from Microsoft Outlook 13.7 • Launch Microsoft Outlook, load Join Me and connect your handset to the computer. • Note, at the end of the import process Outlook can shut down. Please save any information beforehand. • Select the PhoneBook tab in Join Me, see image in 13.6 above. •... -
Page 66: Import Calendar Events From Microsoft Outlook
• Double click the Join Me icon on the desktop. • Select the Internet tab as shown below • Press Connect to go online The default APN is Telstra.internet. Please check with your service provider to confirm the correct APN if required. -
Page 67: Connect To A Bluetooth Device
Connect to a Bluetooth Device 13.10 Bluetooth is used as a wireless connection for headsets, hands free car kits and computers. Not all applications or devices are supported. Bluetooth is an open forum and manufacturers choose which functions to implement. The handset supports Bluetooth 1.2 with Handsfree, Headset, FTP and DUN profiles. - Page 68 Send files from the handset to another device Menu > Tools > File Manager • Browse through the folders to the chosen file • Press the Left Soft Key Options • Choose Send then select Bluetooth and press the OK Key •...
-
Page 69: Dial Up Networking Using Usb Or Bluetooth
Connect to the internet > Set up my connection manually > Connect using a dial up modem Select the ZTE USB Modem and uncheck any other modems The ISP Name can be any name you like eg. T165i Handset Set the Phone number to *99# > The Username and Password must be blank >... - Page 70 Launch the Bluetooth manager software on your PC or MAC. This varies depending on your platform, hardware and software. Create a new connection and enter the same password, when prompted, on each device. Select the T165i Handset, the Dial Number is *99# and the Username and Passwords are blank.
-
Page 71: Pc Connection
PC Connection 13.12 Menu > Settings > Handset > PC Connection > Bluetooth PC Connection specifies how the handset initiates data connections to the PC. It can be set to be via Bluetooth or via the USB cable. Join Me requires the USB connector, other transfers can operate via Bluetooth if supported by your system. -
Page 72: Other Facilities
Other Facilities Browser 14.1 Menu > Tools > Browser Home the home page is set by your Service Provider New Link enter a web address manually using the keypad Bookmark Link to a previously saved page History Display pages visited Saved Page View a local copy of a previously saved page Settings... -
Page 73: Stopwatch
Stopwatch 14.2 Menu > Tools > Stopwatch • Press Key to Start timing. • Press Stop timing. The screen will display the event time. • Press to continue timing. • Press Right Soft Key to reset. Calculator 14.3 Menu > Tools > Calculator •... -
Page 74: Currency Conversion
Currency Conversion 14.5 Menu > Tools > Currency Conversion • Convert currencies quickly and easily • The exchange rate stays set after you close the function • Use the ▲▼arrows to highlight the required field • Press Decimal to use a decimal point •... -
Page 75: Voice Recorder
Voice Recorder 14.8 Menu > Multimedia > Voice Recorder • Press to Start recording the voice memo • Press to Pause / Continue (Contin.) recording • Press the Right Soft Key to Stop recording • Press to Save. The file will be saved to My Audios •... -
Page 76: Access Point Settings
Access Point Settings 14.12 Menu > Settings > Handset > Access point settings Access Point Settings (also called APN) are pre-defined by your service provider and enable the handset to connect to the internet via WAP and to send multi media messages (MMS). When using an alternate carrier, a new Connection setting as defined by your service provider. -
Page 77: Download Location
Download Location 14.15 Menu > Settings > Handset > Download Location When a microSD card is installed the default save location for user photos and videos changes to the External Memory. This refers to the microSD card. Network Settings 14.16 Menu >... -
Page 78: Ctm
14.17 Menu > Settings > tab right to Handset > CTM CTM (Cellular Text Telephone Modem) is a text based communications protocol to offer support to hearing and speech impaired people. Hearing or speech impaired persons can communicate using a teletype (TTY) terminal connected to the mobile phone via a CTM Modem. -
Page 79: Technical, Support And Warranty Information
Technical, Support and Warranty Information Troubleshooting and FAQ’s 15.1 Please check the manual thoroughly before contacting your service provider Symptom Solution No incoming ring Check the ring tone and ring volume settings under Profiles or alarm tone Check the handset is not muted (Long press the # Key) (No) keytones when Check the key tone settings in the current profile. - Page 80 Symptom Resolution Restart your phone every day to refresh the memory My phone is slow to Delete or archive old SMS messages and other content respond, handset storage Restore default settings: problems Menu > Settings > Handset > Restore Default > 0000 > Yes Possible network coverage issue.
-
Page 81: Error Messages
Symptom Resolution My phone is not able to Turn Bluetooth on. Set visibility to Show. Possible compatibility connect to other Bluetooth issues. Manufacturers incorporate different Bluetooth profiles. Not devices all functionality is supported. How do I transfer pictures This is not supported due to different Bluetooth profiles. Copy via Bluetooth to a photo photos using Join Me or a T-Flash card printer (eg Kodak)? -
Page 82: Technical Parameters
Technical Parameters 15.3 Network 3G WCDMA 850, 1900, 2100 MHz with HSDPA data up to 7.2 Mbps Compatibility 2G GSM 850, 900, 1800, 1900MHz with EDGE data up to 236.8Kpbs Dimensions L×W×H Approx 117mm x 51mm x 16mm Weight Approx 119g (Including standard battery) Features MP4 video, MP3 audio, 2.0/0.3MPixel camera, Video Phone, USB, FM Radio, A-GPS, Java MIDP 2.0, 2.0”... -
Page 83: Support Information
Support Information 15.4 • For Warranty Service directions please consult the ZTE website at http://www.zte.com.au • All calls for PIN number enquiries, Network problems, Next G Services, BigPond account information, Web Access, Account and Billing Information, USIM card registration and general enquiries should be directed to your Service Provider. -
Page 84: Environmental Statement
Environmental Statement The ZTE handset is made using the latest manufacturing techniques and environmental standards to reduce waste and hazards to the environment. However at the end of life of the equipment the manufacturer recommends that you return the handset and accessories to the nearest re-cycling depot or send it to our recycling agent below. -
Page 85: General Safety And Maintenance Information
General Safety and Maintenance Information The handset contains delicate electronic circuitry, magnets and battery systems. You should treat it with care and pay attention to the following points: • Handle the handset with care. Do not drop or may be affected by the handset. •... - Page 86 • Do not place the handset close to the edge of flammable gas, liquid or explosives. • At high volume, prolonged listening to audio a table in case it moves when set on vibrate mode. devices can cause hearing loss. •...
- Page 87 Index Advanced Call Settings Dictionary Answer a Call 21, 29 Download Location 47, 77 Appointments DTMF Background Screen E-Mail Backlight Duration Emergency Calls Battery 18, 20 Bluetooth 67, 68 Environmental Bluetooth Car Kit FAQ’s Calculator File Manager Calendar FM radio Call Divert Handsfree Call History...
- Page 88 MP3 Player Shortcut Multimedia Message Silent Mode Music Player SIM card My Words Slide Show Network Settings SMS Message Length 58, 61 Snooze PIN Codes Speakerphone Playlist Speed Dial Predictive Text Stopwatch Preferred mode Streaming URL Preferred selection SyncML Profiles Take Pictures Push Messages Technical Parameters...
Need help?
Do you have a question about the T165i and is the answer not in the manual?
Questions and answers