Table of Contents
Advertisement
Quick Links
Advertisement
Table of Contents

Related Manuals for Williams Sound PLA DL210NET


Summary of Contents for Williams Sound PLA DL210NET
- Page 1 PLA DL210NET Digi-Loop DSP Induction Loop Amplifier ™ USER Manual MAN 179C...
-
Page 2: Table Of Contents
PLA DL210NET Digi-Loop™ DSP Induction Loop Amplifier Table of Contents Safety Warnings and Instructions System Overview Controls and Connectors Figure A: Front Panel Figure B: Rear Panel Typical Connections Figure C: Example Connections Rack Installation Figure D: RS-232 Standard Cable Pinout Configuration... - Page 3 PLA DL210NET Digi-Loop™ DSP Induction Loop Amplifier 6c1-2. Filters ....................................19 6d. AGC ....................................20 6d1-6. AGC Level, Hold Time, Attack, Release .......................... 20 6e. Delay ....................................21 6f1-3. EQ - Lo, Mid, Hi ................................21 6f4a-d. Advanced Settings - Lo, Mid, Hi, Metal Comp ........................ 21 6g.
-
Page 4: Safety Warnings And Instructions
(servicing) instructions in the literature accompanying the appliance. POWER CORD NOTICE FOR INTERNATIONAL OPERATION - Please call Williams Sound Customer Service at 800.328.6190 to order the appropriate power cord for the country of use. - Page 5 3. Do Not Plug in the input, output, ethernet, USB or RS-232 connections while the power switch is switched to the “ON” position. 4. Do Not Touch the PLA DL210NET with wet hands. Do not handle the PLA DL210NET or power cord when your hands are wet or damp.
-
Page 6: System Overview
PLA DL210NET Digi-Loop™ DSP Induction Loop Amplifier System Overview Thank you for purchasing the PLA DL210 Digi-Loop™ DSP Induction Loop Amplifier. This is the latest in induction loop technology. An induction loop system uses a large copper loop, usually run on the floor around the inside perimeter of a room, to transmit electromagnetic signals to a receiving device that picks up the broadcast. -
Page 7: Controls And Connectors
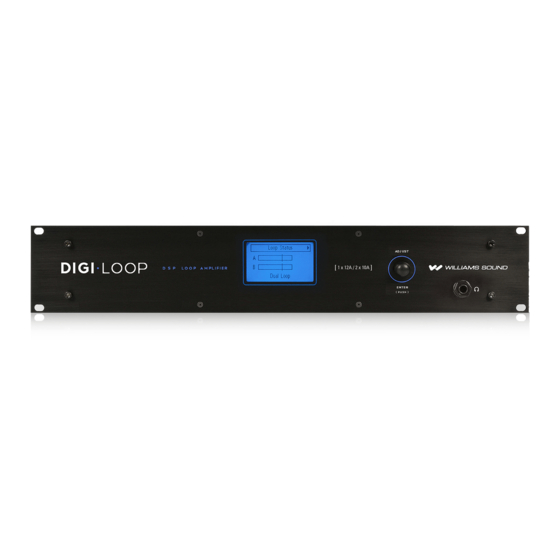
PLA DL210NET Digi-Loop™ DSP Induction Loop Amplifier Controls and Connectors Figure A: Front Panel MENU CONTROL MENU (GUI) KNOB DISPLAY MENU CONTROL MENU (GUI) KNOB DISPLAY HEADPHONE JACK ETHERNET MIC/LINE SPEAKER-LEVEL Figure B: Rear Panel JACK INPUTS INPUTS COOLING FAN... -
Page 8: Typical Connections
Figure C: Example Connections ROUTER COMPUTER iPAD, ANDROID TABLET, (HARD-WIRED TO ROUTER) OR PHONE WITH WI-FI LAPTOP (FOR INITIAL CALIBRATION/CONFIGURATION) PLA DL210NET PROFESSIONAL INDUCTION LOOP AMPLIFIER WITH DIGITAL SIGNAL PROCESSING TO RECORDING EQUIPMENT INDUCTION LOOP FROM COMMERCIAL SPEAKER SYSTEM UNBALANCED AUDIO FROM CONSUMER-... -
Page 9: Rack Installation
PLA DL210NET Digi-Loop™ DSP Induction Loop Amplifier Rack Installation Install into a 19” rack using 10-32 rack screws. Leave 1U rack space above for ventilation. A surge protector or power conditioner is highly recommended. Use a grounded outlet. Connect all input/outputs before applying power. -
Page 10: Setup And Calibration Procedure (Using A Laptop Or Windows Tablet)
Note that for a single loop, “Dual-Loop” mode should be selected. Connect Loop A and Loop B to corresponding outputs on the back of the PLA DL210NET. If using a single loop, connect it to Loop A. If using a Phased Array, connect the Master loop to Loop A and the Slave loop to Loop B. If using a speaker, connect it to the Loop A Output and the loop wire to Loop B. -
Page 11: Single Perimeter Loop Configuration Using Front Lcd (Dual Loop Mode)
PLA DL210NET Digi-Loop™ DSP Induction Loop Amplifier Single Perimeter Loop Configuration using front LCD (Dual Loop Mode) Define the area needed for the loop layout. DC resistance of the loop and lead wire should be between .5 and 1.5 Ohms. -
Page 12: Dual Loop Calibration Using Front Lcd (Dual Loop Mode)
PLA DL210NET Digi-Loop™ DSP Induction Loop Amplifier Dual Loop Calibration using front LCD (Dual Loop Mode) Note: this mode is also used for a single loop; in this case steps referring to Loop B can be skipped. Define the areas needed for the loop layout. -
Page 13: Phased-Array Calibration Using Front Lcd (Phased Array Mode)
PLA DL210NET Digi-Loop™ DSP Induction Loop Amplifier Phased-Array Calibration using front LCD (Phased Array Mode) Master and Slave loop wire layout should follow parameters defined by blueprints and site survey findings. Loop wire and lead wire DC resistance should be between .5 and 1.5 Ohms on both the Master and Slave loops. -
Page 14: One Speaker + Single Loop Calibration Using Front Lcd (Speaker Mode)
PLA DL210NET Digi-Loop™ DSP Induction Loop Amplifier One Speaker + Single Loop Calibration using front LCD (Speaker Mode) Define the area needed for the loop layout. Loop and lead in wire DC resistance should be between .5 and 1.5 Ohms. -
Page 15: Front Screen Menu Tree
PLA DL210NET Digi-Loop™ DSP Induction Loop Amplifier Front Screen Menu Tree The following is an overview of the on-screen menu. The numbers by each block refer to the Front Menu Detail Section (next page). Figure I: Front Screen Menu Tree... -
Page 16: Front Menu Detail
PLA DL210NET Digi-Loop™ DSP Induction Loop Amplifier Front Menu Detail The entire on-screen menu is accessed by either rotating the control knob to the left or right (to view), or pushing it in (to select). See the Menu Tree (previous page) for an overview of the entire menu structure. -
Page 17: Configuration Menu
PLA DL210NET Digi-Loop™ DSP Induction Loop Amplifier 4. CONFIGURATION MENU The configuration menu is where most of the amplifier settings and fine-tuning is performed. This menu is where Inputs and Outputs are configured and system parameters are set up, stored and recalled. -
Page 18: 5A3. Eq
PLA DL210NET Digi-Loop™ DSP Induction Loop Amplifier 5a3. EQ This is a 3-band parametric equalizer providing adjustment for Low, Mid-Band, and High frequency. The center or cutoff frequency for each band is chosen under the Advanced Settings. The first screen (below) shows the level adjustment for each of the bands (midrange highlighted). -
Page 19: Output Configuration
PLA DL210NET Digi-Loop™ DSP Induction Loop Amplifier 6. OUTPUT CONFIGURATION Each of the outputs can be configured individually. To set up Ouput 1, enter “Output Configuration”. Ouput 1 is the first input you can adjust, so it is already selected. To get to the next input, rotate the knob to the right. -
Page 20: 6D. Agc
PLA DL210NET Digi-Loop™ DSP Induction Loop Amplifier 6d. AGC Automatic Gain Control measures the average level of the signal and applies gain reactively to keep the output level constant. It also limits the output power and reduces or eliminates distortion due to clipping that would normally occur without AGC. -
Page 21: 6E. Delay
PLA DL210NET Digi-Loop™ DSP Induction Loop Amplifier 6e. Delay Delay is the amount of time between the input signal and the output signal of the amplifier. This is often useful in a loop system when a PA system is also being used, so that the audio being heard through the loop (receiver or hearing aid) matches that of the PA System speakers. -
Page 22: System Configuration
PLA DL210NET Digi-Loop™ DSP Induction Loop Amplifier 7. SYSTEM CONFIGURATION 7a1-3. Presets - Load Preset, Save Preset, Change Name Presets allow the user to store all of the current amplifier settings into one easy-to-access Preset, and recall the Preset when needed. -
Page 23: 7C. Network
PLA DL210NET Digi-Loop™ DSP Induction Loop Amplifier 7c. Network Network settings provide the ability to choose dynamic IP addressing or specify a static IP Address for the amplifier. The amplifier’s default state is dynamic (DHCP). If using DHCP (choosing “No” for Static IP in the second screen below) you need to go to a different screen to find out what the assigned IP Address is (See 7g5, IP Address under Tech Tools). -
Page 24: 7G. Tech Tools
PLA DL210NET Digi-Loop™ DSP Induction Loop Amplifier 7g. Tech Tools Tech Tools provides the ability to calibrate the amplifier through use of a test tone, perform an open loop test, check the firmware version(s) of the ICs, name the amplifier, set a static or dynamic IP address, and reset the amplifier to factory default settings. -
Page 25: 7G4. Device Name
PLA DL210NET Digi-Loop™ DSP Induction Loop Amplifier 7g4. Device Name The Device Name provides the ability to give the amplifier an 8-character name for easy identification when connecting to it through the PC App on a network. This name will show up on a drop-down list in the PC App as an available device to connect to. -
Page 26: Pc Application Initial Setup
USB 1.1, 2.0 (12 MBs high speed), 3.0 (5GBs super speed); standard-B jack. INSTALLING THE PC MIXER APPLICATION 1. To download the PC Mixer Application, please visit our website, go to the PLA DL210NET product page, and under the “downloads” tab will be a link for the latest firmware and PC App. -
Page 27: Using The Pc Mixer Application
Note: The field strength meter can be purchased through Williams Sound, model PLM FSMP. Please see our website for more information. -
Page 28: Figure L: Pc App Main Screen
PLA DL210NET Digi-Loop™ DSP Induction Loop Amplifier PC APP MAIN SCREEN Mix Gain - Allows an additional point of control to mix individual inputs as required for each output. (Click on the dial, then slide up/ down to adjust) Line/Mic/Phantom Mic Select - Switches between a Line-level signal, dynamic microphone or 48v condenser microphone.* Input Trim - Provides fine trim of the input gain. -
Page 29: Figure M: Input Effects
PLA DL210NET Digi-Loop™ DSP Induction Loop Amplifier INPUT EFFECTS Equalizer Hz (Bass/Mid/Treble Pole Freq) - Sets the center frequency for the gain adjustment of each band. (Click then slide up/down to adjust) dB (Bass/Mid/Treble Pole Freq Gain Adjust)- Adjusts the amount of gain at the pole frequency. This is adjustable from -96.0dB to 0.0dB in 0.5dB steps. -
Page 30: Figure N: Output Effects
PLA DL210NET Digi-Loop™ DSP Induction Loop Amplifier OUTPUT EFFECTS Equalizer Hz (Bass/Mid/Treble Pole Freq) - Sets the center frequency for the gain adjustment of each band. dB (Pole Freq Gain Adjust)- Adjusts the amount of gain at the pole frequency. -
Page 31: Figure O: Amplifier Status Window
PLA DL210NET Digi-Loop™ DSP Induction Loop Amplifier STATUS BOX AND AMPLIFIER STATUS WINDOW The status box shows loop status at a glance. For more detail, open the Amplifier Status Window. Figure O: Amplifier Status Window Status Box. Click inside the box to open the Ampli er Status Window. -
Page 32: Specifications
PLA DL210NET Digi-Loop™ DSP Induction Loop Amplifier Specifications Dimensions 2U rackmount, 19” W x 3.5” H x 12” D. Chassis is 17” W. Weight 14.3 lbs (6.5 kg) Color Case: Black, white and blue legends on front, white legends on back. LCD: Backlit Blue. -
Page 33: Troubleshooting
PLA DL210NET Digi-Loop™ DSP Induction Loop Amplifier Troubleshooting Problem Solution - Check to see that the loop amplifier is on. - Make sure the input source is on/playing. - On the “Loop Status” screen, the horizontal bar graph should be pulsing with the audio from the input source. -
Page 34: Year Warranty
Williams Sound shall not be liable to any person or... -
Page 35: Notes
PLA DL210NET Digi-Loop™ DSP Induction Loop Amplifier Notes... - Page 36 10300 Valley View Rd · Eden Prairie, MN 55344 www.williamssound.com 800-328-6190 / 952-943-2252 · FAX: 952-943-2174 MAN 179C...
Need help?
Do you have a question about the PLA DL210NET and is the answer not in the manual?
Questions and answers