Table of Contents
Advertisement
Advertisement
Chapters
Table of Contents

Related Manuals for SMART 450


Summary of Contents for SMART 450
- Page 1 SMART Document Camera™ 450 User’s guide...
- Page 2 © 2012 SMART Technologies ULC. All rights reserved. No part of this publication may be reproduced, transmitted, transcribed, stored in a retrieval system or translated into any language in any form by any means without the prior written consent of SMART Technologies ULC. Information in this manual is subject to change without notice and does not represent a commitment on the part of SMART.
-
Page 3: Important Information
Ensure that any cables extending across the floor to your SMART product are properly bundled and marked to avoid a trip hazard. To reduce the risk of fire or electric shock, do not expose the SMART product to rain or moisture. - Page 4 Do not block or cover the openings or slots on your SMART product. These slots provide ventilation, ensure reliable operation and protect your SMART product from overheating. Do not carry your SMART product by the camera arm. Carry it by the base of the unit. Do not aim the camera lens at the sun.
-
Page 5: Table Of Contents
Using the on-screen display (OSD) menu in Camera mode Capturing and transferring images and videos Using a microscope Chapter 5: Using your SMART Document Camera with SMART Notebook software Using your document camera with SMART Notebook software Chapter 6: Using your SMART Document Camera in Playback mode... - Page 6 Using the Playback mode on-screen display (OSD) menu Playback mode OSD menu Deleting images in Playback mode Chapter 7: Using 3D Tools for SMART Notebook software and Mixed Reality Tools Introduction Incorporating 3D content into your lessons Getting started with Mixed Reality Tools for SMART Document Camera Inserting and manipulating 3D models...
-
Page 7: Chapter 1: Overview
Downloading software Introduction Your document camera 450 can transform any classroom or lecture hall into a spontaneous and interactive learning environment. It uses a high-resolution video camera to display clear and detailed images of written material or any physical object. -
Page 8: Document Camera Features
Your SMART Document Camera™ 450 enables you to display printed documents, microscope slides and 3D objects on your computer, projector or television. You can record videos, scan documents, capture images and save them to a SMART Notebook™ collaborative learning software file or to an SD/SDHC card or USB drive. -
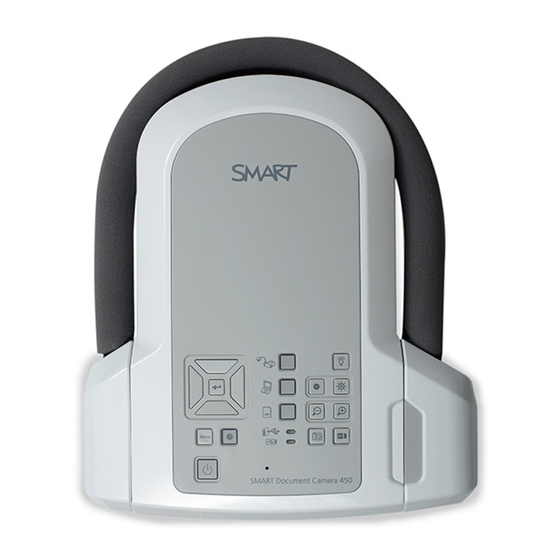
Page 9: Parts Of The Document Camera
C H A P T E R 1 Overview Software SMART Notebook software 11 or later, including 3D Tools for SMART Notebook software and Mixed Reality Tools software. SMART Product Drivers Image and video storage Supports SD/SDHC cards with a built-in card slot (up to 32 GB, speed glass 4). - Page 10 5 Select camera Auto-focus 6 Select computer pass-through 12 Capture to SMART Notebook software or to local memory USB indicator: computer or USB drive For information on the different modes, see Understanding Camera, Computer Pass-Through and Playback modes on page 23.
-
Page 11: Rear Connection Panel
C H A P T E R 1 Overview Rear connection panel The rear connection panel has DC 12V 2A, VGA In, VGA Out, Composite Video Out and USB mini-B connectors. 1 Connect the power cable 2 Connect a VGA output connector of a computer 3 Connect any display device with a VGA cable 4 Connect the supplied composite video adapter cable 5 Connect a USB connector of a computer... -
Page 12: Right-Side Connection Panel
C H A P T E R 1 Overview Right-side connection panel The right-side connection panel has an SD/SDHC card slot, a switch for selecting VGA-DVI or composite video output and a security lock slot. 1 Camera head storage 2 SD/SDHC card slot 3 TV/VGA switch 4 Security lock slot Bottom control panel... -
Page 13: Mixed Reality Cube
NTSC/PAL switch Resolution reset button Mixed reality cube With a mixed reality cube, you can interact with 3D models in SMART Notebook software using Mixed Reality Tools. See Using 3D Tools for SMART Notebook software and Mixed Reality Tools on page 59. Power supply Your document camera comes with a power supply, including a country-specific connector that connects to the external power supply. -
Page 14: Document Camera Modes
C H A P T E R 1 Overview Composite video adapter cable Use the composite video adapter cable to connect your document camera to a projector or a display. You can display objects, capture images and videos to a storage device and use the features in the on-screen menus. -
Page 15: Document Camera Software
You can find system requirements for your computer in the SMART Notebook software 11.1 release notes (smarttech.com/kb/170138). I M P O R T A N T You need to have SMART Notebook software 11 SP1 or later installed on your computer before you connect your document camera. Downloading software To install SMART Notebook software and SMART Product Drivers... -
Page 17: Chapter 2: Setting Up Your Smart Document Camera
Chapter 2 Setting up your SMART Document Camera Introduction Setting up your document camera Connecting your document camera to different displays Setting the TV/VGA switch Connecting your document camera to a monitor or a projector Connecting your document camera to a monitor or a projector with a DVI interface... -
Page 18: Setting Up Your Document Camera
2. Press the camera head down, and then pull the camera arm outward and upward. 3. Move the camera head to aim the lens at your object. I M P O R T A N T To use your document camera with SMART Notebook software you need to connect your document camera to a computer. -
Page 19: Connecting Your Document Camera To Different Displays
C H A P T E R 2 Setting up your SMART Document Camera To connect the power supply 1. Connect the power supply cable to the DC 12V receptacle on the rear connection panel. 2. Connect a country-specific connector to the power supply. -
Page 20: Setting The Tv/Vga Switch
Use Playback mode to view a full-screen slide show on the external display. I M P O R T A N T To use your document camera with SMART Notebook software you need to connect your document camera to a computer. -
Page 21: Connecting Your Document Camera To A Tv Or A Projector
C H A P T E R 2 Setting up your SMART Document Camera To connect your document camera to a monitor or a projector with a DVI interface 1. Complete the basic connection steps (see page 12). I M P O R T A N T Make sure the TV/VGA switch is set to VGA . -
Page 22: Turning You Document Camera On And Off
C H A P T E R 2 Setting up your SMART Document Camera Turning you document camera on and off To turn on your document camera Press the power button on the control panel. The power light changes from amber to flashing green. When the light is solid green, your document camera is operational. - Page 23 C H A P T E R 2 Setting up your SMART Document Camera 2. Attach the microscope adapter to your document camera's camera head, and then connect it to your document camera. 3. Tighten the three bolts until the adapter secures the eyepiece.
-
Page 24: Switching Between Vga, Dvi And Composite Output
C H A P T E R 2 Setting up your SMART Document Camera To connect the microscope to a projector or a display 1. Press the button on the control panel, and then select the tab. 2. Use the button on the control panel to select MODE, and then press the button on the control panel. -
Page 25: Shooting Area, Overhead Light And Anti-Glare Sheet
C H A P T E R 2 Setting up your SMART Document Camera To connect an external microphone to your document camera Connect the microphone's cable to the microphone on your document camera's left-side connection panel. Connecting your document camera to speakers You can connect speakers to your document camera. -
Page 26: Overhead Light
C H A P T E R 2 Setting up your SMART Document Camera To mirror the image 1. Press the button on the control panel. 2. Press the button on the control panel, and then select 3. Press the button on the control panel. -
Page 27: External Memory Storage
C H A P T E R 2 Setting up your SMART Document Camera External memory storage Your document camera supports both an SD/SDHC card and a USB drive for image capture, audio and video recordings. Your document camera detects when an external storage device is connected and automatically switches to the last detected storage. -
Page 29: Chapter 3: Using Your Smart Document Camera
Camera mode In Camera mode, you can view document camera images only in SMART Notebook software. Camera mode allows connection over USB and live image output. You can view full-screen images from your document camera using a projector or high-definition display without a computer. -
Page 30: Computer Pass-Through Mode
C H A P T E R 3 Using your SMART Document Camera You can save images to your SMART Notebook file to present them later, or if your computer is connected to an interactive whiteboard, projector or television, you can deliver your SMART Notebook presentation with live images from your document camera. -
Page 31: Identifying Features Of Each Mode
Access an internal memory and SD/SDHC card from the computer with a USB cable Control the document camera from a computer Capture to SMART Notebook software Capture to an SD/SDHC memory card Access the related on-screen display menu Capture to a USB drive... -
Page 32: Setting Document Camera Modes
C H A P T E R 3 Using your SMART Document Camera Feature description Camera Computer Playback mode Pass-Through mode mode Connect to a DVI digital output projector Camera Memory or a display image card images Connect to a television (composite video... -
Page 33: Displaying Printed Documents
C H A P T E R 3 Using your SMART Document Camera To set your document camera to Playback mode 1. Disconnect the USB cable from the rear connection panel. 2. Connect your document camera to a projector or a monitor with the VGA cable or to a television with the composite video adapter cable if needed. -
Page 34: Inserting And Removing An Sd/Sdhc Card
C H A P T E R 3 Using your SMART Document Camera 5. Press the button on the control panel to select , and then press the button on the control panel. See The Image tab on page 34 for an explanation of the settings. - Page 35 C H A P T E R 3 Using your SMART Document Camera To insert an SD/SDHC card 1. Press the button on the control panel. 2. Insert an SD/SDHC card into the card slot on the right-side connection panel with the contact facing down.
-
Page 37: Chapter 4: Using Your Smart Document Camera In Camera Mode
This chapter explains how to use your document camera in Camera mode. Using Camera mode When your SMART Document Camera is connected to a projector, flat-panel display or television you can display a full-screen image from your document camera. You can use your document camera in Camera mode to perform the following tasks: Display objects. - Page 38 C H A P T E R 4 Using your SMART Document Camera in Camera mode Use the features and settings in the on-screen display menu. Use a microscope with a standard eyepiece with additional adapters. I M P O R T A N T Your document camera must be connected directly to an external display when using the OSD menu.
-
Page 39: Using The On-Screen Display (Osd) Menu In Camera Mode
C H A P T E R 4 Using your SMART Document Camera in Camera mode Using the on-screen display (OSD) menu in Camera mode There are four tabs on the OSD menu: Image, Presentation, Setting and System. Use the OSD menu to adjust settings for your document camera in Camera mode. -
Page 40: The Image Tab
C H A P T E R 4 Using your SMART Document Camera in Camera mode The Image tab To access the Image settings menu 1. Press the button on the control panel. 2. Press the button on the control panel. 3. Press the... - Page 41 C H A P T E R 4 Using your SMART Document Camera in Camera mode Image options Description Mode Select an option from five image settings: Sharp – adjust the contrast to make text appear more visible Graphics – adjust the image gradient Motion –...
-
Page 42: The Presentation Tab
C H A P T E R 4 Using your SMART Document Camera in Camera mode The Presentation tab Presentation features enable you to show previously captured images along with the live camera view. These features aren't available when the document camera is connected as a USB camera. - Page 43 C H A P T E R 4 Using your SMART Document Camera in Camera mode Presentation options Description Picture in Picture (PiP) Shows captured pictures or video as thumbnails in corner of the screen in Camera mode. Press the left and right navigation buttons to navigate through the stored images.
-
Page 44: Using The Picture In Picture (Pip) Feature
C H A P T E R 4 Using your SMART Document Camera in Camera mode Presentation options Description Press the button to cancel split screen. N O T E You can’t capture an image while in Split Screen mode. Timer Provides an on-screen countdown timer for a presenter to assist with presentation time management. -
Page 45: The Setting Tab
C H A P T E R 4 Using your SMART Document Camera in Camera mode 4. Select the corner of the display, and then press the button on the control panel. Your document camera displays a picture in picture image. 5. Press buttons on the control panel to choose different stored images. - Page 46 C H A P T E R 4 Using your SMART Document Camera in Camera mode Settings options Description Capture Select image capture size. In 5M setting, the capture Resolution resolution is 2592 × 1944. Select image quality; Finest, High, Normal. Quality...
-
Page 47: Playback Mode
Action Storage Camera See the memory card from your computer View and use your document camera from SMART Notebook software Capture image to the memory card in both Computer Pass- Through and Camera modes This mode enables you to see the contents of your USB drive or SD memory card from your computer. -
Page 48: The System Tab
C H A P T E R 4 Using your SMART Document Camera in Camera mode The System tab To access the System menu 1. Connect your document camera to a projector, flat-panel display or television (see page 16). 2. Press the button on the control panel. -
Page 49: Capturing And Transferring Images And Videos
C H A P T E R 4 Using your SMART Document Camera in Camera mode System options Description Output Display Set the resolution to display an image on the screen: 1024 × 768 1280 × 1024 1280 × 720 1920 × 1080 N O T E This selection disabled in TV output mode. -
Page 50: Transferring Images To Your Computer
C H A P T E R 4 Using your SMART Document Camera in Camera mode page 31. 4. Press the button on the control panel. To record a video using an SD/SDHC card 1. Insert an SD/SDHC card in your document camera's SD/SDHC card slot. -
Page 51: Using A Microscope
C H A P T E R 4 Using your SMART Document Camera in Camera mode To transfer images to your computer 1. Use the OSD menu to set your document camera USB to PC mode to STORAGE. 2. Connect your document camera to your computer with the USB cable (see Setting up your document camera on page 12). -
Page 53: Chapter 5: Using Your Smart Document Camera With Smart Notebook Software
SMART Notebook file. I M P O R T A N T Your document camera should be in Camera mode. SMART Notebook software also works with the camera in the Computer Pass-Through mode. See The Setting tab on page 39. - Page 54 Focus in manually. Change the appearance of the image: rotate it 180º, define the image color, black and white or film negative. You can also start and stop Microscope mode and start Mixed Reality Tools for SMART Document Camera automatically. Start Mixed Reality.
- Page 55 3. When you’re done, press to stop recording. N O T E display appears in the bottom left corner of your SMART Notebook page. It displays the time that has lapsed since the last screen capture and the number of screen captures taken.
-
Page 57: Chapter 6: Using Your Smart Document Camera In Playback Mode
Chapter 6 Using your SMART Document Camera in Playback mode Introduction Setting your document camera to Playback mode Using the Playback mode on-screen display (OSD) menu Playback mode OSD menu options Playback mode OSD menu Deleting images in Playback mode Introduction This chapter explains how you can use your document camera in Playback mode. When you set your document camera to Playback mode, you can play back images from the SD/SDHC card, USB drive or internal memory. -
Page 58: Using The Playback Mode On-Screen Display (Osd) Menu
C H A P T E R 6 Using your SMART Document Camera in Playback mode 2. Insert an SD/SDHC card in your document camera. 3. Press the button on the control panel. To set Playback mode using a USB drive 1. Connect your document camera directly to a projector or another display. For connection information, see page 13. -
Page 59: Playback Mode Osd Menu
C H A P T E R 6 Using your SMART Document Camera in Playback mode Playback mode OSD menu Playback menu option Description Slide Show Displays all captured still images in an automated slide show. Interval Sets the slide show interval (in 5 second increments) before displaying the next image. - Page 60 C H A P T E R 6 Using your SMART Document Camera in Playback mode 3. Press the buttons on the control panel to toggle between functions. 4. Press the button on the control panel to make a selection. 5. Press the button on the control panel to close the menu.
- Page 61 C H A P T E R 6 Using your SMART Document Camera in Playback mode To play a video N O T E In the thumbnails view, videos have a symbol in the top left corner of the thumbnail image. 1. Connect your document camera directly to a projector another display. For connection information, see page 13 2.
-
Page 62: Deleting Images In Playback Mode
C H A P T E R 6 Using your SMART Document Camera in Playback mode 6. Press the button on the control panel to select the video you want to play. N O T E Press the button to pause your video. - Page 63 C H A P T E R 6 Using your SMART Document Camera in Playback mode To delete all images I M P O R T A N T You are unable to delete images from your computer in Playback mode. You can delete images only from the three memory sources.
-
Page 65: Chapter 7: Using 3D Tools For Smart Notebook Software And Mixed Reality Tools
Using SketchUp sketching software Using Trimble 3D Warehouse Introduction This chapter provides the information you need to begin using 3D Tools for SMART Notebook software and Mixed Reality Tools with your SMART Document Camera as well as SketchUp™ sketching software and Trimble® 3D Warehouse™ (formerly Google™ 3D Warehouse). -
Page 66: Incorporating 3D Content Into Your Lessons
C H A P T E R 7 Using 3D Tools for SMART Notebook software and Mixed Reality Tools 3D Tools for SMART Notebook software and Mixed Reality Tools take this experience to a new level by providing teachers and students with a new way to engage with digital 3D content. -
Page 67: Hardware And Software Requirements
The SMART Software Activation dialog box appears. 3. Click Add. 4. Type the product key you received from SMART in the Product Key box, and then click Add. 5. Click license agreement, review the license agreement, and then click Close. -
Page 68: Inserting And Manipulating 3D Models
Inserting and manipulating 3D models To use 3D Tools for SMART Notebook software, you need to insert a 3D model in your .notebook file. After you insert a 3D model, you can manipulate it in the same way you manipulate other objects in SMART Notebook software. -
Page 69: Inserting 3D Models
3D models are available from the 3D Objects folder in Lesson Activity Examples and the SMART Exchange™ website (exchange.smarttech.com) as well as the Trimble 3D Warehouse (see Using Trimble 3D Warehouse on page 73). You can also insert your own 3D models if they are in one of the following formats: COLLADA (.dae) -
Page 70: Rotating A 3D Model
Using 3D Tools for SMART Notebook software and Mixed Reality Tools N O T E S For information on these basic options, see the Help for SMART Notebook software. When you add a 3D model to the Gallery tab, it appears in the 3D Objects category. -
Page 71: Adding Labels
C H A P T E R 7 Using 3D Tools for SMART Notebook software and Mixed Reality Tools N O T E If a 3D model doesn’t contain animation, the Animation menu documented in the following procedures is disabled. To pause animation 1. -
Page 72: Navigating 3D Scenes
C H A P T E R 7 Using 3D Tools for SMART Notebook software and Mixed Reality Tools The label is hidden. 2. Press the label’s connection point to display the label. To remove a label 1. Select the label. 2. Press Close Navigating 3D scenes Large 3D models that contain internal details are called 3D scenes. - Page 73 1. Select a 3D model. 2. Press the 3D model’s menu arrow, and then select Enter 3D Scene. SMART Notebook software displays the 3D scene in Full Screen mode. A map of the 3D scene, navigation controls and the Close button appear.
- Page 74 C H A P T E R 7 Using 3D Tools for SMART Notebook software and Mixed Reality Tools 3. Navigate the 3D scene using the navigation controls. Button Use to: Change your orientation upward. Change your orientation to the left. Change your orientation to the right.
-
Page 75: Using Mixed Reality Tools For Smart Document Camera
Using Mixed Reality Tools for SMART Document Camera After inserting 3D models in your .notebook files using 3D Tools for SMART Notebook software, you can manipulate those models using Mixed Reality Tools for SMART Document Camera. Manipulating 3D models using Mixed Reality Tools for SMART Document Camera... - Page 76 3. Place the mixed reality cube under the SMART Document Camera, showing one side of the cube to the camera. SMART Notebook software enters Mixed Reality mode and assigns the 3D model to the cube. If there is more than one 3D model on the page, move the cube until the animation on the page indicates that the cube is connected to the 3D model you want to manipulate.
-
Page 77: Disguising 3D Models Before Presenting Them
5. If you’ve purchased a second cube from SMART and there is more than one 3D model on the page, manipulate another 3D model by completing steps 3 and 4 with the other cube. -
Page 78: Using Sketchup Sketching Software And Trimble 3D Warehouse
You can also reveal the 3D model by pressing the hat icon in the lower-left corner. Using SketchUp sketching software and Trimble 3D Warehouse You can use the following 3D tools with 3D Tools for SMART Notebook software and Mixed Reality Tools: SketchUp sketching software Trimble 3D Warehouse (formely Google 3D Warehouse) -
Page 79: Using Sketchup Sketching Software
Trimble 3D Warehouse (formerly Google 3D Warehouse) is an online repository of 3D models. Using this link in the SMART Notebook software Gallery tab, you can search for 3D models and download them to your computer. You can then insert the 3D models into your .notebook files. - Page 80 C H A P T E R 7 Using 3D Tools for SMART Notebook software and Mixed Reality Tools 5. Save the .zip file to your computer. 6. Extract the contents of the .zip file to a folder on your computer. To insert a downloaded 3D model...
-
Page 81: Chapter 8: Troubleshooting
Chapter 8 Troubleshooting This chapter includes troubleshooting information for your SMART Document Camera. Document camera issues Use the following table to troubleshoot issues with your document camera. N O T E These procedures vary depending on your version of Windows operating system and your system preferences. - Page 82 Make sure the USB switch is set to document camera. Make sure your software is up-to-date (you should have at least SMART Notebook software 11 SP1). Make sure the USB cable and the computer USB receptacle are working properly. Make sure the USB to PC setting is set to CAMERA in the document camera's OSD menu.
- Page 83 C H A P T E R 8 Troubleshooting Issue Solution No image appears when Insert an SD/SDHC card or USB drive with stored images, or capture an image to the embedded memory. you press the button. N O T E Images need to be stored in the available memory location in order to enter Playback mode.
-
Page 85: Appendix A: Hardware Environmental Compliance
Consequently, this product also complies with other regulations that have arisen in various geographical areas, and that reference the European Union’s RoHS directive. Packaging Many countries have regulations restricting the use of certain heavy metals in product packaging. The packaging used by SMART Technologies to ship products complies with applicable packaging laws. -
Page 87: Index
2 parts of 3 3D models turning on and off 16 disguising 71 document cameras inserting 63 using with SMART Notebook software 47 manipulating 63 downloading 9 manipulating with Mixed Reality Tools 69 revealing 72 rotating 64 textures 63... - Page 88 18 SD Card view 13, 51 Microscope mode 45 SD/SDHC cards 28 Mixed Reality Tools 7, 60 setup 13 Mixed Reality Tools for SMART Document SketchUp sketching software 73 SMART Notebook 47 Camera 69 SMART Notebook software 9 modes...
- Page 90 SMART Technologies smarttech.com/support smarttech.com/contactsupport...
Need help?
Do you have a question about the 450 and is the answer not in the manual?
Questions and answers