Table of Contents
Advertisement
Advertisement
Table of Contents

Related Manuals for Advanced Bionics Neptune


Summary of Contents for Advanced Bionics Neptune
- Page 1 User Guide...
- Page 2 USER GUIDE for the NEPTUNE Sound Processor ™...
- Page 3 3m (9ft. 10in.) depth. 69.6 kPa Suitable for exposure to relative humidity between 0-95% Ingress Protection (IP) Rating: Rating used to specify strength of an enclosure against ingress of solid particulate matter and moisture. 2 User Guide for the Neptune™ Sound Processor...
-
Page 4: Table Of Contents
Neptune Covers........10... - Page 5 Neptune Connect Wallet ....... . 33 Neptune Swim Cap........33 Zephyr by Dry &...
-
Page 6: Introduction
The Neptune sound processor provides access to the latest sound processing innovations by Advanced Bionics, the market leader in performance. This User Guide will provide all of the information needed to use and care for the Neptune sound processor and its accessories. In addition, this User Guide provides information for troubleshooting basic issues related to the Neptune sound processor as well as important safety information. -
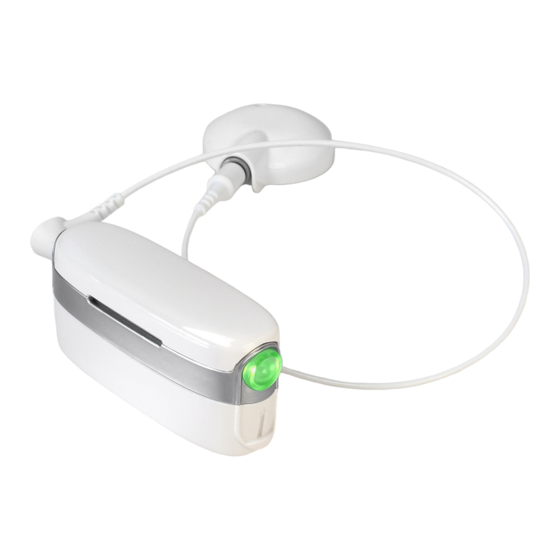
Page 7: The Neptune System
The Neptune System This Section Will Familiarize You With Your Neptune System 1 . 10 . Sound Processor Volume Control 11 . Processor LED Sensitivity Control 3 . 12 . On/Off Button Euro Port Connector 4 . -
Page 8: The System Overview
(9 feet, 10 inches). The Neptune system is not warranted for use in or exposure to sea or lake water. For more information, refer to the ‘IP Rating Information’ section of the User Guide and your Neptune Sound Processor System Limited Warranty. -
Page 9: The Neptune Connect
IntelliLink is another important safety feature for very young children and bilateral implant recipients. The .Neptune .Connect When attached to the sound processor, the Neptune Connect provides access to easy-to-use controls for adjusting volume, microphone sensitivity, and program position. You can also connect to an FM receiver or a battery-operated consumer electronics device (e.g., MP3 player) by plugging these devices directly into the... -
Page 10: The Aquamic
When no longer in a water environment, it is recommended that you remove the AquaMic from your Neptune sound processor and place it in your Zephyr by Dry & Store® or a similar desiccant device to allow it to dry completely. -
Page 11: Neptune Covers
Neptune Connect is not in place. Neptune Covers also allow you to customize the look of your sound processor to suit your personal style. Neptune Color and Battery Covers are offered in a variety of colors to mix and match. -
Page 12: Wearing Your Sound Processor
Neptune sound processor. Wearing .the .Neptune .Sound .Processor The Neptune processor can be worn in a variety of locations using any one of a variety of clips and/or pouches to suit your style. Use of some Neptune accessories may obscure the sound processor LED;... -
Page 13: Using The Pouch
The pouch is intended to allow for multiple wearing options. The pouch attaches to a lanyard, an armband, a belt, or a harness. Neptune pouches are available in a variety of colors and sizes and will accommodate the sound processor with or without the Neptune Connect. -
Page 14: Using The Armband
The armband is intended to attach to your upper arm, typically on the same side as your implant. The Neptune processor can be placed on the armband with or without the Neptune Connect. However, the Neptune Connect should always be removed prior to exposure to water. -
Page 15: Using The Headband
The headband is intended to wrap across your forehead and attach at the back of your head. The Neptune processor can be placed on the headband with or without the Neptune Connect. However, the Neptune Connect should always be removed prior to exposure to water. -
Page 16: Using The Harness
Follow all directions for attachment to avoid possible strangulation due to misuse. No Securing Mechanism Used Some individuals may prefer to wear the Neptune sound processor in a shirt pocket or other locations which do not require the use of a securing mechanism. For maximum comfort, you may wish to remove any previously-attached clip or pouch prior to placing the Neptune processor in the desired location. -
Page 17: Using The Neptune Sound Processor
Advanced Bionics or your clinician. Powering .the .Neptune .sound .processor The ‘on/off’ button is located on the side of the Neptune sound processor. To power on the device, press and hold the ‘on/off’ button for 1-2 seconds. You should notice the orange LED within the button flash to indicate battery charge. - Page 18 3 blinks indicate program three change Note: . .Use .of .some .Neptune .accessories .may .obscure .the .processor .LED; .therefore, . audible .alarms .may .be .desirable .for .use .with .very .young .children .to .ensure . caregiver .notification .of .loss .of .lock .or .low .battery .status...
-
Page 19: Understanding Audible Alarms
Fully remove and re-insert battery to reset processor. Note: .If .the .Neptune .processor .is .placed .within .a .retention .device .(e g , .pouch) .or . worn .beneath .clothing, .the .processor .audible .alarms .may .be .dampened .and .more . difficult .for .caregivers .to .detect... -
Page 20: Removing The Battery Cover
Push the negative end (-) of the battery into the opposite contact in the processor housing. Note: .If .the .AAA .battery .is .inserted .in .the .wrong .orientation, .the .Neptune .sound . processor .will .not .turn .on Insert battery only as shown to prevent loss of function... -
Page 21: Attaching The Battery Cover
.The Universal Headpiece (UHP) .The AquaMic The Universal Headpiece The UHP is designed for use with the Neptune processor during daily activities with the exception of swimming and bathing. The AquaMic The AquaMic is designed for use during swimming and bathing and carries an IP68 rating for water and particulate matter (e.g., dust, sand) resistance. -
Page 22: Adjusting Headpiece Magnet Strength
‘Instructions for Use’ for additional information regarding adjustment of headpiece magnet strength. If you experience any redness, irritation, or discomfort, discontinue use of your headpiece immediately and contact your cochlear implant center. If headpiece magnets are swallowed, seek immediate medical attention. User Guide for the Neptune™ Sound Processor 21... -
Page 23: Removing Headpiece Color Caps
Note: .The .Neptune .Connect .is .not .intended .for .water .use, .and .should .be .removed . from .the .sound .processor .prior .to .swimming .or .bathing .Additionally, .you .should . - Page 24 Attach your Neptune Color Cover when the Neptune Connect is not in use. If you choose to leave the Neptune Connect attached during use, any changes to volume and sensitivity take effect immediately.
- Page 25 Release .Latch Hold the sound processor in one hand. Press the release latch located on the end of the Neptune Connect until you feel it disconnect from the sound processor. Store in a safe place, such as your Neptune Connect Wallet or Neptune Carrying Case, when not in use.
-
Page 26: Changing Programs
To change programs: Slide the program switch located on the front face of the Neptune Connect to the desired program position. You may need to sync the Neptune Connect with the sound processor prior to changing the program. -
Page 27: Changing Sensitivity
Turn the dial to the desired setting. Turn the dial in a clockwise direction to increase or a counter-clockwise direction to decrease the volume Note: .You .may .need .to .sync .the .Neptune .Connect .with .the .sound .processor .prior . to .changing .the .volume The volume range available within a program can be changed or disabled by your implant professional in the SoundWave™... -
Page 28: Using Fm
With the other hand, align the three FM connector pins with the Euro connector on the top of the Neptune Connect. Take care to ensure that the FM receiver pins match the size and orientation of the holes on the Neptune Connect. Failure to do so may cause damage to the FM receiver and/or the Neptune Connect. -
Page 29: Listening To The Microphone And Fm Receiver
Set the sound processor program switch to the monitor (∆) position. Using .the .Telephone There are a variety of ways to use the telephone with your Neptune sound processor. Consult with your clinician for recommendations regarding telephone use and which of the following options are best for you: 1. -
Page 30: Aaa Battery Information
The patch cable connects to the headset connector of your telephone on one end and the auxiliary connector of your Neptune Connect on the other. An Audio Interface Cable is available from AB, or you may require a custom-made patch cable from an independent vendor. -
Page 31: Using Neptune Accessories
Neptune is compatible with the Phonak MLxi wireless FM receiver. For instructions on how to connect an FM receiver to the Neptune Connect, refer to the ‘Using FM’ section of the User Guide or to the Neptune Connect ‘Instructions for Use.’... -
Page 32: Color Customization
Do not swim or bathe with the Neptune Connect and audio accessories attached to the sound processor. Color .Customization Neptune Covers allow you to customize the look of your sound processor to suit your personal style. Neptune Color and Battery Covers are offered in a variety of colors to mix and match. -
Page 33: Battery Cover
Battery Cover Battery Covers provide an airtight seal and allow use of your Neptune sound processor while swimming or bathing. A Battery Cover should be in place on your sound processor at all times during Neptune use. To attach the Battery Cover: Hold the sound processor in one hand, with AAA battery installed. -
Page 34: Neptune Carrying Case
. . Neptune .Connect .Wallet When the Neptune Connect is not in use, it is recommended that you store it in the Neptune Connect Wallet. The wallet is intended to protect the Neptune Connect and provide an easy means of transporting it wherever you go. The Neptune Connect wallet is suitable for storage on your key chain, in a purse, backpack, briefcase, or pocket. -
Page 35: Zephyr By Dry & Store
Zephyr .by .Dry .& .Store® A Zephyr by Dry & Store is included with your Neptune system. The Zephyr is designed to remove moisture from your equipment and is intended for daily use with your Neptune system components. For detailed instructions on how to use and care for the Zephyr, refer to the ‘Operating Instructions’... -
Page 36: Care Of Your Neptune System
It is important to properly care for your Neptune system to ensure optimal hearing at all times. If you wish to clean any part of your Neptune system, use only a damp cloth to wipe the part(s). Do not expose any part of the system to additional solvents (e.g., soap, bleach). -
Page 37: Recommended Neptune System Operating And Storage Temperatures
45°C (115°F) Storage temperature -20°C (-4°F) 55°C (131°F) The Neptune system meets the temperature safety requirements of IEC 60601- 1:2005 in ambient temperatures up to 36.8°C (98°F). Approved .Power .Sources Advanced Bionics has verified Neptune function with the power sources listed below;... -
Page 38: Warnings
Warnings General .Warnings • Do not expose any part of the Neptune system to extreme heat, such as an oven, microwave, or hair dryer. • Using your sound processor accessories and parts contradictory to their intended use (e.g., mouthing, chewing) may cause bodily harm •... -
Page 39: Electrostatic Discharge (Esd)
Do not connect to mains powered sound sources (eg. TV, computer) unless using a mains isolation cable. • Do not swim or bathe with the Neptune Connect and audio accessories attached to the sound processor. • Your processor or headpiece should be serviced only by AB. Do not attempt to open or repair the parts. -
Page 40: Airport Security Metal Detectors
Avoid placing any system microphones in any checked or carry-on baggage that is screened with X-ray. During airport security screenings, the sound processor and microphone should be worn through the metal detector or examined by hand. User Guide for the Neptune™ Sound Processor 39... -
Page 41: Troubleshooting Your Neptune System
If these measures do not resolve the problem, contact your clinician or Advanced Bionics immediately for further assistance. If no sound is heard or a solid red LED is indicated on the Neptune processor LED, try the following troubleshooting steps: Depress and hold the ‘on/off’... - Page 42 AquaMic and/or AquaMic Color Cap. Unaided listeners may perform a listening check of the headpiece microphone as described in the ‘Listening to the Microphone and FM Receiver’ section of the User Guide. User Guide for the Neptune™ Sound Processor 41...
- Page 43 Rinse parts with clean water. Follow typical AquaMic post-submersion care instructions. Place Neptune processor and AquaMic in your Zephyr by Dry & Store® or similar desiccant device and allow to dry completely. If any problem is noted following drying, contact your clinician or Advanced Bionics for further assistance.
- Page 44 If the solid red light persists following re-attachment of the Neptune Connect, power cycle the Neptune processor (i.e., depress and hold the ‘on/off’ button until the processor powers down; then, power on again by depressing and holding the ‘on/off’ button for at least 1 second).
- Page 45 The Neptune LED is a programmable feature which provides diagnostic information regarding battery life, program setting, microphone function, or processor system status. Refer to the ‘Understanding Neptune LEDs’ section of the User Guide for an explanation of the expected LED behavior(s).
- Page 46 If there are no blinks after battery replacement, clean the contacts with a hearing aid brush or damp cloth or cotton swab. If the problem continues, contact your clinician or Advanced Bionics for further assistance. If the LED behaves differently following processor replacement or...
-
Page 47: Guidance And Manufacturer's Declaration
Table 7: Guidance and Manufacturer’s Declaration-Electromagnetic emissions Guidance and manufacturer’s declaration –electromagnetic emissions The Neptune system is intended for use in the electromagnetic environment specified below. The customer or the user of the Neptune system should assure that it is used in such an environment. - Page 48 Table 8: Guidance and Manufacturer’s Declaration-Electromagnetic immunity Guidance and manufacturer’s declaration – electromagnetic immunity The Neptune system is intended for use in the electromagnetic environment specified below. The customer or the user of the Neptune system should assure that it is used in such an environment.
- Page 49 Recommended separation distances between portable and mobile RF communications equipment and the Neptune system The Neptune system is intended for use in an electromagnetic environment in which radiated RF disturbances are controlled. The customer or the user of the Neptune...
- Page 50 The following table details the Neptune processor and its compatible hardware parts with the corresponding Advanced Bionics model number. Advanced Bionics supplies a range of accessories for use with the Neptune processor, although not all accessories may be included in your sound processor kit or listed here. For addi- tional information regarding the Neptune processor or its accessory parts, contact your clinician or Advanced Bionics.
-
Page 51: Contact Us
Advanced Bionics, Neptune, IntelliLink, AutoSound, SoundWave, HiRes, HiRes Fidelity 120, ClearVoice, and Built Kid Tough are trademarks of Advanced Bionics in the United States of America and other countries. Dry & Store® is a registered trademark of Ear Technology Corporation VELCRO®... - Page 52 Suite 4203, 42/F, Tower One Oficina 902 +33.3.89.65.98.00 Lippo Centre, 89 Queensway Bogota, Colombia +33.3.89.65.50.05 Fax Hong Kong +571.691.59.00/05/14 europe@AdvancedBionics.com +852.2526.7668 +571.621.84.42. Fax +852.2526.7628 Fax LA@AdvancedBionics.com AP@AdvancedBionics.com 9050050232 Rev B ©2011 Advanced Bionics, LLC and its affiliates. All rights reserved.
Need help?
Do you have a question about the Neptune and is the answer not in the manual?
Questions and answers