Table of Contents
Advertisement
Your product has been engineered and manufactured to Ryobi's high standard for dependability, ease of operation, and
operator safety. When properly cared for, it will give you years of rugged, trouble-free performance.
WARNING:
To reduce the risk of injury, the user must read and understand the operator's manual before using
this product.
Thank you for buying a Ryobi product.
SAVE THIS MANUAL FOR FUTURE REFERENCE
OPERATOR'S MANUAL
AIRgrip MultiTASKit
EMM0001
™
Advertisement
Table of Contents

Related Manuals for Ryobi AIRgrip MultiTASKit EMM0001


Summary of Contents for Ryobi AIRgrip MultiTASKit EMM0001
- Page 1 AIRgrip MultiTASKit ™ EMM0001 Your product has been engineered and manufactured to Ryobi’s high standard for dependability, ease of operation, and operator safety. When properly cared for, it will give you years of rugged, trouble-free performance. WARNING: To reduce the risk of injury, the user must read and understand the operator's manual before using this product.
-
Page 2: Table Of Contents
This tool has many features for making its use more pleasant and enjoyable. Safety, performance, and dependability have been given top priority in the design of this product making it easy to maintain and operate. Please visit our website at www.ryobitools.com to register this product. Model No. EMM0001... -
Page 3: General Safety Rules
GENERAL SAFETY RULES n Always turn the laser level off when not in use. Leaving WARNING! the tool on increases the risk of someone inadvertently staring into the laser beam. READ AND UNDERSTAND ALL INSTRUCTIONS. Fail- n Do not operate the unit in combustible areas such as in ure to follow all instructions listed below, may result in the presence of flammable liquids, gasses or dust. -
Page 4: Symbols
SYMBOLS Some of the following symbols may be used on this tool. Please study them and learn their meaning. Proper interpreta- tion of these symbols will allow you to operate the tool better and safer. SYMBOL NAME DESIGNATION/EXPLANATION Volts Voltage Amperes Current Hertz... - Page 5 To avoid serious personal injury, do not attempt to use this with original receipt for a replacement unit at no charge. product until you read thoroughly and understand com- Call 1-800-525-2579 for your nearest RYOBI AUTHORIZED pletely the operator’s manual. Save this operator’s manual SERVICE CENTER.
-
Page 6: Features
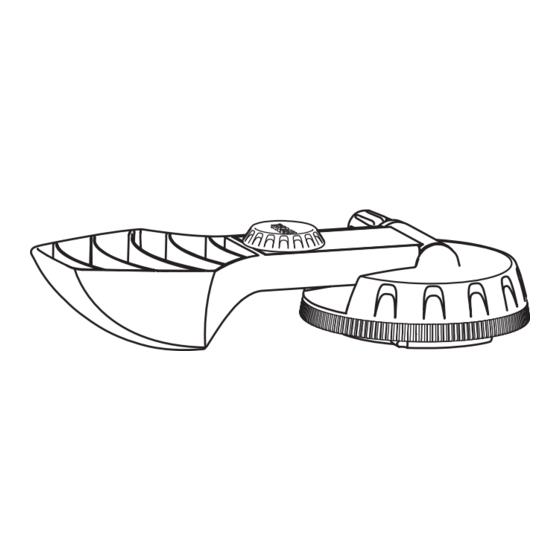
FEATURES PRODUCT SPECIFICATIONS Vacuum Base Recommended Use..............................Indoors Power Supply ..........................2 AA, 1.5 Volt Batteries Battery Life ....................4 Hours Continuous Use - Alkaline Batteries Operating Temperature..........................32°F to 104°F Weight Capacity (on smooth surfaces)........................10 lbs. Laser Head Length of Laser Line............................Up to 30 ft. Laser............................ - Page 7 FEATURES MULTI-FUNCTION BASE CASE HOOK-AND-LOOP STRAP ROUGH-SURFACE ADAPTOR Fig. 2 KNOW YOUR MULTITASKIT LASER LEVEL ATTACHMENT ™ See Figures 1 - 2. The laser level attachment emits a laser line of up to 30 feet Before attempting to use this product, familiarize yourself and can be rotated 360˚.
-
Page 8: Assembly
ASSEMBLY UNPACKING WARNING: This product has been shipped completely assembled. If any parts are missing, do not operate this tool. Please n Carefully remove the tool and any accessories from the return to the place of purchase or call 1-800-525-2579 box. - Page 9 OPERATION TURNING THE VACUUM BASE ON/OFF See Figure 4. Press the button located on the side of the vacuum base to turn it ON and OFF. Always wait for at least 5 seconds between stopping and restarting the unit. USING THE AIR-GRIP VACUUM BASE ™...
- Page 10 OPERATION USING THE MULTI-FUNCTION BASE See Figures 8 - 9. To use the hook-and-loop strap or magnetic mounts, the multi-function base must be installed. To install the base: RAISED RIDGE n While holding the vacuum base with the on/off button facing you, align the raised ridge on the multi-function base with the groove on the vacuum base.
- Page 11 OPERATION REMOVING/INSTALLING ATTACHMENTS See Figure 11. To install an attachment on the vacuum base, align the lock- ing tabs on the desired attachment to the openings on the vacuum base so the molded-in arrow is directly centered above the battery door. Seat the attachment on the base and rotate until you hear the attachment click into place.
- Page 12 OPERATION USING THE LIGHTING ATTACHMENT See Figure 14. The lighting attachment uses three medium-intensity LED lights to provide extra illumination in dark workspaces. The light beam can be adjusted up to 90˚, and the lighting at- tachment can be rotated 360˚. Turn the lights on and off by depressing the on/off button located on top of the attach- ment.
-
Page 13: Maintenance
MAINTENANCE n To clean the laser lens and lighting lens, if needed, use WARNING: ONLY a soft cloth or cotton swab moistened with glass cleaner. To avoid serious personal injury, always remove the n Check the batteries regularly to avoid deterioration. Re- batteries from the tool when cleaning or performing any move the batteries from the vacuum base, laser attach- maintenance. -
Page 14: Troubleshooting
TROUBLESHOOTING Problem Possible Cause Solution Vacuum not running Batteries are low Replace batteries. Press on/off button. Power is turned off Laser line projection is weak Batteries are low Replace batteries. Laser line is hard to see Light in area is too bright Dim light in the work area or use laser-enhancing glasses. - Page 15 NOTES...
-
Page 16: Parts Ordering / Service
Please call 1-800-525-2579 for the nearest Ryobi Authorized Service Center. You can also check our web site at www.ryobitools.com for a complete list of Authorized Service Centers.
Need help?
Do you have a question about the AIRgrip MultiTASKit EMM0001 and is the answer not in the manual?
Questions and answers