Advertisement
JOS-1A, JOS-1V, JOS-1F
HANDS-FREE COLOR VIDEO INTERCOM
INTERPHONE VIDEO COULEUR MAINS LIBRES
INTERCOMUNICACIÓN CON VÍDEO A COLOR MANOS LIBRES
VIDEOCITOFONO A COLORI A VIVAVOCE
FREISPRECH-FARBVIDEO-SPRECHANLAGEN-HAUPTSTELLE
INSTALLATIONS- UND BEDIENUNGSANLEITUNGHANDBUCH
Thank you for selecting Aiphone for your communication and security needs. Please read this manual carefully for proper system
operation. For future reference, keep manual in a safe place.
HANDENVRIJE KLEURENVIDEOFONIE
INSTALLATION & OPERATION MANUAL
MANUEL D'INSTALLATION ET D'UTILISATION
MANUAL DE INSTALACIÓN Y OPERACIÓN
INSTALLATIE- EN BEDIENINGSHANDLEIDING
MANUALE D'INSTALLAZIONE E USO
J O -1 M D
M A S T E R M
O N IT O R S
T A T IO N
FK1899 A P0713KD 55060
J O S - 1 A
J O -D A
V ID E O D O
O R S T A T IO
N
J O S - 1 V
J O -D V
V ID E O D O
O R S T A T IO
N
J O S - 1 F
J O -D V F
V ID E O D O
O R S T A T IO
N
Advertisement
Table of Contents

Subscribe to Our Youtube Channel
Related Manuals for Aiphone JOS-1A


Summary of Contents for Aiphone JOS-1A
- Page 1 V ID E O D O O R S T A T IO Thank you for selecting Aiphone for your communication and security needs. Please read this manual carefully for proper system operation. For future reference, keep manual in a safe place.
- Page 2 * This manual was created by Aiphone Co., Ltd., all rights reserved. Copying, in part * Locations subject to frequent vibration or impact. or in whole, this manual without prior permission from Aiphone Co., Ltd. is strictly forbidden.
-
Page 3: Package Contents
PACKAGE CONTENTS jos-1A jos-1V jos-1F jo-1mD Front panel main unit jo-DA jo-DV Flush mount special screw back box jo-DVF manual special screwdriver special screwdriver (Hexagonal wrench) Transparent name plate x2 NoTEs: •... -
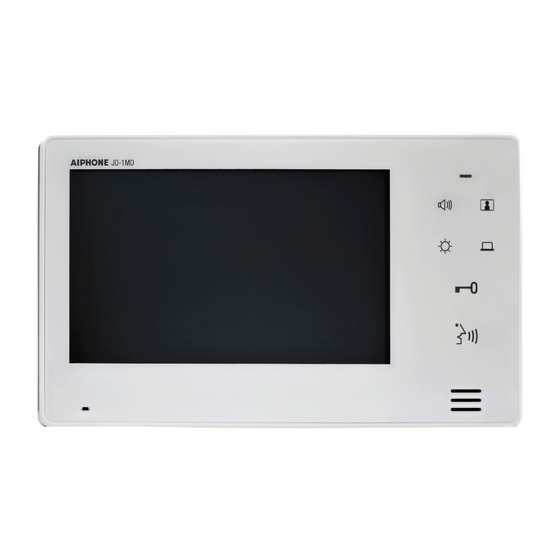
Page 4: Part Names
PART NAMES Remove protective film before use. Volume control button jo-1mD [During standby] Adjust the calling volume. Volume adjustment range: (mute), [During communication or monitoring] Color LCD screen Adjust the communication volume. Displays camera images during door Volume adjustment range: station call-ins, communication with door station, and door station monitoring Status LED (orange) -
Page 5: Installation
INSTALLATION Cable Use PE (polyethylene)-insulated PVC jacket cable. Never use individual conductors, twisted pair cable, or Parallel or jacketed 2-conductor, mid-capacitance, non-shielded coaxial cable. cable is recommended. Wiring method, wiring distance Ø 0.65 mm 22 AWG Ø 0.8-1.2 mm 20-16 AWG 50 m 165' 100 m... - Page 6 MOUNTING jo-1mD <Back wiring> Fasten the mounting 3-gang box bracket to the wall Wires 83.5mm (3-5/16") mounting bracket (attached to the unit with shipment) 1. Press release button to insert or remove wire. 2. Insert wire into the terminal. Mount the unit on the mounting screw ×...
- Page 7 jo-DA <Back wiring> Mount the main unit on Removing the front panel Remove the main unit from the mounting frame, the mounting frame by Mounting screw x 2 Place " UP" upwards <Bottom surface> and fit the front panel on. (Screw shaft: Ø4.1) loosening the locking screws (Slotted Head: Ø8.2 or less...
- Page 8 WIRING Insert wires securely into each terminal as shown. Video door station master monitor station JO-DA JO-DV JO-DVF A1 A2 JO-1MD Electric door strike AC transformer EL-12s Door release (To optional units) An EL-12S (AC 12 V, 0.125 A, DC 12 V, 0.2 A) or (AC/DC 24V, 0.5A N/O dry closure contact) equivalent part and a separate AC transformer (or (Minimum contact: 100mV DC, 0.1mA)
-
Page 9: Answering A Door Call
OPERATIONS Answering a door call Push Call button. The call tone sounds, an image appears on screen. • The screen turns off after approx. 45 seconds if not answered. Push , and after the beep, communicate hands-free (hands-free mode). After finishing communication, push and communication will end after the beep. -
Page 10: Night Illumination
monitoring door station Push in standby mode. The video image from the door station and the incoming audio is heard. If you do not push , the caller will not hear sounds from the inside station. Push to end monitoring. NoTEs: •... -
Page 11: Adjust Screen Brightness
Adjust screen brightness Push when the screen is difficult to see. The screen brightness changes from [ 1] (the darkest) to [ 5] (the brightest) during communication or monitoring. NoTEs: • The current brightness level is displayed on the screen and disappears in approx. - Page 12 MEMO...
- Page 13 Aiphone warrants its products to be free from defects of material and workmanship under normal Aiphone garantiza que sus productos están libres de defectos de material y mano de obra, en uso y use and service for a period of two years after delivery to the ultimate user and will repair free of servicio normal, por un período de dos años después de la entrega final al último usuario y reparará...
Need help?
Do you have a question about the JOS-1A and is the answer not in the manual?
Questions and answers
We have a Video intercom device to see people visiting our home. The model is JO-1MD. At present, it does not respond to external devices. None of the other buttons responds to both inside and external devices. After being reset, it still does not function. The internal device inside the phone shows a blinking light on top. What should we do to rectify the fault?
If the Aiphone JOS-1A video intercom is not responding and shows a blinking light, follow these steps:
1. Check for Wiring Issues: If a short is detected between A1 and A2 of the door station, the unit stops functioning, and the Status LED flashes rapidly. Inspect and correct any wiring issues.
2. Reboot the Device: Press the RESET button on the station to reboot it.
3. Power Cycle the System: If the issue persists, turn off the power supply and restart the device.
After rebooting, note that brightness, communication volume, and call tone volume settings will return to default.
This answer is automatically generated