Table of Contents
Advertisement
Advertisement
Table of Contents

Related Manuals for Strong SRT 5429


Summary of Contents for Strong SRT 5429
- Page 1 High Definition Digital Terrestrial Receiver USER’S MANUAL...
-
Page 2: Important Safety Instructions
Important Safety Instructions • To avoid electric shock, do not open the unit. • There are no user-serviceable parts inside. Servicing can only be performed by qualified service personnel. • Connection can only be to a 240V AC mains supply. •... -
Page 3: Overview
Overview Thank you for purchasing this Strong Digital Terrestrial Television Receiver. This product has been manufactured in accordance with strict quality control procedures and is fully compliant with Australian specifications. Your new receiver will enable you to experience superior picture and sound quality, widescreen images, extra channels plus a variety of new features. -
Page 4: Table Of Contents
Contents Important Safety Instructions ............................2 Overview .................................... 3 Main Features ..................................3 Checklist of Accessories..............................5 Controls and Indicators ..............................6 Front panel ........................错误!未定义书签。 Rear panel..............................7 Remote Control ................................. 8 Installing the batteries in the remote control ....................9 How to Connect................................ -
Page 5: Checklist Of Accessories
Checklist of Accessories The following accessories have been supplied with your . If any were not supplied, contact the retailer from whom you purchased the unit. User’s manual : 1 Remote control : 1 Batteries (AAA type) : 2 CVBS Composite video and audio cable (yellow, white, red) : 1... -
Page 6: Controls And Indicators
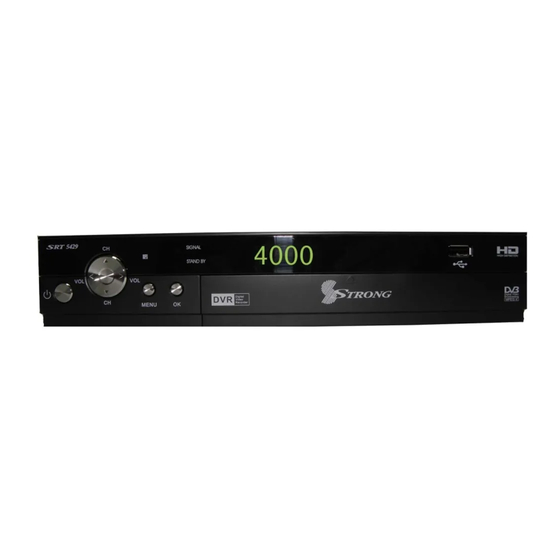
Controls and Indicators Front panel To switch the receiver between stand-by mode and power-on mode. To change the volume, or next option in a menu. To select the previous channel, or previous option in a menu. To display the main menu,or return to a previous menu To confirm menu selection. -
Page 7: Rear Panel
Rear panel Name Connector Function LOOP OUT IEC 169-24 female Loop-through output to VCR, etc. HDMI HDMI cable HDMI video-and-audio connection S/PDIF RCA Coaxial Digital audio output (coaxial) Audio (Left and RCA cinch Left and right audio for Component or •... -
Page 8: Remote Control
Remote Control 8. PAGE / : To move to the next or previous 1. STANDBY: To switch to stand-by mode when the receiver is on (or vice versa) page 2. Numeric Keys (0–9): To choose a channel directly, CH ( / ) ▲... -
Page 9: Installing The Batteries In The Remote Control
To fast forward in a movie or music track 24.TIMER:To access timer menu directly. To go to the end of a movie or music 25. INFO: To show information about the track, or show the next photo current program 18. MUTE: To turn the sound on or off 26. -
Page 10: How To Connect
How to Connect Refer to the diagram on page 7 for the location of the sockets identified by numbers in the procedures in this section. Make sure you have installed the batteries in the remote control before you begin connecting the receiver to your TV. -
Page 11: A: High Definition Multimedia Interface
A: High Definition Multimedia Interface If your TV has an HDMI socket, connect an HDMI cable between the HDMI socket on the (socket 2) and the HDMI socket on your TV. A HDMI connection incorporates video and audio. You do not need to make separate connections for audio. A HDMI cable is not provided with the B: Y/Pb/Pr (Component) using a RCA blue–red–green cable For Component video, connect to your TV with a Y/Pb/Pr Component cable (with blue, red and green leads,... -
Page 12: C: Cvbs (Composite) Using The Supplied Rca Red-White-Yellow Cable
C: CVBS (Composite) using the supplied RCA red–white–yellow cable Using the appropriate socket colour-coding on sockets 4 and 7, you can connect to your TV with the supplied red–white–yellow RCA cable. This gives you CVBS (Composite Video) and MPEG-4 stereo audio. For video, connect the yellow RCA lead between the yellow video socket (socket 7) on the and the corresponding socket on your TV. -
Page 13: Dolby Digital
Step 3: Coaxial connections Dolby Digital Dolby digital bitstream audio S/PDIF can be achieved using a coaxial cable. (This cable is not supplied.) The cable should be connected between socket 3 on the and the S/PDIF socket on your Dolby Digital decoder amplifier. -
Page 14: Getting Started
TV/AV or VIDEO button on your TV remote control. (Refer to your TV user’s manual for instructions.) The Strong banner appears on your TV screen, followed by a message asking if you want to automatically search for channels and stations. -
Page 15: Operation
Operation Basic operations Selecting a channel There are a number of ways to select a TV channel or radio station: • Number pad on the remote control: If you know the channel number, enter the number using the numeric keys on the remote control and then press OK. (If you don’t press OK, the channel selected appears after approximately 2 seconds.) To choose a radio station using the number keys, press TV/RADIO first and then enter the number. -
Page 16: Adjusting The Volume
• Favourites list: Press FAV on the remote control to see the first channel or station in your favourites list. Press to see each favourite in turn. See “Favourites” on page 17 for instructions on creating a favourites list. • Scroll: Press on the remote control to scroll through the channels in channel number order. -
Page 17: Closed Captions
Closed captions Closed captions are the spoken words written on the screen. This option is particularly useful for the hard- of-hearing. To turn on closed captions (or turn them off): 1. Press the SUB button on the remote control. The Subtitle window appears. 2. -
Page 18: Adding Channels Or Stations To Your Favourites List
You display your favourites lists by pressing FAV on the remote control. You then press to step through each favourite. Stop pressing when you reach the favourite you want. Adding channels or stations to your favourites list Follow this procedure to add channels or stations to your favourites list, or to remove them. 1. - Page 19 6. If you want to select another channel or station as a favourite, repeat from step 4. 7. Press EXIT. A message appears asking you to confirm that you want to save the changes. 8. To Save,Select Yes,To cancel, Select NO. 9.
-
Page 20: Selecting A Favourite To Watch Or Listen To
Selecting a favourite to watch or listen to Press FAV on the remote control. The first channel or station or channel in your favourites list appears. Note that the information panel reads FAV channel. Organising channels and stations The Channel Manager option on the Main Menu enables you to organise channels and stations. 1. -
Page 21: Usb
5.MOVE:Press until the channel or station you want to lock is highlighted.Press AUDIO button(the green button),the Move logo will appear on the sreen. Press to move to the place what you want. 6.DELETE:Press until the channel or station you want to delete is highlighted. Press the INFO button on the remote contron,the following will appear “Do you want to delete this.”... -
Page 22: Usb Update
. You will need a USB memory stick (not supplied with ). Visit the Strong website for announcements of software upgrades. 1. Once you have obtained an upgrade file, transfer it to a USB memory stick. You need to place the file at the root (or top) level on the memory stick, not inside a folder or directory. -
Page 23: Instructions For Recording Tv Programs
for recording. Instructions for recording TV programs: 1. To record a TV program you are currently viewing press the RECORD button. The default recording time is 3 Hours. If you wish to edit the default recording time, press the RECORD button again then manually enter the desired time using the numeric buttons. -
Page 24: Selecting A Partition And Partitioning Your Usb Hdd
was first activated. To change channels you must stop the receiver Timeshifting. 3. To stop the Timeshift feature press the STOP button and press OK to confirm or EXIT to cancel. 4. There is no default time limit for the Timeshift feature. The receiver will Timeshift for as long as HDD space allows. -
Page 25: Rescanning For Channels And Stations
To display more information than is currently shown about a selected channel, you can move the channel name pane (at the left of the window) and move the program name pane & press OK. (at the right of the window) and vice versa. •... - Page 26 Manual Searching NOTE: Automatic searching (described above) is suitable in most cases. You might use manual searching if you have deleted a channel and now want to access it again. In this case, you would just search for that particular channel. 1.
-
Page 27: Multi-Language And Dolby Digital Broadcasting
Multi-language and Dolby Digital broadcasting If a channel is being broadcast in more than one audio language, you can choose which language to listen to. Similarly, if a channel is being broadcast in more than one audio format, you can choose which format to listen to. -
Page 28: User Settings
User Settings Audio–Visual (AV) settings 1. Press MENU on the remote control. The Main Menu appears. 2. If User Setting is not highlighted on the main menu, press until it is and then press OK. The User Setting menu appears. If OSD Setting is not highlighted on the menu, press until it is and then press... -
Page 29: Parent Control
Note that some of these settings are restricted by the type of connection you have made between the and your TV. For example: • If you have connected the to a Dolby Digital decoder amplifier, the S/PDIF output setting must be set to AC3. 4. -
Page 30: Timer Settings
4. If Parent Lock is not highlighted, press until it is and then press OK The Parent Lock menu appears. You can press to select the Level of parental guidance (All, R and above, AV and above, MA and above, M and above, PG and above and G above). 5.Press to move to the Change Password option,Press OK to Old Password option and enter the current PIN using the number keys on the remote control. - Page 31 4. Press SUB key ( the red button) to add a timer you want to.The Event Add screen appears. 5, All the timer options should now be available to you (see below). Press to activate to select a timer you want to set.You can Edit and Delete the timer. 6,If you have selected a timer that has already been set and want to edit it, press the AUDIO key(the green button) to edit the timer.
-
Page 32: System Maintenance
OK. The System Settings window appears. Make a note of the information on this window if you are intending to contact Strong for technical support. 3. Press EXIT or MENU twice to return to normal viewing. - Page 33 The USB window appears. 5.Select USB Update and press OK. Receiver will automatically search for software file on USB memory stick and will load new software on to receiver. NOTE: the updated file must be “STRONG5429A.AP”They must be at the root level on the memory stick, not inside a folder or directory.
-
Page 34: Clearing And Resetting Data
Clearing and resetting data You can reset the , by restoring the unit to the default settings it had when it left the factory. This clears all channels, stations, preferences and other user settings. You will need to rescan for channels and stations before you can continue watching digital TV or listening to digital radio. -
Page 35: Troubleshooting
Troubleshooting There may be a number of causes of abnormal operation. Occasionally receivers can hang (just as a PC will do from time to time). In this case, you should disconnect the from mains power, wait 30 seconds and then reconnect it to mains power. If the unit is still not operating correctly, refer to the following table for the indicated problem and likely solution. -
Page 36: Support
Please email us at: tech@strong.com.au Product Return Tracking: If you need to send your receiver to Strong for repair or evaluation, please keep a record of the unit’s serial number. This will ensure ease of tracking and identification on your behalf. -
Page 37: Specifications
Specifications Input Connector Antenna IEC 169-2 Female Output Connector – RF Loop Out IEC 162-2 Male Frequency range 174MHz–230MHz, 474MHz–868MHz Tuner Input impedance 75Ω & Channel Decoder IF bandwidth 7 and 8 MHz (switchable) Code Rate 1/2, 2/3, 3/4, 5/6, 7/8 Guard Interval 1/4, 1/8, 1/16, 1/32 Standard... - Page 38 60 WEDGEWOOD ROAD, HALLAM, VICTORIA 3803 PH: +61 3 8795 7990 FAX: +61 3 8795 7991 TECHNICAL SUPPORT: 1800 820 030 STRONG & CO. (FAR EAST), LTD. P. O. BOX 85, YOKOHAMA, KANAGAWA-KEN JAPAN 231-91 FAX: +81 45 651-1842 www.strong.com.au tech@strong.com.au...
Need help?
Do you have a question about the SRT 5429 and is the answer not in the manual?
Questions and answers