
Related Manuals for Daikin BRC230Z4


Summary of Contents for Daikin BRC230Z4
-
Page 1: Wired Remote Controller
WIRED REMOTE CONTROLLER OPERATION MANUAL MODELS : BRC230Z4 BRC230Z8 BRC24Z4 BRC24Z8... -
Page 3: Table Of Contents
CONTENTS READ BEFORE OPERATION Name and Functions of Buttons ······························ 2 Preparation before Operation ·································· 4 OPERATION FAN · DRY · AUTO · COOL · HEAT Operation ········ 6 TIMER Operation ···················································· 8 SIMPLE 7 DAY TIMER Operation ························· 10 MULTI 7 DAY TIMER Operation ····························... -
Page 4: Read Before Operation
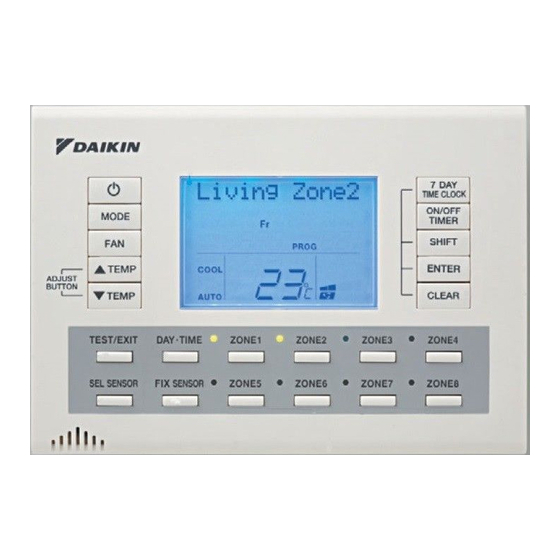
Name and Functions of Buttons ● Two remote controllers can connect to the system. In that case, the remote controllers will work as master and sub remote controllers respectively. The sub remote controller is the same in function as the master remote controller except for time and day settings, which can be set in the master remote controller only. - Page 5 ON/OFF button CLEAR button Press this button to turn the air Press this button to cancel settings. conditioner ON and OFF. TEST/EXIT button MODE selector button Press this button to exit programs. Press this button to select the AUTO/ COOL/HEAT/DRY/FAN mode. DAY/TIME button Press this button to go to the clock and FAN setting button...
-
Page 6: Preparation Before Operation
Preparation before Operation ■ Turn the breaker ON Turn the breaker ON if nothing is displayed on the LCD of the remote controller. ■ Time and Day Settings * If two remote controllers are connected, time and day settings can be made in the master remote controller only. - Page 7 Press “ button” to enter the settings. ● The set time and day will be displayed. ■ To cancel Time and Day Settings Press “ button”. ● The time and day setting screen will appear. Press “ button” for at least 4 seconds.
-
Page 8: Operation
FAN · DRY · AUTO · COOL · HEAT Operation The air conditioner operates with the operation mode of your choice. From the next time on, the air conditioner will operate with the same operation mode. ■ To start operation Press “... - Page 9 ■ To change the airfl ow setting Press “ button” and select an airfl ow rate. ● The volume of air is selectable from two levels while the air conditioner is in either normal mode or AUTO fan mode. ■ Note on HEAT operation ●...
-
Page 10: Timer Operation
TIMER Operation Timer functions are useful for automatically switching the airconditioner on or off at night or in the morning. You can also use ON TIMER and OFF TIMER in combination. ■ To use ON TIMER and OFF TIMER operation ●... - Page 11 ■ To cancel ON TIMER and OFF TIMER operation Press “ button” to select ON TIMER or OFF TIMER. ● The timer setting is displayed. Press “ button” for at least 4 seconds. ● The setting that has been made is cleared. ●...
-
Page 12: Simple 7 Day Timer Operation
SIMPLE 7 DAY TIMER Operation ■ To use SIMPLE 7 DAY TIMER operation ● Make sure the day of the week and time are set. If not, set the day of the week and time. (page 4.) Press “ button”. ●... - Page 13 Press “ button” and select time. ● Set the OFF TIMER. ● The time is selectable in 10 minute increments between 00:00 and 23:50. “ ” blinks. Press “ button”. ● The MODE setting section is selected. “FAN” blinks. Press “ button”...
- Page 14 SIMPLE 7 DAY TIMER Operation Press “ button”. ● To complete the timer setting, press “ button”. The normal display appears again and “PROG” is displayed. Press “ button” twice to enter program 2 (If required). ● To set the timer for another day of the week, repeat the procedure from step 1 (page10.) or refer to page 13 “copy mode”...
- Page 15 ■ Setting SIMPLE & MULTI 7 DAY TIMER using copy mode ● A setting can be copied to the setting for the next day. Press “ button”. ● Press the button and select the program number of the desired day of the week to copy. “...
-
Page 16: Multi 7 Day Timer Operation
MULTI 7 DAY TIMER Operation You can set SIMPLE 7 DAY TIMER, zone control, and thermistor switching. ■ To use MULTI 7 DAY TIMER operation Press “ button” for at least of 4 seconds. ● Each time the button is pressed, the day and program number will shift. - Page 17 Press “ button”. ● Switch the thermistor sensor. ● Switching of thermistor sensor is available only if an optional product is installed, with the exception of master and indoor sensors. Press “ button”. ● The thermistor sensor position is fi xed. “...
-
Page 18: Explanation Of The 7 Day Timer Operation
Explanation of the 7 DAY TIMER operation For 7 DAY TIMER operation, two types are provided: simple and multi. Use the desired type according to your lifestyle and situation. You can use this operation as follows. Case 1 The SIMPLE 7 DAY TIMER can be programmed to start & stop the air conditioning unit twice a day, 7 day a week. -
Page 19: Zone Control
ZONE Control For ZONE control, select the rooms you wish to heat or cool. ■ To select ZONE Press “ button”. ● Select the desired ZONE number you wish to switch on. ● “ ” is displayed on the LCD. Press “... -
Page 20: Temperature Sensor Switching (Option)
TEMPERATURE SENSOR Switching (Option) You can add up to 2 optional temperature sensors. (For example in the living room, bedroom, and so on.) By switching the detection position of the mounted temperature sensors, you can control the temperature according to the temperature of the selected room. ■... -
Page 21: Name Registration
Name registration You can register a name for each zone and temperature sensor. When you switch the zone or temperature sensor, the registered name will be displayed. ■ To register the name Press “ button” for at least 4 seconds. ●... - Page 22 Name registration ■ To initialize registered names Press “ button” for at least 4 seconds. ● The display shifts to name setting. Press “ button” for at least 4 seconds. ● The display returns to the initial state. OPERATION...
-
Page 23: Care
Cleaning ■ Filter Cleaning Notice Reset When the fi lter becomes dirty with dust, or the system has operated for a predetermined period of time the remote controller will notify you that fi lter cleaning is required. (Check the fi lter and see if cleaning is required.) ●... - Page 24 MEMO...
- Page 26 MEMO...
- Page 28 Two-dimensional bar code is a code for manufacturing. 3P209820-1 M07B043 (0709) HT...
Need help?
Do you have a question about the BRC230Z4 and is the answer not in the manual?
Questions and answers