Table of Contents
Advertisement
Available languages
Available languages
Quick Links
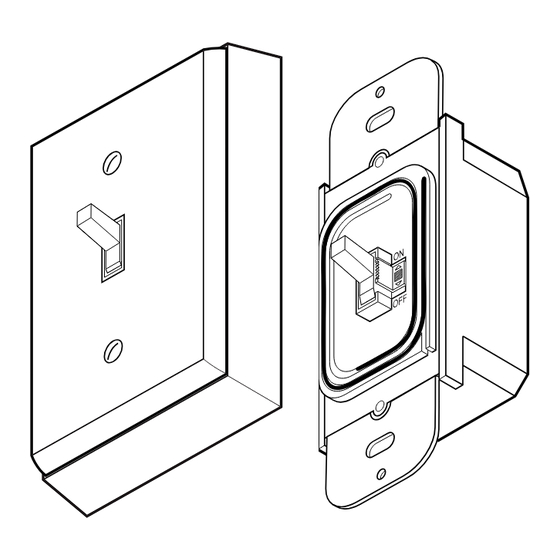
Wireless Add-on Switch
Model 6133
Y
our wireless add-on switch includes:
• 1 transmitter wall switch unit
• 1 receiver wall switch unit
• 2 wire connectors
• 2 #8 x 2" wood screws
You'll need to buy a 9-volt alkaline battery for the wireless switch. In typical
use, this battery will last one year.
Multiple channels (A thru E) are available so that you can operate several
systems at different locations in your home. If you purchase more than one
system, make sure you select different operating channels, or they will interact
with each other.
If you purchase a different switch plate to match your decor, make sure it is not a
metal plate. Metal wall plates will reduce the operating range.
IMPORTANT: Use only as a second switch to remotely control a light.
Do not use if more than one switch exists.
1.
Select a wall switch location that controls a light or overhead incandescent
light. Keep the following points in mind while selecting a location:
• Never install two receiver units within 3 feet (0.9 m) of each other or it could
reduce the operating range.
• The total lighting load must not exceed 500 watts (incandescent only).
• The receiver must be located within the range of the transmitter (up to 100
feet [30 m]) in the room or hallway that they are installed so they will oper-
ate properly.
• Make sure that large metal objects are not located between the transmitter and
receiver since it could interfere with the signals.
2. Turn off the power to the light switch circuit before you proceed. Do this
at your circuit breaker or fuse box.
© 2007 HeathCo LLC
Installation
595-4918-06
Advertisement
Table of Contents

Related Manuals for Heath Zenith 6133


Summary of Contents for Heath Zenith 6133
- Page 1 If you purchase a different switch plate to match your decor, make sure it is not a metal plate. Metal wall plates will reduce the operating range.
- Page 2 You may have to bend the wires to fit inside the box. You will mount the switch plate later. 8. Turn on the power to the light switch circuit. Do this at your circuit breaker or fuse box.
- Page 3 9. If not already there, slide the receiver's master switch, located beside the toggle switch to its ON (up) position. The light may turn on at this time. NOTE: If you are controlling a lamp, make sure it is connected to the switched outlet and that the lamp is switched on.
- Page 4 Junction Box 16. Mount the switch plate supplied with the transmitter over the transmitter using the screws that were supplied. 17. Mount the switch plate (not supplied) over the receiver with the screws you removed earlier. This completes the installation. Switch...
-
Page 5: Troubleshooting Guide
1. Circuit breaker or fuse is turned off. 2. Switch on lamp is turned off. 3. Bulb is defective. 4. Receiver’s master switch is set to OFF. 5. Receiver wiring to house wiring loose. 6. Receiver antenna needs to be adjusted 1. -
Page 6: Regulatory Information
The user is cautioned that changes or modifications not expressly approved by the party responsible for regulatory compliance could void the user's authority to operate the equipment. This device complies with RSS-210 of Industry Canada. Operation is subject to the following two conditions: (1) this device may not cause interference, and (2) this device must accept any interference, including interference that may cause undesired operation of the device. -
Page 7: Instalación
Interruptor Inalámbrico de Anexo Modelo 6133 Su interruptor in alámbrico de anexo incluye: • 1 interruptor transmisor de pared • 1 interruptor receptor de pared • 2 conectores de cables • 2 tornillos para madera #8 x 2” Es necesario comprar una pila alcalina de 9 voltios para el interruptor inalám- brico. - Page 8 3. Retire la placa del interruptor y el interruptor existentes y desconcecte sus dos cables. Guarde la placa del interruptor y los tornillos para volver a instalarlos más adelante. Si el interruptor tiene más de dos cables conectados, consulte con un electricista acerca de la instalación.
- Page 9 Mueva hacia arriba y hacia abajo el interruptor de palanca. La luz debe mantenerse apagada. 11. Slide the receiver’s master switch to its ON (up) position. Move the switch lever up and down. The light should switch on and off.
- Page 10 Caja de Empalmes 16. Instale la placa del interruptor, suministrado con el transmisor, sobre este último y sujétela con los tornillos suministrados. 17. Instale la placa del interruptor (no suministrado) sobre el receptor y sujétela con los tornillos que retiró anteriormente. Con esto concluye la instalación. Placa del Interruptor Figura 4- Instalación del Transmisor...
-
Page 11: Guía De Solución De Problemas
Guía De Solución De Problemas SÍNTOMA La Luz no se enci- ende. La luz no se apaga. La luz se enciende ocasionalmente. Favor de llamar al 1-800-858-8501 (sólo para hablar en inglés) para pedir ayuda antes de devolver el producto a la tienda. Si tiene algún problema, siga esta guía. - Page 12 Se le notifica al usuario que cualquier modificación que no haya sido expresamente aprobada por la entidad responsable por el cumplimiento de las normas podría anular el derecho del usuario de operar este equipo. Este dispositivo cumple con la norma RSS-210 de Industry Canada. Su funciona- miento está...
- Page 13 595-4918-06 -13-...
-
Page 14: Installation
Interrupteur rapporté sans file Modèle 6133 Votre interrupteur rapporté sa fil comprend: • 1 transmitter wall switch unit • 1 receiver wall switch unit • 2 wire connectors • 2 #8 x 2" wood screws ll vous faudra acheter une pile alcaline de 9V pour l’interrupteur sans fil. En utilisation type, cette pile durera un an. - Page 15 3. Enlevez l’interrupteur existant et sa plaque et débranchez ses deux fils. Con- servez la plaque et les vis pour réinstallation ultérieure. Si plus de deux fils sont attachés à l’interrupteur, consultez un électricien. De plus, le code du bâtiment de votre région pourrait exiger que l’installation soit faite par un électricien reconnu.
- Page 16 Interrupteur à Bascule Figure 2 - Interrupteur Principal du Récepteur 9. S’il n’est pas déjà là, glissez l’interrupteur principal du récepteur, situé à côté de l’interrupteur à bascule, à sa position ON (haut). Le luminaire pourrait s’allumer à ce moment-là. NOTE: Si l’interrupteur commande un luminaire, assurez-vous de le connecter à...
- Page 17 Boîte de Jonction 16. Installez la plaque d’interrupteur, incluse avec l’émetteur, sur l’émetteur à l’aide des vis incluses. 17. Installez la plaque d’interrupteur (non incluse) sur le récepteur à l’aide des vis enlevées précédemment. Ceci complète l’installation. Plaque d’interrupteur Figure 4 - Installation de I’émetteur 595-4918-06 Figure 3 - Antenne Réceptrice Vis à...
-
Page 18: Guide De Dépannage
SYMPTÔME L’éclairage ne s’allume pas. L’éclairage ne s’éteint pas. L’éclairage s’allume de facon erratique. Veuillez faire le 1 800 858-8501 (service en anglais seulement) pour obtenir de l’aide avant de retourner l’article au magasin. En cas de problème, suivez ce guide. Vous pouvez aussi visiter notre site Web à... -
Page 19: Informations Sur La Réglementation
Informations Sur la Réglementation L’utilisateur est informé que tout changement ou modification, non approuvé ex- plicitement par l’organisme de réglementation pertinent, pourrait annuler le droit de l’utilisateur à faire fonctionner cet appareil. Ce dispositif est conforme aux exigences de RSS-210 d’Industrie Canada. Son fonctionnement est sujet aux deux conditions suivantes: 1) Ce dispositif ne doit pas causer de parasites nuisibles, et 2) Ce dispositif doit endurer tous les parasites reçus, y compris ceux susceptibles de provoquer un fonctionnement intempestif. - Page 20 INFORMACIóN DE LA COMPRA RENSEIGNEMENTS D’AChAT Model #: __________________ Nº de modelo / N° de modèle STAPLE PURChASE RECEIPT hERE ENGRAPE AqUÍ EL RECIBO DE COMPRA AGRAFEz LE REçU D’AChAT ICI PLEASE kEEP YOUR DATED SALES RECEIPT, IT IS REqUIRED FOR ALL WARRANTY REqUESTS. POR FAVOR GUARDE SU RECIBO DE VENTA FEChADO;...
Need help?
Do you have a question about the 6133 and is the answer not in the manual?
Questions and answers