Table of Contents
Advertisement
Advertisement
Table of Contents

Subscribe to Our Youtube Channel
Related Manuals for AT&T CL2909


Summary of Contents for AT&T CL2909
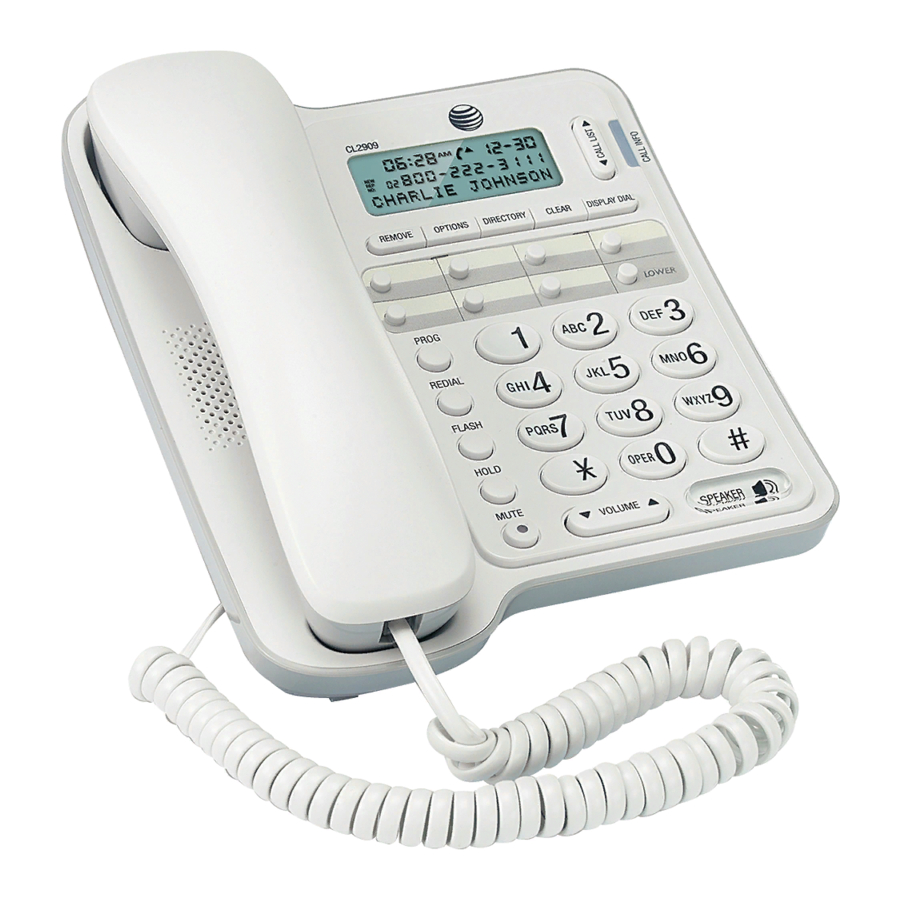
- Page 1 User’s manual CL2909 Speakerphone with caller ID/call waiting LOWER...
- Page 2 1 (800) 222-3111 1 (866) 288-4268 or call . In Canada, dial Model number: CL2909 Type: Speakerphone with caller ID/call waiting Serial number: Purchase date: Place of purchase: Both the model and serial numbers of your AT&T product can be found on the bottom of the telephone base.
- Page 3 Make sure to install four STOP! See page 4 for easy AA alkaline batteries instructions. (not included). If you subscribe to high-speed Internet service (DSL - digital subscriber line) through your telephone line, you must install a DSL filter between the telephone line cord and the telephone wall jack (see page 5).
-
Page 4: Parts Checklist
Coiled handset cord Telephone line cord Quick start guide CL2909 Speakerphone with caller ID/call waiting LOWER This quick start guide provides you with basic installation and use instructions. A limited set of features are described in an abridged form. -
Page 5: Table Of Contents
User’s manual CL2909 Speakerphone with LOWER caller ID/call waiting Table of contents Getting started Redial ............15 Chain dialing ........16 Product overview ........1 Flash/call waiting ......17 Quick reference guide ......2 Hold ............17 Base lights ..........3 Mute ............ - Page 6 Table of contents Review directory entries ....24 Dial a directory number ....24 Delete a directory entry ....24 Caller ID operation Caller ID operation ......... 25 Caller ID information ....... 25 Information about call history ..26 Caller ID ..........27 Review call history ......
-
Page 7: Getting Started
Getting started Product overview This AT&T CL2909 speakerphone with caller ID/call waiting can be used flat on a tabletop or mounted on a wall and does not require AC power for operation. The CL2909 also features a 14-number memory for fast dialing and has a directory that can store up to 25 additional numbers with names. -
Page 8: Quick Reference Guide
Getting started Quick reference guide CALL LIST REMOVE Press to review call history Press to delete the displayed records (page 27) or scroll entry (page 21, 24, 28). through options when in the feature menu. When the telephone is idle, press and hold to remove all DISPLAY DIAL call history entries (page 28). -
Page 9: Base Lights
Getting started Quick reference guide Base lights CALL INFO SPEAKER • On when the line is in use. On when speakerphone • Flashes slowly when a call is on hold. is in use. -OR- When the connected telephone line cord is LOWER not plugged into a wall jack. -
Page 10: Battery Installation
Getting started Battery installation Before using the telephone, you should install four good AA alkaline batteries (not included) to provide memory backup and enable the use of some features. The four AA batteries are required for the following features to work: speakerphone, hold, mute, flash, caller ID, screen display, feature options menu, directory, clock, and the CALL INFO light. -
Page 11: Installation Options
Getting started Installation options The telephone base comes with the mounting bracket already installed for tabletop use. If you want to mount your telephone on a wall, use the provided wall bracket to connect with a standard dual stud telephone wall mounting plate. - Page 12 Getting started Installation options Connect the handset to the telephone. Plug one end of the coiled handset cord into the handset jack on the left side of the telephone base. Plug the other end of the coiled cord into the handset, then place the handset on the telephone.
-
Page 13: Wall Installation
Getting started Installation options Wall installation Reverse the handset tab. This tab holds the handset when you hang up. Hold down the switch hook, and slide the handset tab up and out of its slot. Turn the tab so that the end with the hook is up, then insert the handset tab back into its slot. - Page 14 Getting started Installation options Route the telephone line cord. Plug one end of the telephone line cord into the telephone line jack on the top of the telephone base, and then route the line cord through the slot on the bottom of the telephone base. Route the telephone line cord around the bracket, leaving the last few inches of the line cord for wall jack connection.
- Page 15 Getting started Installation options Mount the telephone on the studs on the mounting plate. Make sure the telephone line cord snaps firmly into place. Place the telephone just above the studs on the wall jack mounting and then slide the telephone down until it is held securely. Follow steps 4-5 in Tabletop installation on page 6.
-
Page 16: Telephone Settings
Telephone settings Telephone settings The screen will display prompts to help you set up the telephone when you first install it. You can always get back to these setup screens by pressing OPTIONS. NOTE: You can exit feature setup at any time by pressing CLEAR or by lifting the handset when LOWER there is no incoming call. -
Page 17: Set Home Area Code
Telephone settings Telephone settings Set home area code You must program your area code, so your telephone can properly recognize and dial calls. For calls within your area code You dial Enter in step 2 7 digits Your area code (telephone number, no area code) 10 digits 0 0 0... -
Page 18: Set Local Area Code
Telephone settings Telephone settings Set local area code You can program up to four local area codes. For calls outside your area You dial Enter in step 2 All calls outside 11 digits (1 + area code No local area your area code + telephone number) code... -
Page 19: Set Time And Date
Telephone settings Telephone settings Set time and date Press OPTIONS repeatedly until the screen displays: 12:00 1-01 SET CLOCK LOWER Use the dial pad keys (0-9) to change the blinking digits. • Press CALL LIST to move to the previous digit or CALL LIST to move to the next digit. - Page 20 Telephone settings Telephone settings Feature summary (Default settings indicated by *) Feature/options Function SET CLOCK Set the date and time. Use # (pound key) to select between AM and PM. Use CALL LIST or CALL LIST to choose a digit to edit, then 12:00 1-01* use the dial pad keys to change the digits.
-
Page 21: Telephone Operation Telephone Operation
Telephone operation Telephone operation Telephone operation Make a call LOWER Lift the handset, then enter the telephone number. -OR- Press SPEAKER on the telephone base, then enter the telephone number. To end the call, hang up. -OR- Press SPEAKER. Answer a call •... -
Page 22: Chain Dialing
Telephone operation Telephone operation Chain dialing Chain dialing is useful if you need to access numbers other than telephone numbers (such as bank account numbers or access codes) from the directory, speed dial locations or call history. SPEAKER. Lift the handset or press Wait for a dial tone. -
Page 23: Flash/Call Waiting
Telephone operation Telephone operation LOWER Flash/call waiting If you subscribe to call waiting service with your telephone service provider, you can answer a new incoming call without losing your current call. While on a call, press FLASH to connect to the new call when you receive a call waiting signal. -
Page 24: Ringer Volume
Telephone operation Telephone operation Ringer volume Use the ringer switch on the right side of the base to adjust the ringer volume to OFF, LO or HI. If the ringer switch is set to OFF, this telephone will not ring when there is an incoming call. However, the CALL INFO indicator will still flash to indicate an incoming call. -
Page 25: Speed Dial
Speed dial Speed dial Speed dial overview This telephone has 14 speed dial locations where you can store telephone numbers you want to dial using only one or two keys. You can store up to 24 digits in each location. The first seven locations can be accessed using the speed dial keys. -
Page 26: Store A Number In A Speed Dial Location
Speed dial Speed dial Store a number in a speed dial location There are 14 speed dial locations (seven upper and seven lower). To access an upper location, press a LOWER speed dial key. To access a lower location, press LOWER, then press a speed dial key. -
Page 27: Review A Speed Dial Entry
Speed dial Speed dial Review a speed dial entry LOWER Press the speed dial key for the entry you want to review. -OR- Press LOWER, then press the speed dial key for the entry you want to review. Press PROG or CLEAR to return to idle mode. Dial a speed dial number Using handset or speakerphone: Lift the handset. -
Page 28: Directory
Directory Directory Directory operation Directory memory capacity This telephone has a directory where you can store up to 25 additional telephone numbers and names. Numbers can be up to 24 digits long and names can be up to 15 characters. Directory entries are stored in alphabetical order. -
Page 29: Store Numbers And Names In The Directory
Directory Directory operation Store numbers and names in the directory Press DIRECTORY, then press CALL LIST CALL LIST to scroll to STORE. to scroll to Press OPTIONS and the screen displays ENTER NUMBER. Enter the telephone number (up to 24 digits) you want to store. -
Page 30: Store A Call History Number In The Directory
Directory Directory operation Store a call history number in the directory Press CALL LIST or CALL LIST to scroll through the call history. Press DIRECTORY to store the displayed call information in the telephone directory. The screen displays STORED. LOWER NOTE: Call information is stored exactly as it appears in the call history. -
Page 31: Caller Id Operation
Caller ID operation Caller ID operation Caller ID information This product has a caller ID with call waiting 12:00 1-01 feature that works with services from your telephone service provider. 1-888-7227702 LOWER Caller ID with call waiting lets you see who is CHARLIE JOHNSON calling before you answer the telephone, even when you are on another call. -
Page 32: Information About Call History
Caller ID operation Caller ID operation Caller ID operation Information about call history If you subscribe to caller ID service with your 12:00 1-01 telephone service provider, this telephone stores all incoming calls with valid caller ID information 1-888-7227702 LOWER in the call history. -
Page 33: Caller Id
Caller ID operation Caller ID operation Caller ID You can customize how the caller ID features of this product work. See Set remaining features on page 13 for instructions. For options, see REPEATED CALLS and CALL LIST ORDER in the Feature summary on page 14. -
Page 34: Remove Call Records
Caller ID operation Caller ID operation Remove call records Remove a specific call record Press CALL LIST or CALL LIST to display the call record you want to remove. Press REMOVE. The call record is removed. Remove all call records When the telephone is idle, press and hold REMOVE until the screen displays (for approximately 3 seconds):... -
Page 35: Dialing Options
Caller ID operation Caller ID operation Dialing options If the number displayed in the call history needs to have a 1 or the area code added or removed, you can do that. When the number you wish to call is displayed, press OPTIONS and then press CALL LIST or CALL LIST to scroll through the... -
Page 36: Troubleshooting
Appendix A Troubleshooting If you have difficulty with your telephone, please try the suggestions below. www.telephones.att.com For customer service, visit our website at , or 1 (800) 222-3111 1 (866) 288-4268 call . In Canada, dial No dial tone. • Make sure all plugs are connected properly. - Page 37 No caller ID information for some calls. • The telephone cannot display or store the information while another telephone is using the same telephone line, whether this CL2909 telephone is being used or not. I cannot edit a directory entry.
- Page 38 Appendix A Troubleshooting I subscribe to a nontraditional telephone service that uses my computer to establish connections, and my telephone doesn’t work. • Make sure your computer is powered on. • Make sure your Internet connection is working properly. • Make sure that the software is installed and running for your nontraditional telephone service.
-
Page 39: Maintenance
Appendix Appendix B Maintenance Taking care of your telephone • Your telephone contains sophisticated electronic parts, so it must be treated with care. Avoid rough treatment. • Place the handset down gently. Save the original packing materials to protect your telephone if you ever need to ship it. Avoid water •... -
Page 40: Important Safety Information
Appendix Appendix C Important safety information This symbol is to alert you to important operating or servicing instructions that may appear in this user’s manual. Always follow basic safety precautions when using this product to reduce the risk of injury, fire, or electric shock. -
Page 41: Fcc And Acta Information
Appendix D FCC and ACTA information If this equipment was approved for connection to the telephone network prior to July 23, 2001, it complies with Part 68 of the Federal Communications Commission (FCC) rules. If the equipment was approved after that date, it complies with the Part 68 rules and with the Technical Requirements for Connection of Equipment to the Telephone Network adopted by the Administrative Council for Terminal Attachments (ACTA). - Page 42 Appendix D FCC and ACTA information Rights of the telephone service provider If this equipment is causing harm to the telephone network, the telephone service provider may temporarily discontinue your telephone service. The telephone service provider is required to notify you before interrupting service.
-
Page 43: Part 15 Of Fcc Rules
Appendix E Part 15 of FCC rules Some telephone equipment generates, uses, and can radiate radio frequency energy and, if not installed and used properly, may cause interference to radio and television reception. This product has been tested and found to meet the standards for a Class B digital device, as specified in Part 15 of the FCC rules. -
Page 44: Appendix F Limited Warranty
Appendix F Limited warranty The AT&T brand is used under license - any repair, replacement or warranty service, and all questions about this product should be directed to: In the www.telephones.att.com United States of America, visit or call 1 (800) 222-3111 1 (866) 288-4268. - Page 45 Appendix F Limited warranty • PRODUCT that has been damaged due to repair, alteration, or modification by anyone other than an authorized service representative of the manufacturer; or • PRODUCT to the extent that the problem experienced is caused by signal conditions, network reliability or cable or antenna systems;...
- Page 46 Appendix F Limited warranty What must you return with the PRODUCT to get warranty service? You must: Return the entire original package and contents including the PRODUCT to the service location along with a description of the malfunction or difficulty; and Include “valid proof of purchase”...
-
Page 47: Technical Specifications
Appendix G Technical specifications 1.1B Batteries Four AA alkaline batteries Operating temperature 32°F - 122°F 0°C - 50°C... -
Page 48: Index
Index Index Mute, 17 Answer a call, 15 Pause, 20, 23 Base lights, 3 Battery, 4 Redial, 15 Battery compartment, 4 Remove call records, 28 Blank screen, 30 Ringer switch, 2, 18 Caller ID, 27, 31 Safety information, 34 Call history, 27 Screen messages, 3 CALL INFO, 18, 30 Speakerphone, 2, 3, 15... - Page 49 www.telephones.att.com © 2009-2013 Advanced American Telephones. All Rights Reserved. AT&T and the AT&T logo are trademarks of AT&T Intellectual Property licensed to Advanced American Telephones, San Antonio, TX 78219. Printed in China. Issue 11 AT&T 04/13.
Need help?
Do you have a question about the CL2909 and is the answer not in the manual?
Questions and answers