AT&T CL2909, CL2909WH - Speakerphone Manual
- User manual (49 pages) ,
- Quick start manual (23 pages) ,
- Quick start manual (7 pages)
Advertisement
Parts checklist
Check to make sure your telephone package includes the following items.

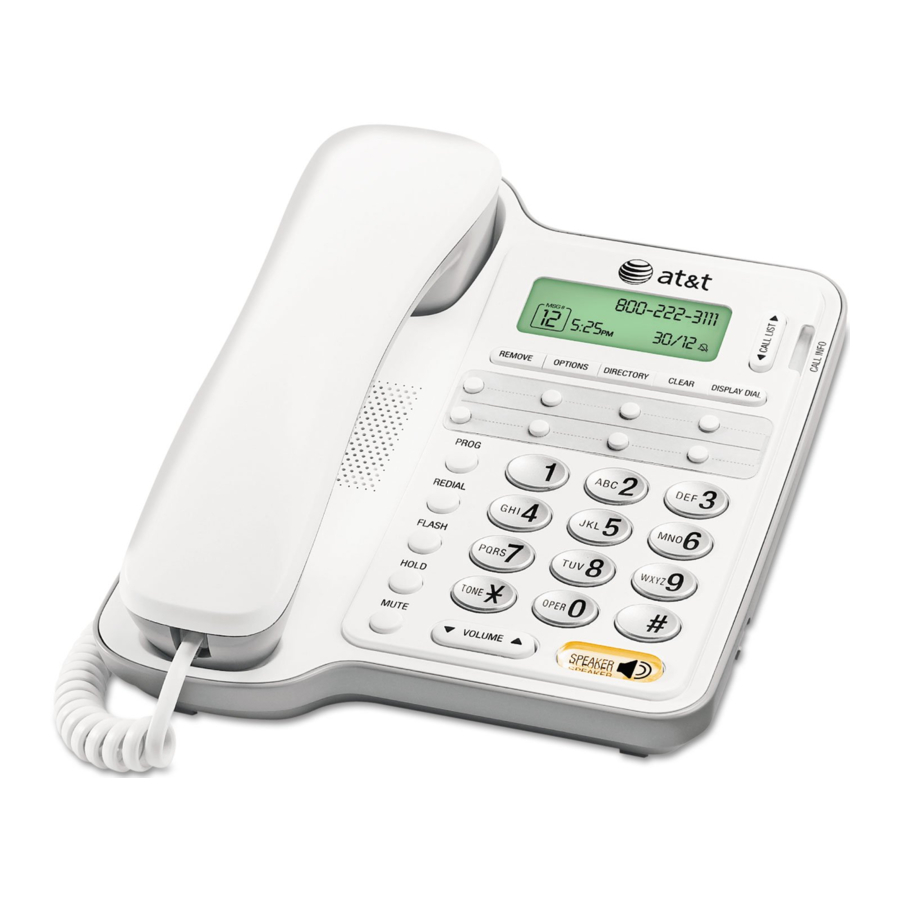
Product overview
This AT&T CL2909 speakerphone with caller ID/call waiting can be used flat on a tabletop or mounted on a wall and does not require AC power for operation. The CL2909 also features a 14-number memory for fast dialing and has a directory that can store up to 25 additional numbers with names. This telephone has a caller ID feature that supports caller ID with call waiting service. (Caller ID services are subscriber services available from your telephone service providers for a fee.)
This user's manual contains detailed instructions for installing and operating your AT&T CL2909 speakerphone with caller ID/call waiting. Please follow the instructions carefully.
Quick reference guide

Base lights

Screen icons

 | There is an error in the caller ID information. |
 | Line is in use or the connected telephone line cord is not plugged into a wall jack. |
 | The caller ID information has not been reviewed. |
 | A person from this number has called more than once. |
 | The lower speed dial location is active. |
 | The position of the number stored in call history. |
 | The battery power is low. |
 | The ringer volume is set to OFF. |
Display screen messages
| Displays | Means |
| STORED | The telephone number displayed is stored. |
| DELETED |
|
| END OF LIST | You have reached the end of the call history records. |
| DIRECTORY EMPTY | There are no telephone numbers stored in the directory. |
| NO NAME FOUND | There are no names matching the letter combination you have selected. |
| NO NUMBER | There is no entry stored in the speed dial location you have selected. |
| LINE IN USE | The connected telephone line cord is not plugged into a wall jack or another telephone on the same line is in use. |
| LINE RINGING | There is an incoming call. |
| LINE ON HOLD | The line is on hold. |
| MEMORY FULL | The directory is full. |
| ONLY 24 ALLOWED | The number you have entered in the directory or speed dial memory is over 24 digits. |
| ONLY 15 ALLOWED | The name you have entered in the directory is over 15 characters. |
| CHECK BATTERY | There are no batteries installed or you need to replace the old batteries. |
Battery installation
Before using the telephone, you should install four good AA alkaline batteries (not included) to provide memory backup and enable the use of some features. The four AA batteries are required for the following features to work: speakerphone, hold, mute, flash, caller ID, screen display, feature options menu, directory, clock, and the CALL INFO light.
If you unplug the telephone from the wall jack, or you lose telephone service for a few minutes, and good batteries are not installed, the following information is lost: call list, numbers stored in the directory, redial list, and all settings in the feature menu. We recommend that you initially install new batteries and change the batteries soon after the low battery icon ![]() appears.
appears.

Always unplug the telephone line cord before installing new batteries.
- Press down on the battery compartment cover tabs as shown, and pull to open the battery compartment cover.

- Insert four AA alkaline batteries (not included) following the polarity markings in the battery compartment.

- Close the battery compartment cover as shown, making sure the cover snaps into place.


NOTES:
- If there are no batteries installed and the telephone is plugged into a telephone wall jack, the screen display operates using the power from the telephone line when you lift the handset. When operating in this mode, the screen display may be dimmer than usual.
- If no batteries are installed, calls can only be made or answered using the handset. However, you can switch the call to speakerphone mode by pressing
![]() SPEAKER while it is in progress.
SPEAKER while it is in progress.
Installation options
The telephone base comes with the mounting bracket already installed for tabletop use. If you want to mount your telephone on a wall, use the provided wall bracket to connect with a standard dual stud telephone wall-mounting plate. If you do not have this mounting plate, you can purchase one from many hardware or consumer electronic retailers. You might need a professional to install the mounting plate.
If you subscribe to high-speed Internet service (DSL - digital subscriber line) through your telephone line, you must install a DSL filter (not included) between the telephone line cord and the telephone wall jack. The filter prevents noise and caller ID problems caused by DSL interference. Please contact your DSL service provider for more information about DSL filters.
Tabletop installation
Follow the instructions to install your telephone to tabletop position.
- Check the mounting bracket.
The telephone's mounting bracket is positioned for tabletop use. Make sure it is secure by pressing the two feet.
![]()
- Connect one end of the telephone line cord to the jack labeled TEL on the back of the telephone.

- Connect the other end of the line cord into a telephone jack or a DSL filter.
- Connect the handset to the telephone.
Plug one end of the coiled handset cord into the handset jack on the left side of the telephone base. Plug the other end of the coiled cord into the handset, then place the handset on the telephone.
![]()
- Check for dial tone.
Lift the handset and listen for a dial tone. If you cannot hear a dial tone, press VOLUME![]() . If you still do not hear a dial tone, see the Troubleshooting section.
. If you still do not hear a dial tone, see the Troubleshooting section.
Your telephone will work immediately after installation using the default feature settings (see default settings in Feature summary).


NOTE: If you subscribe to caller ID services from your telephone service provider, set the home area code for your telephone to properly recognize and dial calls from the call history list. You may also need to set the local area code if you want the telephone to recognize multiple area codes.
Wall installation
- Reverse the handset tab.
This tab holds the handset when you hang up. Hold down the switch hook, and slide the handset tab up and out of its slot. Turn the tab so that the end with the hook is up. Then, insert the handset tab back into its slot.

- Reposition the mounting bracket for wall use.
Press on the mounting bracket, as shown in Figure A, to release the bracket. Rotate the bracket, as shown in Figure B, so that the larger end is toward the bottom of the telephone. Secure the bracket by positioning it, as shown in Figure C, and pressing it (as indicated by the arrow) into the telephone base until it locks in place.

- Route the telephone line cord.
Plug one end of the telephone line cord into the telephone line jack on the top of the telephone base, and then route the line cord through the slot on the bottom of the telephone base. Route the telephone line cord around the bracket, leaving the last few inches of the line cord for wall jack connection.

- Connect the telephone line cord to a wall jack.
Plug the other end of the telephone line cord into a wall jack or a DSL filter.

- Mount the telephone on the studs on the mounting plate.
Make sure the telephone line cord snaps firmly into place. Place the telephone just above the studs on the wall jack mounting and then slide the telephone down until it is held securely.

- Follow steps 4-5 in Tabletop installation.


Telephone settings
The screen will display prompts to help you set up the telephone when you first install it. You can always get back to these setup screens by pressing OPTIONS.

NOTE: You can exit feature setup at any time by pressing CLEAR or by lifting the handset when there is no incoming call.
Language selection
You can select ENGLISH, ESPANOL (Spanish) or FRANCAIS (French) as the language in which your screen prompts are displayed. When you first install batteries, the screen displays:

- Press CALL LIST
![]() or CALL LIST
or CALL LIST ![]() until the screen displays your language selection.
until the screen displays your language selection.
![]()
- Press OPTIONS to save your setting, and move to the next option.

NOTE: If you accidentally change the language to French or Spanish, you can reset it back to English without going through the French or Spanish menus. When in idle mode, press OPTIONS once, then enter *3645474#.
Set contrast
Adjust screen brightness to a comfortable level, from 1 (light) to 4 (dark).
- Press OPTIONS repeatedly until the screen displays:
![]()
- Press CALL LIST
![]() or CALL LIST
or CALL LIST ![]() until the screen displays the contrast level you prefer.
until the screen displays the contrast level you prefer.
![]()
- Press OPTIONS to save the setting, and move to the next option.


Set home area code
You must program your area code, so your telephone can properly recognize and dial calls.
| For calls within your area code | |
| You dial | Enter in step 2 |
| 7 digits (telephone number, no area code) | Your area code |
| 10 digits (area code + telephone number) -OR- 11 digits (1 + area code + telephone number) | 0 0 0 |
- Press OPTIONS repeatedly until the screen displays:
![]()
- Use the dial pad keys (0-9) to enter the three digits of your home area code.
![]()
- Press CALL LIST
![]() to backspace and erase a digit.
to backspace and erase a digit. - Press CALL LIST
![]() to move to the next digit.
to move to the next digit. - Press REMOVE to delete all digits entered.
- Press CALL LIST
- Press OPTIONS to save the setting. You will see the local area code setup screen.


NOTE: A home area code must be programmed to use the display dial feature. If you try to use DISPLAY DIAL before entering a home area code, you will be prompted to enter the home area code. Enter the code and press OPTIONS.
Set local area code
You can program up to four local area codes.
| For calls outside your area | ||
| For | You dial | Enter in step 2 |
| All calls outside your area code | 11 digits (1 + area code + telephone number) | No local area code |
| Some calls outside your area code | 10 digits (area code + telephone number) | Area codes that do not require a 1 |
| If you dial 10 digits (area code + telephone number) for calls within your own area code, include your area code as a local area code. | ||
- Press OPTIONS repeatedly until the screen displays:
![]()
- Use the dial pad keys (0-9) to enter the three digits of the first local area code.
- Press CALL LIST
![]() to backspace and erase a digit.
to backspace and erase a digit. - Press CALL LIST
![]() to move to the next digit.
to move to the next digit. - Press REMOVE to delete all digits entered.
- Press CALL LIST
- Press OPTIONS to save the setting.
- Repeat steps 2-3 to set more local area codes.

NOTE: If you do not need to program the local area codes, press OPTIONS repeatedly to scroll to other options or press CLEAR to exit.
Set date and time

- Press OPTIONS repeatedly until the screen displays:
![]()
- Use the dial pad keys (0-9) to change the blinking digits.
- Press CALL LIST
![]() to move to the previous digit or CALL LIST
to move to the previous digit or CALL LIST ![]() to move to the next digit.
to move to the next digit. - Press # (pound key) to select between AM and PM.
- Press CALL LIST
- When the correct time and date (month-year) are shown, press OPTIONS to save the new setting and move to the next option.

NOTE: After the first time you set up the telephone menu, the order of the menu options changes to: SET DATE/TIME, SET CONTRAST, WHICH LANGUAGE?, HOME AREA CODE?, LOCL AREA CODE?
Feature summary (Default settings indicated by *)
| Feature/options | Function |
| SET DATE/TIME --:-- -----* | Set the date and time. Use # (pound key) to select between AM and PM. Use CALL LIST  or CALL LIST or CALL LIST  to choose a digit to edit, then use the dial pad keys to change the digits. to choose a digit to edit, then use the dial pad keys to change the digits. |
| WHICH LANGUAGE? ENGLISH* ESPANOL FRANCAIS | Choose whether the display language is English, Spanish, or French. |
| SET CONTRAST 1 2* 3 4 | Adjust screen brightness to a comfortable level, from 1 (light) to 4 (dark). |
| HOME AREA CODE? HAC-_ _ _* | Program the system to recognize calls from your area code. |
| LOCL AREA CODE? LAC1-_ _ _* LAC2-_ _ _* LAC3-_ _ _* LAC4-_ _ _* | Program up to four local area codes that do not require dialing a 1 before them. |
Telephone operation
Make a call
- Lift the handset, then enter the telephone number.
-OR-
Press![]() SPEAKER on the telephone base, then enter the telephone number.
SPEAKER on the telephone base, then enter the telephone number.
![]()
- To end the call, hang up.
-OR-
Press![]() SPEAKER.
SPEAKER.

Answer a call
- Lift the handset.
-OR-
Press![]() SPEAKER.
SPEAKER.
NOTE: The CALL INFO indicator flashes quickly to show that the telephone is ringing.
Switch between handset and speakerphone
While on a handset call, press ![]() SPEAKER and replace the handset in the telephone base.
SPEAKER and replace the handset in the telephone base.
While on a speakerphone call, lift the handset.
Handset or speakerphone volume
Press VOLUME ![]() or VOLUME
or VOLUME ![]() to adjust the volume of what you hear while on a call.
to adjust the volume of what you hear while on a call.

Redial
The last number called from this telephone (up to 32 digits) is stored in redial memory.
- Lift the handset.
-OR-
Press![]() SPEAKER.
SPEAKER. - Press REDIAL. The number is dialed automatically.
NOTE: When the telephone is idle, press and hold REDIAL to delete the last number dialed. DELETED displays.
Chain dialing
Chain dialing is useful if you need to access numbers other than telephone numbers (such as bank account numbers or access codes) from the directory, speed dial locations or call history.
- Lift the handset or press
![]() SPEAKER.
SPEAKER. - Wait for a dial tone. Dial the first number. You can do this manually, from the directory, a speed dial location or the call history.
- To dial a number (up to 48 digits):
From the directory:
![]()
- Press DIRECTORY.
- Press CALL LIST
![]() or CALL LIST
or CALL LIST ![]() to scroll to REVIEW. Press OPTIONS.
to scroll to REVIEW. Press OPTIONS. - Press CALL LIST
![]() or CALL LIST
or CALL LIST ![]() to scroll to the desired entry.
to scroll to the desired entry. - Press DISPLAY DIAL. The telephone will automatically dial the displayed number.

From a speed dial location:

- Press the desired speed dial key.
-OR-
Press LOWER, then press the desired speed dial key.
The telephone will automatically dial the displayed number.
From the call history:

- Press CALL LIST
![]() or CALL LIST
or CALL LIST ![]() to scroll to the desired entry.
to scroll to the desired entry. - Press DISPLAY DIAL. The telephone will automatically dial the displayed number.
Flash/call waiting
If you subscribe to call waiting service with your telephone service provider, you can answer a new incoming call without losing your current call.

- While on a call, press FLASH to connect to the new call when you receive a call waiting signal.
- Press FLASH again to return to the original call.
NOTES:
- Use FLASH to access other subscriber services, as described by your telephone service provider.
- The telephone cannot display the caller ID information if another telephone on the same line is in use. Make sure all extensions are not in use.
Hold
- Press HOLD to put a call on hold.
![]()

To return to the call:
- Press HOLD again.
-OR-
Lift the handset.
-OR-
Press![]() SPEAKER.
SPEAKER.
-OR-
Pick up the call at another extension connected to the same telephone line.
Mute
Press MUTE to prevent the other party from hearing you. You will still be able to hear the other party. Press MUTE again to return to your two-way conversation.

Ringer volume
Use the ringer switch on the right side of the base to adjust the ringer volume to OFF, LO or HI. If the ringer switch is set to OFF, this telephone will not ring when there is an incoming call. However, the CALL INFO indicator will still flash to indicate an incoming call.

Call info
The CALL INFO indicator on the telephone is used to indicate there is additional information in the display about the current or previous calls.
Speed dial
Speed dial overview
This telephone has 14 speed dial locations where you can store telephone numbers you want to dial using only one or two keys. You can store up to 24 digits in each location. The first seven locations can be accessed using the speed dial keys. To access the remaining seven locations, press LOWER and then the speed dial key for the desired location.
You may wish to write the names or telephone numbers of speed dial entries on the directory card. Use the white spaces for the first seven locations and the gray spaces for the other seven locations.

Store a number in a speed dial location
There are 14 speed dial locations (seven upper and seven lower). To access an upper location, press a speed dial key. To access a lower location, press LOWER, then press a speed dial key.

- Access the desired speed dial location, as described above.
- Enter the telephone number you want to store (up to 24 digits). Press CALL LIST
![]() to backspace and make corrections.
to backspace and make corrections.
![]()
-OR-
Press REDIAL to store the last number dialed (up to 24 digits). - Press PROG to save the entry in the location you pressed in step 1. The screen displays STORED.

NOTES:
- If the speed dial location you pressed in step 1 is occupied, delete the number before storing a new number.
- If the number you entered is over 24 digits, the screen displays ONLY 24 ALLOWED.
Store a pause or flash in a speed dial entry
Press CALL LIST ![]() twice to store a pause in the dialing sequence (P displays). Press FLASH to store a flash in the dialing sequence (F displays).
twice to store a pause in the dialing sequence (P displays). Press FLASH to store a flash in the dialing sequence (F displays).
Store a call history number in a speed dial location
- Press CALL LIST
![]() or CALL LIST
or CALL LIST ![]() to scroll through the call history.
to scroll through the call history. - Press PROG, then press a speed dial key.
-OR-
Press PROG, then press LOWER and a speed dial key to store the number. The screen displays STORED.
![]()

NOTE: If the speed dial location you pressed in step 2 is occupied, the new telephone number replaces the old one. Take caution not to replace entries you do not wish to delete from the speed dial locations.
Review a speed dial entry
- Press the speed dial key for the entry you want to review.
-OR-
Press LOWER, then press the speed dial key for the entry you want to review. - Press PROG or CLEAR to return to idle mode.
![]()

Dial a speed dial number

Using handset or speakerphone:
- Lift the handset.
-OR-
Press![]() SPEAKER.
SPEAKER. - Press the speed dial key for the number you want to dial.
-OR-
Press LOWER, then press the speed dial key for the number you want to dial.
Using DISPLAY DIAL:
- Press the speed dial key for the number you want to dial.
-OR-
Press LOWER, then press the speed dial key for the number you want to dial. - When the number is displayed on the screen, press DISPLAY DIAL to dial the number automatically by speakerphone.
-OR-
Lift the handset, then press DISPLAY DIAL to dial the number.
Delete a speed dial entry
- Follow the directions in Review a speed dial entry to find the number you want to delete.
- When the number you want to delete is displayed, press REMOVE. The entry is deleted.
![]()

Directory operation
Directory memory capacity
This telephone has a directory where you can store up to 25 additional telephone numbers and names. Numbers can be up to 24 digits long and names can be up to 15 characters.
Directory entries are stored in alphabetical order. You may wish to enter names with the last name first to maintain consistency with information stored through the caller ID features of this telephone.
Press CLEAR at any time to exit the directory without saving changes and return to the idle screen.

| Dial key | Characters by number of key presses | ||||
| 1 | 2 | 3 | 4 | 5 | |
| 1 | 1 | ||||
| 2 | A | B | C | 2 | |
| 3 | D | E | F | 3 | |
| 4 | G | H | I | 4 | |
| 5 | J | K | L | 5 | |
| 6 | M | N | O | 6 | |
| 7 | P | Q | R | S | 7 |
| 8 | T | U | V | 8 | |
| 9 | W | X | Y | Z | 9 |
| 0 | 0 | ||||
| * | * | ||||
| # | # | ||||
NOTE: Entries cannot be edited after the screen displays STORED.
Store numbers and names in the directory
- Press DIRECTORY. Then, press CALL LIST
![]() or CALL LIST
or CALL LIST ![]() to scroll to STORE.
to scroll to STORE.
![]()
- Press OPTIONS and the screen displays ENTER NUMBER.
- Enter the telephone number (up to 24 digits) you want to store. Press CALL LIST
![]() to backspace and make corrections.
to backspace and make corrections.
-OR-
Press REDIAL to store the last number dialed (up to 24 digits). - Press OPTIONS, and the screen displays ENTER NAME.
- Use the character chart to enter a name (up to 15 characters). Press CALL LIST
![]() to backspace and CALL LIST
to backspace and CALL LIST ![]() to advance or add a space. The screen automatically returns to idle mode if you do not press a dial pad key within 15 seconds.
to advance or add a space. The screen automatically returns to idle mode if you do not press a dial pad key within 15 seconds. - Press OPTIONS to store the name and number.

NOTE: If the number you entered is over 24 digits, the screen displays ONLY 24 ALLOWED.
Store a pause or a flash in a directory number
Press CALL LIST ![]() twice to store a pause in the dialing sequence (P displays). Press FLASH to store a flash in the dialing sequence for some special services (F displays).
twice to store a pause in the dialing sequence (P displays). Press FLASH to store a flash in the dialing sequence for some special services (F displays).

NOTE: To exit the directory at any time without saving changes, press CLEAR.
Store a call history number in the directory

NOTE: When the telephone is idle, pressing 2-9 on the dial pad will also access the directory, as described in step 2 of Review directory entries.
- Press CALL LIST
![]() or CALL LIST
or CALL LIST ![]() to scroll through the call history.
to scroll through the call history. - Press DIRECTORY to store the displayed call information in the telephone directory. The screen displays STORED.
NOTE: Call information is stored exactly as it appears in the call history.
Review directory entries
- Press DIRECTORY. Then, press CALL LIST
![]() or CALL LIST
or CALL LIST ![]() to scroll to REVIEW.
to scroll to REVIEW. - Press OPTIONS, and the screen displays the first entry in the directory.
- Press CALL LIST
![]() or CALL LIST
or CALL LIST ![]() to scroll through an alphabetical list of names stored in the telephone directory.
to scroll through an alphabetical list of names stored in the telephone directory.
-OR-
Use the dial pad keys and the character chart to enter the first character of the name you want to view, then press CALL LIST![]() (if needed) to move to the desired name.
(if needed) to move to the desired name. - Press DIRECTORY or CLEAR to exit.
Dial a directory number
- Follow the instructions in Review directory entries to find the number you want to call.
- When the entry you want is displayed, press DISPLAY DIAL to make the call. The speakerphone is activated.
-OR-
Press DISPLAY DIAL, then lift the handset to make the call.
![]()

Delete a directory entry
- Follow the instructions in Review directory entries to find the number you want to delete.
- When the number is displayed, press REMOVE to delete the entry.
![]()

Caller ID information
This product has a caller ID with call waiting feature that works with services from your telephone service provider.

Caller ID with call waiting lets you see who is calling before you answer the telephone, even when you are on another call.
You may need to change your telephone service to use this feature. Contact your telephone service provider if:
- You have both caller ID and call waiting, but as separate services (you may need combined service).
- You have only caller ID service, or only call waiting service.
- You do not subscribe to any caller ID service, and you can use this product's other features without subscribing to either caller ID or combined caller ID with call waiting service.
There are fees for caller ID services, and they may not be available in all areas.
This product can provide information only if both you and the caller are in areas offering caller ID service, and if both telephone service providers use compatible equipment.
Information about call history
If you subscribe to caller ID service with your telephone service provider, this telephone stores all incoming calls with valid caller ID information in the call history. Name, number, time and date can all be stored, if they are sent with the call. A call is assigned a number from 1 to 65. The most recent call will have the highest number. The call history number appears next to the telephone number on the display. New (missed) call information shows NEW in the display. A repeat call from the same number shows REP in the display.
If you answer a call before information appears on the screen, it will not be stored in the call history. Between the first and the second rings, the screen displays:
- The caller's name (up to 15 letters are sent by your telephone service provider)
- The caller's area code and telephone number (area code is not displayed if it is programmed as the home area code).
- The time and date of the call.
- The caller's position in the call history, which is displayed to the left of the telephone number.
Call information is displayed for about 15 seconds.
NOTES:
- If you press REMOVE while the telephone is ringing, or while you are on a call, the call information will not be stored in the call history.
- If you are using the display for setup or to review entries stored in the memory and a call comes in, press CLEAR while the telephone is ringing to see the information. If you are setting up the telephone, press OPTIONS first to save the setup information. Even if the call information is not displayed, it will be stored in the call history.
Review call history
- When the telephone is idle, press CALL LIST
![]() or CALL LIST
or CALL LIST ![]() to enter the call history.
to enter the call history. - Press CALL LIST
![]() or CALL LIST
or CALL LIST ![]() to scroll through the caller ID entries. The screen displays END OF LIST when you have reached the end of the call history records.
to scroll through the caller ID entries. The screen displays END OF LIST when you have reached the end of the call history records.
![]()
- Press CLEAR to exit and return to idle mode.

Remove call records

Remove a specific call record
- Press CALL LIST
![]() or CALL LIST
or CALL LIST ![]() to display the call record you want to remove.
to display the call record you want to remove. - Press REMOVE. The call record is removed.
Remove all call records
- When the telephone is idle, press and hold REMOVE until the screen displays (for approximately 3 seconds):
![]()
- Press REMOVE again to remove all calls. The screen will briefly display DELETED and then automatically return to idle mode.

NOTES:
- Once a call is removed from the call history, it cannot be retrieved.
- When there are no call records, the screen displays the model name CL2909 in idle mode.
![]()

Display dial
While you are reviewing the call history, you can dial a number displayed on the screen:
- Lift the handset.
-OR-
Skip to step 2 to use the speakerphone. - Press CALL LIST
![]() or CALL LIST
or CALL LIST ![]() until the number you want to dial is displayed.
until the number you want to dial is displayed. - Press DISPLAY DIAL. The screen shows the number being called and the call is dialed automatically. If the screen displays ERROR PRESENT or NO NUMBER, the present number cannot be dialed.
![]()

NOTE: You cannot use this feature to dial PRIVATE or UNKNOWN numbers.
Dialing options
If the number displayed in the call history needs to have a 1 or the area code added or removed, you can do that. When the number you wish to call is displayed, press OPTIONS and then press CALL LIST ![]() or CALL LIST
or CALL LIST ![]() to scroll through the dialing format choices.
to scroll through the dialing format choices.
The various dialing options are:
888-722-7702
1-722-7702
722-7702
1888-7227702
The specific dialing options available for each call history record depends on the format of the original call.
Display screen messages
| Displays | When |
| PRIVATE NAME | The other party is blocking the name information. |
| PPP | The other party is blocking the number information. |
| PRIVATE CALLER | The other party is blocking the name and number information. |
| UNKNOWN NAME | Your telephone service provider is unable to receive information about this caller's name. |
| UUU | Your telephone service provider is unable to receive information about this caller's number. |
| UNKNOWN CALLER | Your telephone service provider is unable to receive information about this caller's name and number. |
| ERROR PRESENT | The displayed caller ID entry cannot be dialed. |
| NO NUMBER | The displayed caller ID entry cannot be dialed. |
Troubleshooting
If you have difficulty with your telephone, please try the suggestions below. For customer service, visit our website at www.telephones.att.com, or call 1 (800) 222-3111. In Canada, dial 1 (866) 288-4268.
No dial tone.
- Make sure all plugs are connected properly. Inspect the telephone line cord connections at the wall jack and telephone. Also inspect the coiled handset cord connections at both ends.
- Unplug the telephone and connect it to another wall jack. If it still does not work and other telephones in your home are working, the problem is with this telephone.
Telephone does not ring.
- Make sure the RINGER switch is set to LO or HI.
- If there are several other telephones on the same line, try disconnecting some of the other telephones. Having too many telephones connected can also create problems such as low ringer volume or impaired sound quality during calls.
Incorrect time and date on incoming calls.
- If you subscribe to caller ID service, your service provider sends the time with the caller ID information. The time and date should be correct after receiving a call. If the time and date are not correct after receiving a call, report the problem to your service provider.
- If you do not have caller ID service, please set the time and date manually.
CALL INFO light incorrectly flashing.
- Make sure the telephone line cord is connected properly.
Difficulty storing numbers in memory.
- Make sure you are pressing the correct sequence of keys for storing numbers.
- If you are interrupted by a recorded announcement asking you to hang up or by a loud buzzing noise, hang up and store the number without lifting the handset.
Screen is blank
- Make sure the batteries are correctly installed.
- Replace batteries with new batteries.
Screen displays ERR.
- The telephone has received incomplete or corrupted caller ID information from the telephone service provider.
Caller ID isn't working.
- Caller ID is a subscription service. You must subscribe to this service from your telephone service provider for this feature to work on your telephone.
- If you subscribe to high-speed Internet service (DSL - digital subscriber line) through your telephone line, you must install a DSL filter between the telephone line cord and the telephone wall jack. The filter prevents noise and caller ID problems caused by DSL interference. Please contact your DSL service provider for more information about DSL filters.
- Your caller must be calling from an area that supports caller ID.
- Both your and your caller's telephone service providers must use equipment that is compatible with caller ID.
No caller ID information while on a call.
- Make sure your telephone service provider provides caller ID information while you are on a call. This is sometimes known as caller ID on call waiting or type 2 caller ID.
- The telephone cannot display the caller ID information if another telephone on the same line is in use. Make sure all extensions are on hook.
DISPLAY DIAL does not work.
- A home area code must be programmed. If you try to dial a number displayed on the screen before entering a home area code, you will be prompted to enter the home area code. Enter the code or enter 000 if you dial 10-digit telephone numbers, then press OPTIONS.
Screen incorrectly displays LINE IN USE.
- Make sure the telephone line cord is connected properly.
No caller ID information for some calls.
- The telephone cannot display or store the information while another telephone is using the same telephone line, whether this CL2909 telephone is being used or not.
I cannot edit a directory entry.
- Editing directory entries is not available. You need to create a new entry.
I subscribe to a nontraditional telephone service that uses my computer to establish connections, and my telephone doesn't work.
- Make sure your computer is powered on.
- Make sure your Internet connection is working properly.
- Make sure that the software is installed and running for your nontraditional telephone service.
- Make sure to plug your USB telephone adapter into a dedicated USB port on your computer. Do not plug into a multiple port USB hub (USB splitter) that is not powered.
- In a few rare instances, the USB port on your computer may not have enough power. In these instances, try using a USB hub with its own external power supply.
- If you are using a firewall, it may prevent access to your nontraditional telephone service. Contact your service provider for more information.
I've set my LCD language to Spanish or French and I don't know how to change it back to English.
- When the telephone is idle, press OPTIONS and then enter *3645474#. The LCD language is reset to English and the telephone returns to idle mode.
Make sure to install four AA alkaline batteries (not included).
If you subscribe to high-speed Internet service (DSL - digital subscriber line) through your telephone line, you must install a DSL filter between the telephone line cord and the telephone wall jack. The filter prevents noise and caller ID problems caused by DSL interference. Please contact your DSL service provider for more information about DSL filters.
Your product may be shipped with a protective sticker covering the telephone base display - remove it before use.
To reduce the risk of fire or injury to persons or damage to the telephone, read and follow these instructions carefully:
- Use only four AA alkaline batteries (not included).
- Dispose of these batteries in a safe manner. Do not burn or puncture. Like other batteries of this type, if burned or punctured, they could release caustic material which could cause injury.
- Do not open or mutilate the battery. Released electrolyte is corrosive and may cause damage to the eyes or skin. It may be toxic if swallowed.
- Exercise care in handling batteries in order not to create a short circuit. Do not allow conductive materials such as rings, bracelets, or keys to touch the battery. The battery or conductor may overheat and cause harm.
- Use the battery identified for use with this product only in accordance with the instructions and limitations specified in this manual.
- Observe proper polarity orientation between the battery and metallic contacts.
- Do not disassemble your telephone. There are no serviceable parts inside. Refer to qualified service personnel for servicing.
- To prevent risk of fire or battery explosion, replace with the correct battery type. Dispose of used batteries according to the instructions.
You can also visit our website at www.telephones.att.com or call 1 (800) 222-3111. In Canada, dial 1 (866) 288-4268.
Documents / ResourcesDownload manual
Here you can download full pdf version of manual, it may contain additional safety instructions, warranty information, FCC rules, etc.
Advertisement


Need help?
Do you have a question about the CL2909 and is the answer not in the manual?
Questions and answers