Advertisement
Quick Links
OPERATORS MANUAL
QUICK START
This section is provided as a convenience for those in a rush. If you are experienced with this unit or other Rane
products, these few words will refresh your memory.
INPUTS 1 through 4 may be microphone or line level. The choice between the two is made by setting the LINE push-
buttons through the access holes on the front of the unit near the INPUT LEVELS. Follow the silk-screening on the rear
for proper wiring hookup.
Choose between MIC or LINE output levels at each of the XLR OUTPUT connectors. If the MLM 82 is connected
directly to a power amplifier, equalizer or recorder input, choose LINE level. If the MLM 82 is connected to a microphone
jack of an existing sound system, choose MIC level. Follow the silk-screening on the rear for proper wiring hookup.
Once Inputs, Outputs, and power are properly connected, with the OUTPUT LEVELS counterclockwise (off), set the
Input LEVELS as high as possible without causing the SIG/OL indicators to blink red more than occasionally during
extreme signal peaks. Now slowly raise the OUTPUT LEVELS as desired.
Never connect anything except an approved Rane power supply to the red thing that looks like a telephone jack on
the rear of the MLM 82. This is an AC input and requires special attention if you do not have a power supply exactly like
the one that was originally packed with your unit. See the full explanation of the power supply requirements on page
Manual-3.
MLM 82 CONNECTION
When connecting the MLM 82 to other components in
your system for the first time, leave the power supply for last.
This gives you a chance to make mistakes and correct them
without damage to your fragile speakers, ears and nerves.
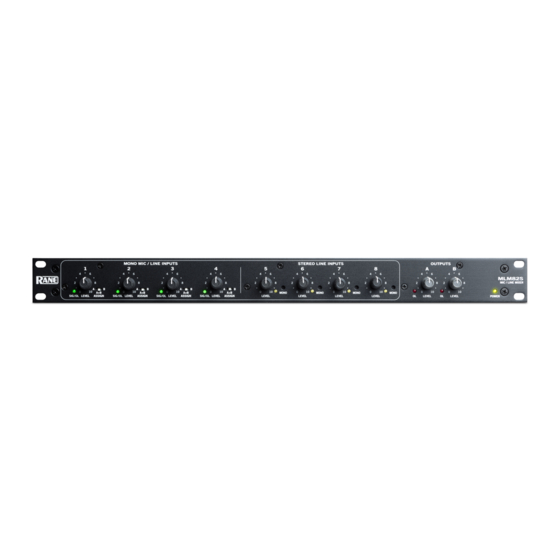
INPUTS
The sixteen jacks at the Inputs of the MLM 82 are
balanced. They will also accept unbalanced connectors. Use
only shielded cable for Inputs. For best noise rejection use
two-conductor-plus-shielded wire, even for unbalanced
operation. Connect the shield at both ends to help insure
proper grounding. See the Sound System Interconnection
RaneNote included with this manual for all cable adaptations.
MONO INPUTS 1-4. Connect up to 4 sources to these
XLR jacks. Rane follows the AES recommended practice of
pin 2 postive, pin 3 negative, and pin 1 to shield. Switch any
Input connected to a microphone to the mic position by the
associated "limited access" switches on the front panel (LED
off). When connecting line level signals, switch the input to
the LINE position (LED on). Use a small probe such as a #0
Phillips screwdriver to actuate the switch.
STEREO INPUTS 5-8. The ¼" connectors are line level
stereo/mono balanced/unbalanced Inputs. If the MLM 82 is to
be used with unbalanced sources (such as CD players),
WEAR PARTS: This product contains no wear parts.
consult the Sound System Interconnection RaneNote included
with this manual for proper wiring using ¼" TRS input
connectors. Stereo Inputs use both RIGHT and LEFT jacks at
each INPUT.
INPUTS 5 through 8 also serve as mono Inputs by either
using the XLR inputs (always mono) or by plugging into only
one of the ¼" jacks. Automatic switching occurs when only
one of these ¼" jacks are used at any Input, splitting the mono
signal to both Outputs. Connect to just one of these jacks and
the MLM 82 does the rest. If you only want the signal to
come out of one channel and not the other, plug an unwired
"dummy" ¼" plug into the other channel.
OUTPUTS
The MLM 82's OUTPUTS are balanced. The same wiring
conventions as the XLR Inputs apply. The type of device
following the MLM 82 must be considered when setting the
Output Level switch. Choose between LINE (0 dB) or MIC
(-40 dB) output levels. If the MLM 82 is connected directly to
a power amplifier input, choose LINE level. If the MLM 82 is
connected to a microphone jack on an existing sound system,
choose MIC level. For unbalanced OUTPUT connections do
not tie pin 3 (i.e. "–") to ground.
MLM 82
MIC/LINE MIXER
Manual-1
Advertisement

Related Manuals for Rane MLM 82


Summary of Contents for Rane MLM 82
-
Page 1: Quick Start
Never connect anything except an approved Rane power supply to the red thing that looks like a telephone jack on the rear of the MLM 82. This is an AC input and requires special attention if you do not have a power supply exactly like the one that was originally packed with your unit. -
Page 2: Front Panel Description
FRONT PANEL DESCRIPTION SIGnal present/OverLoad LED. This bi-color LED lights green for a -30 dBu signal, and turns red when the Input is within 3 dB of clipping. MONO MIC/LINE INPUT LEVEL controls 1-4 determine the amount of microphone or line signal to be delivered at equal levels to both Outputs. -
Page 3: Rear Panel Description
Put these in the out position when LINE level Outputs are desired, and depress them in for MIC level Outputs. POWER supply input. This is not a telephone jack. The MLM 82 is supplied from the factory with an RS 1 remote power supply suitable for connection to this input jack. -
Page 4: Operating Instructions
If the summer approaches overload and the OL indicators illuminate, just turn down the OUTPUT LEVELS until the overload stops—the mix ratios of all the inputs will not change. ©Rane Corporation 10802 47th Ave. W., Mukilteo WA 98275-5098 TEL (425)-355-6000 FAX (425)-347-7757 WEB http://www.rane.com Manual-4 103224...
Need help?
Do you have a question about the MLM 82 and is the answer not in the manual?
Questions and answers