Table of Contents
Advertisement
Advertisement
Table of Contents

Subscribe to Our Youtube Channel
Related Manuals for Rane SIXTY-FOUR


Summary of Contents for Rane SIXTY-FOUR
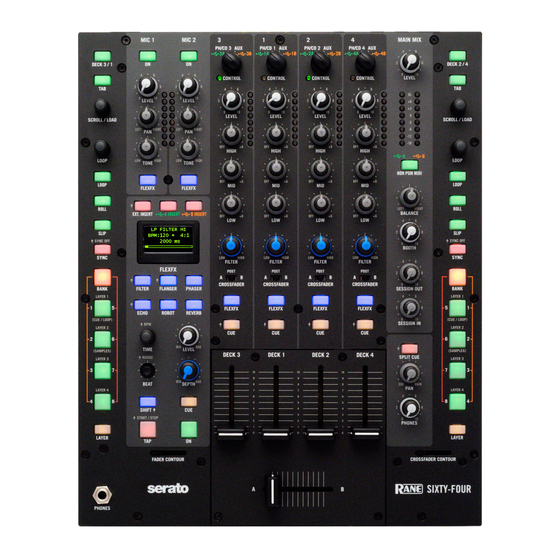
- Page 1 OWNER’S MANUAL RANE SIXTY-FOUR MIXER MANUAL SIXTY-FOUR...
-
Page 2: Important Safety Instructions
10. Protect the power cord and plug from being walked on or pinched particularly at plugs, convenience receptacles, and the point where it exits from the apparatus. 11. Only use attachments & accessories specified by Rane. 12. Use only with the cart, stand, tripod, bracket, or table specified by the manufacturer, or sold with the apparatus. -
Page 3: Fcc Statement
• IEC C5 line cord. • Serato DJ Software Manual. • This Sixty-Four Mixer Manual. Wear Parts The Sixty-Four Mixer contains no wear parts. The control vinyl records and CDs are wear parts as described in "Limited Warranties" on page 36. SIXTY-FOUR... -
Page 4: Table Of Contents
6 Quick Start: Hardware 23 Filter Effect Options Menu 23 Flanger Effect Options Menu 23 Echo Effect Options Menu 9 Sixty-Four Overview 24 Deck 1-4 Input Channel Options Menu 24 Main Mix Options Menu 10 Sixty-Four Connections 24 Mixer Shift Functions... -
Page 5: Quick Start: Software
Quick Start: Software Before using your Sixty-Four, at least read this short section for the basics. Read the complete manual to get the best investment from your new Sixty-Four. This section will help get you started with one computer. Serato DJ Software Installation for Mac OSX Before installing, we recommend you check for a newer version of Serato DJ at serato.com/... -
Page 6: Quick Start: Hardware
PHONO SIXTY-FOUR GROUNDS MIC 1 PH - CD PH - CD PH - CD PH - CD OFF - +48 MADE IN U.S.A. RANE CORP. 100-240V 50/60 Hz 15 WATTS S/PDIF FLEXFX LOOP SESSION RETURN SEND 001 345 482 RIGHT... - Page 7 CONTROL CONTROL For control of opposing decks, the center channels of the Sixty-Four are wired to Decks 1 and 2, and the outside channels are wired to 3 and 4. This places pairs of decks centered over the crossfader. Press the Deck 3 / 1 button to assign the left-hand control strip to Deck 3 or Deck 1. Similarly, press the Deck 2 / 4 button to assign the right-hand control strip to Deck 2 or Deck 4.
- Page 8 If you are still experiencing issues, you might have to adjust the placement of your setup. For example, make sure bass bins aren’t directly under the turntables. More help is in the Troublshooting section of the Serato DJ software manual. SIXTY-FOUR...
-
Page 9: Sixty-Four Overview
• Includes Serato DJ software. • Includes Rane ASIO and Core Audio Drivers for Serato DJ and other audio programs. • Advanced MIDI and audio routing: route any deck to either USB Port, and MIDI follows the audio. • Control Library, Cues, Loops and Samples on two computers. -
Page 10: Sixty-Four Connections
The Sixty-Four allows simultaneous connection of two computers. Each port is completely independent. Rane's ASIO (PC) and Core Audio (Mac) drivers connect to most audio software. It is possible to run Serato DJ on one computer while running third-party software on the other, Mac or PC, in any combination. -
Page 11: Deck Input Channels
MIDI for Deck 2 only MIDI for Deck 4 only to/from USB Port B. to/from USB Port B. to/from USB Port B. to/from USB Port B. For details on sharing the Sixty-Four with a second computer, see "DJ Swapping" on page 25. SIXTY-FOUR... -
Page 12: Headphone Cueing
• The Phones control sets the level to the headphone jacks. • Headphones output is available on two 1/4" jacks, one on the front and one on the top. An additional 3.5 mm jack is located on the front. All share the same signal. SIXTY-FOUR... -
Page 13: Software Controls
LAYER Press to turn on and Sync a Deck. If Sync is already on, pressing Sync again re-syncs the Deck. Hold down the Shift button and press Sync to turn Sync off. See Sync in the Serato DJ manual. SIXTY-FOUR... -
Page 14: Midi Triggers
Deck and for each USB port assignment. When the Layer button is pressed, the current Layer 1-4 button is lit. The mapping for each layer is shown above. Note that mappings for Layer 1 and Layer 2 are fixed while Layer 3 and Layer 4 may be changed by the user. SIXTY-FOUR... -
Page 15: Microphone Inputs
Cabling Note: When using unbalanced 1/4" TS cables from the Booth Outputs or RCA cables from the analog Session outputs, keep cables short, less than 3 meters (10 feet) to avoid hum and interference. Balanced 1/4" TRS or XLR cables are the best choice, allowing greater distance runs without problems. SIXTY-FOUR... -
Page 16: Flexfx Loop
INSERT FILTER FLANGER PHASER DECK 2 FLEXFX SEND BYPASS SEND Main ECHO ROBOT REVERB RETURN A RETURN Effects DECK 4 FLEXFX Engine B RETURN FLEXFX TIME LEVEL MIC 1 FLEXFX RETURN BEAT DEPTH RETURN RIGHT LEFT MIC 2 FLEXFX SIXTY-FOUR... -
Page 17: Effects Engine
When signals from the two paths are mixed, the frequencies that are out of phase cancel out, creating the phaser's characteristic notches. An LFO (low frequency oscillator) modulates the frequency of the all-pass filters. Operation of controls for the Phaser is defined in the "Effects Parameter Table" on page 20. SIXTY-FOUR... -
Page 18: Echo Effect
appears, there is an inequality between the BPM*Beat and Time. The arrow indicates which way to adjust the Beat Multiplier to correct the inequality and get the closest possible time. If the BPM source is displayed (*, S, A, B), the BPM*Beat matches the displayed Time. SIXTY-FOUR... -
Page 19: Effects Synchronization
Send MIDI Beat Clock option is selected in the MIDI Configuration page of the driver control panel. Both USB ports will also echo out any system real-time messages from the host computer. See "MIDI Configuration Screen" on page 28. SIXTY-FOUR... -
Page 20: Effects Parameter Table
Adjusts reverb reverb decay time, Does not affect Reverb time up/right or down/ Options" on page 23 intensity. shown by the bar in reverb. left in 10% steps. or in the "Driver Control the display. Panel" on page 26. SIXTY-FOUR... -
Page 21: Usb Audio
USB 9-10 USB Insert Return Deck 3 Record USB 1-2 Deck 1 Record USB 3-4 Deck 2 Record USB 5-6 Deck 4 Record USB 7-8 x2 USB Ports USB RECORD USB Insert Send USB 9-10 Main Mix Record USB 11-12 SIXTY-FOUR... - Page 22 DVS). • Main Mix These can be changed in the "Deck 1-4 Input Channel (default). Options Menu" on page 24, or the "Deck Inputs 1-4 • Mic 1. Screen" on page 27. • Mic 2. SIXTY-FOUR...
-
Page 23: Shift Options
For the high-pass Echo and high-pass Hold Echo, adjust the filter corner frequency by rotating the Time encoder, as it is displayed in the menu. Press any effect button or the Shift button to exit the menu. SIXTY-FOUR... -
Page 24: Deck 1-4 Input Channel Options Menu
BPM up or down. MIDI beat clock is a system real time message sent 24 times per quarter note. BPM Adjust Hold the Shift button and turn the Time encoder to adjust the BPM to a specific value. SIXTY-FOUR... -
Page 25: Dj Swapping
Swapping between two DJs using the Sixty-Four with Serato DJ is quick and seamless. In the scenario below, one DJ, let’s call him DJ A, is already connected to the Sixty-Four using either USB port A or B. With DJ A’s computer already connected to the Sixty-Four and playing music, do the following: 1. -
Page 26: Driver Control Panel
Windows Control Panel. Select Start > Control Panel > Rane Sixty-Four. Core Audio (Macintosh) The Sixty-Four uses a low-latency Core Audio device driver on the installation CD to interface with Serato DJ and other 3rd-party software applications on Macintosh operating systems. Core Audio allows audio software applications to simultaneously stream audio to and from the Sixty-Four. -
Page 27: Deck Inputs 1-4 Screen
• Low-cut Hold Echo with adjustable feedback filter and adjustable recirculation of 0% to 100%. • The sliders set the low-cut filter cutoff frequency The Analog Insert panel has two options. We recommend the +4 dBu setting unless you insert a low- voltage device using RCA connectors. • +4 dBu. • -10 dBV. SIXTY-FOUR... -
Page 28: Midi Configuration Screen
• Push both Deck 1 FlexFX and Deck 2 FlexFX buttons at the same time. • While holding these buttons down, power on the Sixty-Four. • Immediately after fading up, the FlexFX lights flash bright one time, indicating a successful reset. -
Page 29: Front Panel Midi Controls
LAYER LAYER LAYER FADER CONTOUR CROSSFADER CONTOUR SIXTY-FOUR PHONES PHONES Controlling button backlighting is only possible for software controls. The MIDI Note ON/OFF number for button backlighting is the same as for the associated switch note on/off. The acceleration value determines the color and intensity of the backlight as follows: •... -
Page 30: Rear Panel Midi Controls
PHONO SIXTY-FOUR GROUNDS MIC 1 PH - CD PH - CD PH - CD PH - CD OFF - +48 MADE IN U.S.A. RANE CORP. 100-240V 50/60 Hz 15 WATTS S/PDIF FLEXFX LOOP SESSION RETURN SEND 001 345 482 RIGHT... -
Page 31: Technical Specifications
Unit Size: 36.4 cm x 30.5 cm x 10.2 cm 14.3˝ H x 12˝ W x 4˝ D Weight: 5.2 kg 11.3 lb Shipping Size: 19.7 cm x 38.1 cm x 49 cm 7.75˝ H x 15˝ W x 19.25˝ D Weight: 16 kg 7.26 kg SIXTY-FOUR... -
Page 32: Fader Maintenance
OWNER’S MANUAL Fader Maintenance The crossfader in the Sixty-Four is designed with materials highly resistant to corrosion and most chemicals. While it will handle millions of operations, it may become dirty over time. Bad things may be spilled into the crossfader, but in many instances the crossfader may not be damaged and the sound quality thus unaffected. - Page 33 • Right white cable connects Decks 2-4 to J3. • Blue center cable connects Crossfader to J2. • Test all the faders before installing the fader panel face plate and fader knobs. CROSSFADER DECK 2-4 DECK 3-1 CROSSFADER DECK 2-4 DECK 3-1 SIXTY-FOUR...
-
Page 34: Mounting Brackets
Mounting Bracket Accessory When installing a Sixty-Four mixer in a coffin case, it is important to leave 3.9 inches (10 cm) in front and in back of the mixer to allow room for cables and access to controls. The rubber feet provided on the chassis for table top use should remain in place when installing the mixer in a coffin case. -
Page 35: Declaration Of Conformity
LV directive and the EMC directive in the event that the equipment is modified without written consent of the manufacturer. This declaration of conformity is issued under the sole responsibility of Rane Corporation. Type of Equipment: Professional Audio Signal Processing... -
Page 36: Limited Warranties
1) arising out of material or workmanship not provided or furnished by Rane, or 2) resulting from abnormal use of the product or use in violation of instructions, or 3) in products repaired or serviced by other than the Rane Factory, or 4) in products with removed or defaced serial numbers, or 5) in components or parts or products expressly warranted by another manufacturer. - Page 37 IN THE COUNTRY WHERE THE UNIT WAS PURCHASED, OR (if product was purchased in the U.S.) AT THE RANE FACTORY IN THE U.S.. If the product is being sent to Rane for repair, please call the factory for a Return Authorization number.
- Page 38 OWNER’S MANUAL SIXTY-FOUR...
- Page 39 OWNER’S MANUAL SIXTY-FOUR...
- Page 40 OWNER’S MANUAL PART 21052 SIXTY-FOUR...
Need help?
Do you have a question about the SIXTY-FOUR and is the answer not in the manual?
Questions and answers