Table of Contents
Advertisement
Advertisement
Table of Contents

Subscribe to Our Youtube Channel
Related Manuals for Hasselblad H1D


Summary of Contents for Hasselblad H1D
- Page 1 Hasselblad H1D USER MANUAL (V1)
-
Page 2: Table Of Contents
Hasselblad H1D C O N T E N T S Introduction Quick Start Guide Function Control & Display Camera Body Viewfinder Lenses Film Magazines Light Metering & Exposure Control General Functions Advanced Features 10. Flash 11. Optional Accessories 12. Appendix Quick Start Guide Function Control &... - Page 3 Manual focus Manual focus mode Manual override Autofocus Single Shot Continuous Autofocus mode Drive Single Continuous Multi exposure Hasselblad H1D Profiles Making a profile Changing a profile name Advanced Features Self Timer Bracketing Interval Settings Custom Options Digital User Button...
- Page 4 The H1D camera system presents a list of features coloured by superlatives. What was once considered optional is now integral. The potential of this outstanding professional equipment straight out of the box is dazzling.
- Page 5 And, apart from the practical aspects, the H1D also exudes a feeling of superb design and ergonomics that makes the camera a pleasure to own as well as use. Being Hasselblad,...
- Page 6 We are also confident that you are going to produce images you are proud of. Some of these will remain as a documenta- tion of the history of our world, perhaps even beyond. That’s how it is with Hasselblad. sssssssssssssss The primary goal of all camera development is of course the seamless and unobtrusive production of superb images, regardless of situation.
- Page 7 Take your time to learn the intricacies and potentials of the H1D. Go at your own pace and explore the possibilities when you feel ready for the next step. Results will be good from the word go, that’s guaranteed, but there is always room for improvement, more...
-
Page 8: What's In The Box
Familiarise yourself with the various parts and components. Leave protective covers on as much as possible and avoid touching glass surfaces and inserting fingers into the camera body. The H1D has a robust construction and is capable of withstanding fairly rough treatment but nevertheless is a precision instru- ment and will serve you longer if treated with respect from the beginning. - Page 9 The following is included with a brand new H1D: • H1D camera body complete with sensor unit • Viewfinder HV90X • HC 2.8/80 mm lens • Image Bank • Link cables ( 2 pcs) • FireWire cable • FlexColor software •...
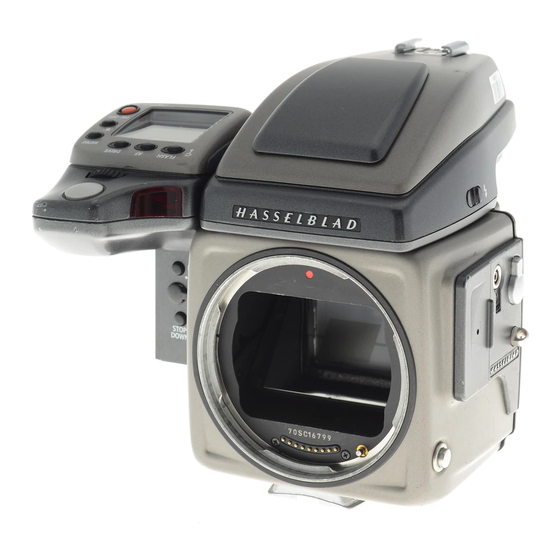
- Page 10 Hasselblad H1D 1. Flash unit hot-shoe 2. Rubber eyecup 3. Exposure mode and metering method selector button 4. Exposure compensation button 5. Eyepiece adjustment dial 6. Grip LCD 7. Rear control wheel 8. User button 9. Camera control buttons 10. Support strap lug 11.
- Page 11 24. Focusing ring 25. Lens shade bayonet 26. Filter screw thread 27. Databus connection 28. Viewfinder release button 29. Flash unit catch Hasselblad H1D 30. Viewfinder attachment hook 31. Viewfinder databus connection 32. Magazine release button 33. Flash PC socket 34.
- Page 12 Hasselblad H1D 44. Standard L-size battery 45. FireWire socket 46. External power supply socket 47. Link connector 48. Status indicator 49. On/Off button 45 46 47 48 49...
-
Page 13: Quick Start Guide
Quick Start This section is mainly a quick start guide to assembling your new H1D. This process should take no more than a few minutes to complete and you will be able to take simple and straightforward photographs digitally in untethered mode. - Page 14 Hasselblad H1D Untethered Tethered FlexColor...
-
Page 15: Introduction
Quick start H1D assembly from new The H1D can be used tethered to a computer or untethered, though in either case always connected to the Image Bank for digital capture. The following procedure is a general introduction to the camera from new. - Page 16 Hasselblad H1D Quick Start Guide...
-
Page 17: Hasselblad H1D
Hasselblad H1D... - Page 18 LCD in the viewfinder. and finally ... 20. From the inactive mode, press the ON.OFF button until you see the H1D logo on the grip LCD. The LCD then in turn displays the ‘standard’ screen.
- Page 19 24. Release the cable from the camera and Image Bank by pulling straight out on the connector collars. Familiarize yourself with the H1D Take a few minutes to familiarize yourself with the H1D and its various controls. Note the difference between a long press and a short press with some buttons. For example from the standard screen a click of the ON.OFF...
- Page 20 Hasselblad H1D Attempt a half-press with the shutter release button with the camera set at autofocus too see how the lens focuses and the light metering reacts. Notice that the lens barrel does not revolve in autofocus but you can immediately change the focus manually and immediately revert to autofocus again by using a half-press again.
-
Page 21: Function Control & Display
Function Control & Display LCD and LED displays on camera and viewfinder Pixel based display Upgradeable software Rapidly accessible menu Interactive display Customizable functions Hasselblad H1D... - Page 22 Hasselblad H1D All functions and settings on the H1D are accessed and altered by the readily accessible control buttons and wheels on and around the grip and on the sensor unit. The information on the LCDs is in menu format and has a great deal in common with those found in modern computers, cell phones, etc.
- Page 23 AF button Accesses focus modes. DRIVE button Accesses the various drive (film advance) modes. Front control wheel Accesses various settings. Hasselblad H1D MENU button Accesses menu. Illumination button Illuminates grip LCD. ON.OFF (PROFILES/ESC) button Turns the camera on and off. Accesses Profiles and acts as escape button for other functions.
- Page 24 Hasselblad H1D M.UP button Raises and lowers mirror. Remote release cord port For attaching a remote release cord (electrical). STOP DOWN button Stops down aperture to current setting. AE-L button Locks light reading made in both auto- matic and manual exposure modes.
- Page 25 Metering method indication Exposure mode indication (Average) (Automatic exposure setting) Focus setting (Autofocus setting, single shot mode) Sensor format Hasselblad H1D Drive condition (Single setting) Shutter speed setting ( 1/20s ) Film speed rating (160 ISO /ASA) Low battery symbol...
- Page 26 Hasselblad H1D Typical camera grip display when changing settings. Command indication The upper row on the screens describes commands (which change according to the setting). The button immediately above each com- mand effects the change. So in this case, for example, you would press the FLASH button to ‘exit’...
- Page 27 Aperture setting (‘aperture priority’ mode) ( f/4.8) Flash LED Warning triangle LED Exposure compensation setting (+0.7 EV) Exposure compensation Metering method setting setting reminder symbol (average) Shutter speed setting Film magazine (0.4 second) status (empty) Hasselblad H1D Focus aid LED...
- Page 28 Hasselblad H1D Some examples of various viewfinder LCD screens visible with standard settings and when specific control buttons are pressed Standard settings Normal screen FLASH ���� Flash mode ���� AF mode DRIVE ���� Drive mode MENU ���� Menu mode Exposure compensation mode...
- Page 29 LCD of where you are on the menu and represents the current state of settings. The H1D features the advantage of multiple customization of set- tings. This means that your personal choice of settings, and thereby appearance of various combinations of symbols on the LCD at any time, will not necessarily be the same as many of the screens illus- trated in this manual.
- Page 30 Hasselblad H1D The following is a list of various terms describing various actions that appear in the menu: Enter : moves screen down one level on the menu. Exit : moves screen back up one level on the menu. Does not save any settings.
- Page 31 Main direction of path through menu e main path traces step-by-step the path that has to be taken through the various branches of the menu tree as they appear on the LCD to reach the relevant functions. Hasselblad H1D...
- Page 33 Hasselblad H1D...
- Page 34 Hasselblad H1D Grip controls There are five buttons that surround the grip LCD combined with two control wheels to access various parts of the menu and to alter settings. Additionally there is an LCD illumination but- ton as well as the shutter release button.
-
Page 35: Shutter Release Button
is is a triple function button. It will access the drive settings screen on the LCD from the working screen. See separate section for full details. It also acts as the SAVE and ENTER but- tons for many other settings. (EXIT) (ON) (SEL.) (SAVE) (ENTER) Hasselblad H1D... -
Page 36: Menu Button
Press to illuminate the LCD. Remains active until camera enters standby mode. ON.OFF (PROFILES/ESC) button Press the button for a half second to activate the camera. e H1D start-up logo will appear and then the standard screen. Aer a few seconds (customizable) the camera will enter Standby mode. - Page 37 Can be designated another func- tion in Custom options. This button is particularly useful and can save you a great deal of time and effort depending Hasselblad H1D...
- Page 38 (two within a half second) will immediately access the ‘Self timer’ function. Can be designated another function in Custom options. Remote release cord port For attaching a remote release cord (electrical). e Hasselblad accessory jack plug socket is protected by a captive rubber plug. STOP DOWN button Press this button to make a visual check of the depth-of-field on the viewfinder screen at the chosen aperture.
- Page 39 Hasselblad H1D There are also two control buttons on the viewfinder, as well as the eyesight correction adjust- ment wheel: Eyesight correction adjustment wheel e personal eyesight adjustment facility has a diopter range of -4 – +2.5, to suit most users.
- Page 40 Hasselblad H1D...
-
Page 41: Sensor Unit & Image Bank
Sensor unit & Image Bank 22 million pixels Up to 850 images at full resolution Hasselblad H1D... - Page 42 Hasselblad H1D The H1D can be used untethered or tethered. ‘Untethered’ means that the camera is con- nected only to its Image Bank which acts as an image storage facility and power supplier to the sensor unit ( the camera body, viewfinder and lenses take their power requirements from the batteries in the grip).
-
Page 43: Shooting Modes
Attachment socket for link cable to provide connection to the Image Bank. Shooting modes e H1D captures images in two different modes: Preview mode (tethered mode only) Captures a low resolution image and applies minimal processing. is type of capture appears most quickly on your computer screen. -
Page 44: Control Panel
Hasselblad H1D Control panel When using the H1D untethered some features are controlled from the control panel on the sensor e control panel displays the following: A Image counter: shows the number of images currently stored in the Image Bank and how many images there are le... -
Page 45: Using The Control Panel
When power is supplied to the sensor unit it starts up showing the main window: 1. The picture displayed in the main window is the latest shot. To change the display to show the image info and histogram press MENU button. Hasselblad H1D... - Page 46 Hasselblad H1D 2. In the pop-up menu use Browse/Scroll button to highlight the Setup item, then press OK button to enter. 3. Now scroll and highlight the Display... item and press OK to enter. 4. Highlight Show Histogram. Press OK.
-
Page 47: Zooming
Generally it is recommended to use Up or Down as the Le and Right keys will still function as browse keys when in Browse mode. 1. Press Up or Down on the Browse/Scroll button to display the Zoom Box. Hasselblad H1D... -
Page 48: Browse Options
Hasselblad H1D Now use the Browse/Scroll button to move the Zoom Box to the area in the image you want to zoom into, then press the OK button. If necessary repeat procedure until max. zoom level (3 times) has been reached. You can exit the zoom function anytime by pressing the MENU button. -
Page 49: Deleting Images
Deleting images is possible from both the main display and in ‘Browse’ mode while deleting batches is only possible in ‘Browse’ mode. 1. From the main display you can delete the currently previewed image by pressing the MENU button and in the pop-up menu highlight Delete... and press OK button. Hasselblad H1D... - Page 50 Hasselblad H1D 2. Use Browse/Scroll button to highlight either Yes (to delete) or No (to cancel) then press OK button to confirm. 3. Alternatively press OK button to enter ‘Browse’ mode, use Browse/Scroll button to find the image you want to delete and press MENU button. In the menu highlight Delete... and press OK button.
-
Page 51: Changing Settings
5. In ISO Setting turn the rear control wheel to choose an ISO value of 50, 100, 200 or 400. In White balance turn the rear control wheel to choose between manual, flash, daylight or tungsten. 6. Press SAVE (the DRIVE button) or half press the shutter release button to save the setting. Hasselblad H1D... - Page 52 Hasselblad H1D Changing settings on the sensor unit e menu holds all the parameters for setting up the sensor unit To enter the menu press MENU button from the main window. Use Browse/Scroll button to scroll through the menu items - please note that holding down the button will make scroll- ing quicker.
- Page 53 Hasselblad H1D Info… Shows the serial numbers of your sensor unit and Image Bank. It also lists the total number of captures shot, the time used in ‘Live Video’ mode and the total time in which the unit has been switched on.
-
Page 54: Basic System Set-Up
Hasselblad H1D Use the Display -> Show Histogram and Show Info settings to display the histogram and info bar respectively for the current image on top of the preview image - see ‘Displaying Images’. Use the Display -> Light... setting to turn the display background light on or off. -
Page 55: Error Messages
If you make the same changes in FlexColor while the sensor unit is not connected it will have no effect. Error messages When working with the H1D untethered the following error messages in the rear display ensure complete control of image quality. Each message is accompanied by a low key error sound: ‘Image transfer error’... -
Page 56: Standard L-Size Battery
(in 2 secs.) for viewing and processing in FlexColor. During untethered operation, the H1D is powered by its own batteries in the grip and the Image Bank is powered by a standard lithium ion battery (see Technical Specifications). All shots are saved straight to the Image Bank’s hard disk, which has a capacity of up to 850 shots. -
Page 57: External Power Supply
To attach the battery on the Image Back follow procedure below: 1. Lower the battery into the battery compartment. Do not place it on top of the terminal pins! 2. Push the battery as far as it goes towards and onto the termi- nal pins. Hasselblad H1D... -
Page 58: Removing The Battery
Hasselblad H1D Removing the battery Before removing the battery make sure that the Image Bank’s hard disk is not busy - the status indicator/must be green - then switch off the unit on the On/Off button. Push the battery away from and off the terminal pins then li it off. -
Page 59: Transferring Images
2. Connect the Image Bank to the computer using a FireWire cable. 3. Switch on the Image Bank on the On/Off button/. 4. Within a few seconds a Contents window is available with thumbnails of all images ready to load. Hasselblad H1D... -
Page 60: Contents Window
Hasselblad H1D Exposure mode Transferred mark Image name Selected image Approval checkmark The Contents window e Contents window displays the following: Get Info Displays a basic image file information window for each of the selected shots. Deletes the currently selected shot(s) from the Image Bank’shard disk. - Page 61 Hasselblad H1D Image searching Using the Search field enables you to filter the Contents window contents. Simply enter the text you want to search for and type Return, and only images containing this text will be shown. To return to an unfiltered display simply delete the text from the Search field and type Return.
-
Page 62: Image Transfer Options
Hasselblad H1D Image transfer options When transferring images from the Image Bank to the currently selected Thumbnails folder you have the following options: Drag and drop Simply select a number of thumbnails in the Contents window and drag them to the thumb- nails window. - Page 63 For information about the processor, operating system, RAM and hard disk requirements please refer to the ‘FlexColor Soware Reference’ manual, that comes with the FlexColor soware. e H1D is very easy to connect to a computer. Use the procedures below to set up your system. Hasselblad H1D...
-
Page 64: In The Studio
Hasselblad H1D In the studio 1. Connect the H1D to the Image Bank with the link cable. 2. Connect the Image Bank to the computer with the FireWire cable. FlexColor 3. If needed, attach a studio-flash (strobe lighting) system to the camera body for synchronizing flash and exposure. -
Page 65: Care And Maintenance
Untethered use (on location) 1. Connect the H1D to the Image Bank with the link cable. 2. Attach the battery to the Image Bank (see ‘Attaching/Detaching the Battery’ for details). 3. If required, attach a studio-flash (strobe lighting) system to your camera body for synchronizing flash and exposure. - Page 66 Hasselblad H1D Protect your camera and Image Bank from impact. Keep the original shipping boxes for storage. Cleaning the infrared filter If you see dark or coloured spots or lines in your images, then you may need to clean the sensor’s infrared filter.
- Page 67 3. If you still see spots on your shot after you have cleaned the outside of the infrared filter, then you may have dust on either on the back side of the IR filter or on the CCD itself. This can only be removed at the Hasselblad factory. Contact your Hasselblad dealer for assist- ance.
- Page 68 Hasselblad H1D the filter only once. Do not wipe the same area twice with the same tissue as you might reapply dirt removed in the first sweep, potentially making things worse. 4. Finally check if the IR filter has been properly cleaned either by visual inspection or by mounting the camera back to the camera and making a shot.
-
Page 69: Camera Body
Camera Body Aluminium cast in one piece Stainless steel shell Integral Quick coupling plate Digitally controlled Upgradeable software Modular design Integral ergonomic grip Pixel based LCD user interface Hasselblad H1D... - Page 70 Slight marks or some dust particles on the mirror will not affect results. More noticeable prob- lems, however, should be taken care of by a Hasselblad Authorized Service Center. The camera body also contains the viewfinder screen, which can be easily removed or exchanged without the use of special tools or adjustment procedures.
-
Page 71: Carrying Strap
Batteries e H1D requires batteries for all actions. ere is no mechanical reserve facility so it is advisable to always have a spare set of batteries or exchange set if using a rechargeable battery pack. As is the case with most batteries, problems might be encountered when used in very low temperatures. -
Page 72: Viewfinder Screen
Please see specific user manual supplied with the rechargeable battery pack for further information. Viewfinder screen e H1D is fitted with a Spherical Acute-Matte D viewfinder screen for extreme bright- ness, clarity and even illumination. An optional accessory screen with a grid pattern is also available. -
Page 73: Accessory Connection
If the screen becomes damp, do not use hot air to dry it. Use a soft cloth on the upper surface only. Seek advice from an Authorized Hasselblad Service Center if the screen becomes particularly soiled. Remember that particles or greasy marks on the screen might impair the viewfinder image but have no effect whatsoever on the recorded image. - Page 74 Hasselblad H1D...
-
Page 75: Viewfinder
Viewfinder Multi-mode light metering Full exposure information 100% image 90° viewing angle for eye-line composition Full image for spectacle wearers Integral dioptre adjustment Integral flash unit Hasselblad H1D... - Page 76 Hasselblad H1D The 90° viewfinder provides a laterally corrected 100% image at eye- line level. It features a wide-range diopter adjustment to suit most users. The viewing distance is designed to provide full frame view even for eyeglass wearers. The bright Spherical Acute-Matte D focus-...
-
Page 77: Parts & Components
Hasselblad H1D Parts & Components A. Rubber eye cup B. Hot shoe C. Eyesight adjustment wheel D. Exposure compensation button E. Exposure method / mode button F. Integral flash unit G. Flash unit button H. Viewfinder release button Attaching and removing the viewfinder... -
Page 78: Eyepiece Adjustment
Rubber eye cup Two rubber eye cups are available for the H1D. e one fitted is suitable for users who do not intend to use eyeglasses when photographing. e second shorter eye cup is for those who either prefer to position their eye further from the viewfinder and those who wish to wear eyeglasses. -
Page 79: Lenses
Non-rotation of filter or accessory when focusing Non-rotation of lens barrel in automatic mode Shutter speeds 18 hours to 1/800 sec Reversed lens shade serves as protection Automatic detection of extension rings and converters Hasselblad H1D... -
Page 80: Parts & Components
All HC lenses have been specially formulated for the H system to produce the extremely high performance expected from Hasselblad to meet the demands from conventional and digital photography alike. In addition to extreme sharpness, the design also incorporates a soft, pleas- ant looking boké... -
Page 81: Removing A Lens
Hasselblad H1D by unscrewing it in a counter-clockwise direction. Align the index on the lens with the index on the camera body and rotate the lens clockwise (bayonet fitting) until it clicks into place. Removing a lens Depress the lens release button and keep it depressed while rotating the lens counter-clock- wise until it stops and li... -
Page 82: Shutter And Aperture Control
Hasselblad H1D clockwise into place aer ensuring the index on the lens shade aligns with the index on the front of the lens. When mounted in reverse, they are attached by matching the indexes and turning counter-clockwise. Shutter and aperture control Both the shutter and aperture are electronically controlled and are adjusted by the control wheels on the grip. -
Page 83: Infrared Focus Settings
Focus aid As well as the conventional view on the focusing screen to ensure a sharp image, the H1D also features LED focus aid appearing as two arrowheads to the right of the viewfinder display (except for lenses with a maximum aperture of f/6.7 or smaller). e arrowheads provide confirmation of a precision focus setting and are a useful support to a setting made with eyesight alone. - Page 84 Hasselblad H1D Focus setting too far beyond the chosen distance Focus setting too close for chosen distance Focus setting correct for chosen distance Manual focus setting When the le arrowhead alone appears it means the focus setting is too far beyond the chosen distance (the area framed within the central zone in the viewfinder) and when the right ar- rowhead alone appears it means the focus setting is too close.
-
Page 85: Film Magazines
Automatic wind on / wind off Automatic film advance LCD information panel Integral dark slide Customizable data imprinting Illuminated LCD Barcode recognition Count-up or count-down film frame reminder choice Hasselblad H1D... -
Page 86: Parts & Components
Hasselblad H1D F G H The film magazine is an optional accessory, highlighting again the great advantages of the modular sytem. A film magazine does not only function simply as back up for for a depleted Image Bank battery on location. It can also be used where long exposures are a necessity,... -
Page 87: Lcd Illumination Button
When the magazine is attached to the camera, the button on the magazine is inaccessible but you can still illuminate the LCD by pressing the illumination button on the grip instead. Change up button Can alter the settings ‘upwards’. For example, to increase the film speed setting. Toggle action. Hasselblad H1D... -
Page 88: Darkslide Indicator
Hasselblad H1D F G H Change down button Can alter the settings ‘downwards’. For example, to decrease the film speed setting. Toggle action. Function selector Selects the four functions that can be changed on the magazine. e functions are on a menu loop so that repeated pressing of the selector button will successively access all functions in turn. -
Page 89: Magazine Settings Lock
Hasselblad H1D If you attempt to make an exposure with the darkslide is closed, however, you will receive a warning message in the viewfinder and grip LCDs – ‘e darkslide is closed’. Darkslide key Withdraws and replaces the darkslide. Fold out the key and turn it counter-clockwise 360°... -
Page 90: Battery Replacement
Hasselblad H1D tected from damage. Keep the protective cover on when the magazine is being stored or transported. Operation Battery e magazine uses a battery to retain information and settings when unattached from the camera. When attached to the camera body, the magazine takes its power requirements from the camera batteries. -
Page 91: Attaching And Removing The Magazine
Hasselblad H1D insert the battery incorrectly, the film magazine will not be damaged though it will not func- tion. Try to avoid touching the surface of the battery with your bare fingers as sweat residue can decrease the electrical conductivity of the battery casing and might cause corrosion. -
Page 92: Film Speed Setting / Barcode
Hasselblad H1D Ensure you press on the centre of the button, not on the lever. You cannot remove a magazine if the darkslide is not closed. If the film holder is inadvertently removed mid-film, then exposed frames will naturally be lost due to light fogging. However, if the film holder is quickly re-inserted, the film will automatically be advanced by three frames to position fresh unexposed film. -
Page 93: Film Length/Number Of Frames
(or barcode symbol) appears together with ISO. or the button to reach the required setting. button until the 120 or 220 symbol appears. or the button to change the desired setting (not possible at barcode Hasselblad H1D... -
Page 94: Frame Counter Setting
Hasselblad H1D Manual film speed setting. 220 film length setting. Data imprinting setting. Frames remaining film counter setting. 4) The new setting will be saved automatically after timeout. 5) Return the magazine settings lock to the locked position. Data imprint setting Data imprinting can be activated or deactivated through the magazine menu. -
Page 95: Low-Battery Symbol
In the example shown here: • 120 film length set manually • the film speed (ISO160) has been set manually • 5 frames have already been exposed (therefore with regular 120 film, 11 frames remain) • the battery is functional Hasselblad H1D... -
Page 96: Film Loading
Hasselblad H1D Film loading The film magazine can be loaded either on or off the camera. Regularly check the interior of the magazine and remove dust, par- ticles or any scraps of paper from previous rolls of film. Load and unload film magazines away from direct light sources. - Page 97 Hasselblad H1D...
-
Page 98: Film Wind Off
Hasselblad H1D key clockwise 90˚ to lock the film holder in place and fold the key back into its stored position. You might find that increased pressure on the left hand side of the film holder will more easily ensure a positive and correct positioning in the magazine. -
Page 99: Exposure Control
Light Metering & Exposure Control Three metering methods Five exposure methods Extremely accurate light metering Hasselblad H1D... - Page 100 Hasselblad H1D Light metering and exposure control The light metering system is capable of selective sensitivity producing three reflective meter- ing methods: Average, Centre weighted and Spot. All methods are measured in increments of 1/12 EV. Information transfer is rapid and automatic ensuring consistently correct exposure settings even in difficult and changeable lighting situations.
- Page 101 Centre weighted are not sure about choice, please check in a photographic textbook for a fuller explanation. Also check our website occasionally – www.hasselblad.com – for articles and discussions concerning such matters. Remember that exposure configurations are only applicable to the speed of the film in use.
-
Page 102: Metering Method
Hasselblad H1D Average (45 x37mm) ~ 70% Centre weighted (23x20mm) ~ 20% Spot (diameter 7.5mm) ~ 2% Metering method There are three metering methods available. All three are reflective methods (measuring the light reflected off various selected parts of the subject according to method) and are through the lens (TTL). -
Page 103: Exposure Method
In each mode you can see both the aperture and the shutter speed information on the grip LCD and on the viewfinder LCD. In manual mode, aperture is set by the front control wheel and the shutter speed by the rear control wheel. Hasselblad H1D... -
Page 104: Manual Exposure - M
Hasselblad H1D In the automatic modes, the aperture and shutter speed settings are controlled by the camera, either partially or completely according to setting. Within this mode there are four choices. (Please see the Appendix for P and Pv mode charts that describe the aperture and shutter speed setting combinations). - Page 105 Hasselblad H1D • by figures above the scale representing the amount of adjustment in EVs. A ‘+ 0.3’ above the scale in the display, for example, would indicate a ‘0.3 EV overexposure’ setting. Conversely, a ‘-2’ , for example, would indicate a ‘2EV underexposure’ setting. Note that the appearance of a +/- symbol on the grip and viewfinder LCDs in manual mode means that a change has been made to the exposure compensation setting.
-
Page 106: Ae- L Button
Hasselblad H1D Programmed variable: Pv - is mode is very similar to Programmed, except with the additional parameters of lens focal length being au- tomatically taken into account. For example, long shutter speeds will automatically be avoided with a long focal length lens. - Page 107 Hasselblad H1D a) lock an EV setting in manual and automatic modes. b) be used in Zone mode. a) When the button is pressed, the light metering facility is locked to the EV setting at that moment. An L (= locked) symbol appears between the shutter speed and the aperture indica- tion on the grip LCD and viewfinder LCD to confirm the status.
- Page 108 Hasselblad H1D Zone 5 and click the AE-L button. e meter will now display different parts of the subject as zone values in the viewfinder LCD as you move the spot marking over the subject. (Included are Lo and Hi to signify areas beyond the range of the film).
-
Page 109: Exposure Compensation
- to + scale with central index. 4) Press Save (DRIVE button) to retain the setting. A ± symbol is then displayed between the aperture and shutter speed setting as confirmation of the setting. Hasselblad H1D... - Page 110 Hasselblad H1D...
-
Page 111: General Functions
General Functions Manual and autofocus modes Three drive modes Quick adjust wheel User Profiles Hasselblad H1D... - Page 112 Custom Options. Settings can only be made when the camera is in the ON mode. To activate the camera press the red ON.OFF button until you see the start-up H1D logo appear on the grip LCD. e logo is automatically followed by the standard screen. e camera is now in ON mode.
-
Page 113: Manual Focus
Hasselblad H1D Standby mode is automatically set from the ON mode aer 15 seconds (default) of inactive use (programmable in Custom Options). OFF mode is also automatically set aer several hours of inactivity. Press the red ON.OFF button for a half second. All buttons (except the ON.OFF button) remain ineffective, producing minimal demand on the batteries. -
Page 114: Manual Focus Mode
Hasselblad H1D With Manual Override, you can manually alter a focus setting that has been made in the auto- focus mode, by rotating the lens barrel in the conventional manner and without having to change modes. As long as the shutter release button is kept at the half-press position, the new focus setting is maintained. -
Page 115: Single Shot
Hasselblad H1D e instant manual override facility produces a convenient way of working. You can take advantage of autofocus while retaining an instantly adjustable manual focus check if preferred for pin-point accuracy without making any changes in the settings. Natural friction is inherent in the design to purposely reproduce the secure feel of a manual lens. - Page 116 Hasselblad H1D Note though that in this mode the lens will focus at a distance and will remain focused at that distance while pressure remains on the shutter release button. In this way, you can focus on a nearby object for example, temporarily positioned within the focusing zone on the viewing screen and then without releasing pressure on the shutter release button, recompose knowing that the focus remains on the object chosen even though it is now outside the focusing zone.
-
Page 117: Autofocus Mode
Hasselblad H1D Continuous In Continuous setting (AF C), the shutter can be released rapidly before the lens is focused in order to capture a split-second shot (in Single Shot, an exposure cannot be made until the camera has had time to focus). However, the camera will continue to focus if a moving subject is within the focusing zone or if you recompose, even though the shutter release button is half pressed. -
Page 118: Continuous
Hasselblad H1D DRIVE There are three drive modes: Single, Continuous and Multi exposure. They are all accessed by pressing the DRIVE button on the grip. Single In this mode, an exposure is made when the shutter release button is pressed, the film is advanced to the next frame and the camera is made ready for the next exposure. -
Page 119: Multi Exposure
8) You can change your mind at any time to exit the sequence by pressing the DRIVE but- ton to advance the fi lm to the next frame. The camera is then prepared for another new multi exposure sequence according to the initial setting. Hasselblad H1D... -
Page 120: Profiles
Hasselblad H1D PROFILES e profiles feature allows rapid access to pre-determined combinations of settings that in- crease the speed and security of workflow. One example might be in a social situation where there might be a need for formal outdoor portraiture followed by informal indoor handheld flash-assisted wide-angle shots, both situations requiring very different settings in a stressful environment. -
Page 121: Making A Profile
To use a profile from the standard screen, press the PROFILES button to reach the profiles screen again. Scroll down the list to the profile you want and then press the Load (AF) but- ton. All the saved settings will then be automatically implemented. Hasselblad H1D... -
Page 122: Changing A Profile Name
Hasselblad H1D Changing a profile name You can change a profile name (except ‘Standard’) at any time by clicking on the PROFILES button, scrolling to the desired name in the profile list and pressing the Load button (in order to activate the profile). en press the PROFILES button again, scroll to the same profile and press the Save button. -
Page 123: Advanced Features
Advanced Features Programmable self timer Programmable bracketing Programmable interval setting 21 custom options Data and text imprinting Hasselblad H1D... -
Page 124: Self Timer
There are a number of more advanced features that while not necessarily used every day still remain immediately accessible through the menu system. They provide the integral finesses that make the H1D a powerful and sophisticated tool to satisfy a variety of professional de- mands. -
Page 125: Self-Timer Setting
(A drop shadow will be displayed beneath the selected symbol, for example 5) When Delay is highlighted - - turn the rear control wheel to choose a delay range from 2 - 60s in 1s intervals. 6) Turn the front control wheel again to choose sequence. Hasselblad H1D... -
Page 126: Self Timer
Hasselblad H1D ���� ���� ���� ����� ����� Self Timer MIRROR GOES DOWN DELAY / MIRROR UP 2 - 60 s MIRROR UP / DELAY MIRROR REMAINS UP ����� ����... - Page 127 12) Press the shutter release button to activate the sequence of events. Check the lower row on the screen for ON or OFF status You can halt the sequence by pressing the ON / OFF ( ESC) button. Hasselblad H1D - turn the rear con- .- choice.
-
Page 128: Bracketing
Hasselblad H1D Number of exposures highlighted. 3 chosen as option. Sequence high- lighted. ‘Standard, over, under’ chosen as option. Step highlighted. 1/3 EV variation chosen as option. 2 Bracketing The bracketing facility provides an automatic series of exposures; one at the standard ex- posure setting (Manual or Auto) and the others with pre-determined deviations in EV from the standard exposure. - Page 129 ���� ���� ����� ����� Bracketing 2 frames 1/3 EV 3 frames 1/2 EV 5 frames 1 EV Hasselblad H1D ����� ����...
- Page 130 Hasselblad H1D Screen after Bracketing setting activated indicating 3 frames remaining in a Standard, Over, Under, sequence with no adjustment to the Viewfinder display indicating no adjustment to next frame and three frames left in the sequence. (A drop shadow will be displayed beneath the selected symbol, for example...
-
Page 131: Interval
The illustration here shows the grip LCD display when interval has been set three shots indicating 3 shots re- remaining in sequence of one frame every 30 seconds. maining at 30 second An interval setting can be stopped mid-sequence by pressing the ESC button. intervals. Hasselblad H1D... - Page 132 Hasselblad H1D ���� ���� ���� ����� ����� Interval 1 second 2 frames - 24 hours - 32 frames ����� ����...
-
Page 133: Custom Options
4) Turn the front control wheel to access 4.1 Custom options and press the DRIVE (Enter) button. 5) You can now access the 21 choices available. The main heading is the chosen function (accessed by the front control wheel) followed by the settings available (accessed by the rear control wheel) beneath. Hasselblad H1D... -
Page 134: Date And Time
Hasselblad H1D ���� ���� ���� Info ����� Date & time ����� Settings... - Page 135 Hasselblad H1D Imprint Custom options...
- Page 136 • 5s • 10s• 15s • 30s Determines the amount of time the camera remains active before it automatically reverts to standby mode (indicated on the grip LCD by the H1D logo). Minimises battery consumption. EV increment • 1 Step • 1/2 Step • 1/3 Step...
- Page 137 8 to f/ 9.5 to f/ 11, and so on. Hasselblad H1D...
-
Page 138: True Exposure
Hasselblad H1D Flash ready exposure lock • Yes • No. Allows you to make an exposure before the flash is fully charged. For use with integral flash unit or other TTL compatible flash units connected to the hot-shoe. Not valid for flash units connected by the PC connector. -
Page 139: Spot Mode
Average or Centre Weighted. Zone makes the camera behave in the same fashion as the Hasselblad 205FCC. at is, the central spot is placed over a particular area of the subject and the AE-L button is pressed. -
Page 140: Control Lock
Hasselblad H1D Rear wheel quick adjust • Yes • No Allows rear control wheel to make a rapid EV adjustment (or EV compensation) in auto-ex- posure mode. Yes turns the setting on. By turning the rear con- trol wheel, the adjustment is made and appears on both LCDs as a ±... - Page 141 Allows the display of ISO settings on the grip Yes enables the display. No disables the display. Bracket parameter in manual • Shutter speed • Aperture Allows either the shutter speed setting or the aperture setting to change when using the Bracketing mode Hasselblad H1D...
-
Page 142: Digital
Hasselblad H1D 5 DIGITAL ISO and White Balance settings for digtial capture are changed as follows: 1) Press the MENU button on the grip. 2) Turn the front control wheel until the Digital (screen 5) appears. 3) Press ENTER (DRIVE button on the grip). - Page 143 ���� ���� ���� ����� ����� Digital manual, fl ash, 50, 100 daylight, tungsten 200, 400 Hasselblad H1D ����� ����...
-
Page 144: User Button
Hasselblad H1D Button function choice The User button, AE-L button, StopDown button and Mirror Up button can be custom programmed to directly access a list of functions. A quick way to do this is to use the following short-cut method: 1) Click the MENU button. - Page 145 Changes the light-metering method in a loop manner: Centre Weighted/ Average/Spot. Delete last image Activate the delete function for the last image in a digital back. Dig. foc check Displays last exposure taken at 100% scale on digital backs with LCD. Hasselblad H1D...
- Page 146 Hasselblad H1D 4.2 Imprint The Imprint facility controls the text that will appear along the edge of each frame. It is pos- sible to imprint approximately 40 characters at one time. From 4.2 Imprint, press Enter to access: • 4.2.1 Imprint Type •...
- Page 147 • By turning the front control wheel, the cursor moves horizontally. • By turning the rear control wheel, the cursor moves vertically and introduces all available characters. To store the characters, proceed as follows: Hasselblad H1D...
- Page 148 Hasselblad H1D Removing text 1) Turn the front and rear control wheels until the X symbol is highlighted. On the text row, the text cursor is automatically placed to the right of the character that is to be changed. 2) Press Sel. (AF but- ton) and the charac- ter will be erased.
- Page 149 Date & Time 1) From 4 Settings, press the Enter (DRIVE) button. 2) Turn the front control wheel until 4.3 Date & Time appears. 3) Press the DRIVE (Enter) button. You will now see the following on the display. Hasselblad H1D...
- Page 150 Hasselblad H1D 5) By turning the front control wheel you can move the cursor to mark the following for change: hours, minutes, year, month and day respectively. By pressing the 24 h button (AF), you can choose between a 24 hour or 12 hour system for time.
-
Page 151: Flash
Flash Sync at all shutter speeds to 1/800s Integral fill-flash SCA 3002 compatible Flash measure capability Rear sync capability Hasselblad H1D... - Page 152 Hasselblad H1D The H1D can be used together with most flash units. Connection is either by the PC socket or by the hot shoe if the unit is compatible (see note below). The viewfinder houses an integral fill-flash with a guide number of 12 and features OTF/TTL flash control.
- Page 153 SCA 3002 compatible or for SCA 3002 compatible units at manual setting. Only flash units specially adapted for use with the H1D / H1 should be connected to the hot shoe on the camera.
-
Page 154: Integral Flash
Hasselblad H1D Example of viewfinder LCD display showing Flash set to Rear sync as well as - 1EV exposure compensation. To change the balance between flash output and camera exposure requirements to produce a variety of effects, use the exposure compensation function. For various long exposure effects use the sync function. - Page 155 5) Conventional measures should then be taken to correct the situation. (That is: move closer to the main subject, use a larger aperture setting or use a faster film). Separate flash unit connection and use Separate flash units can be electrically connected either by way of the hot shoe accessory Hasselblad H1D...
-
Page 156: Flash Measure
Hasselblad H1D holder (if SCA3902 compatible) on the top of the viewfinder or via a cord to the PC connection port on the le hand side of the camera body. Slave unit switches/ transmitters can also be connected similarly dependant on unit (see specific user manuals for details). -
Page 157: Optional Accessories
Converter Extension tubes Rechargeable battery grip IR Release unit Release cord Hasselblad H1D Filters Tripod quick coupling Support strap Grid focusing screen Flash adapter Proshade CF lens adapter... - Page 158 Hasselblad H1D There are a number of optional accessories available for the H1D with more being developed to suit a variety of photographic situations and needs. Please see www. hasselblad.com for the latest information. The figures in brackets after the headings are the product codes.
-
Page 159: Uv-Sky Filters
H1D has a TTL light metering system, exposure compensation is automatic. Battery Grip Rechargeable 7.2V Removable H1D grip containing Li-Ion rechargeable battery with a capacity up to 1850 mAh. An economical option for full time users. A Battery Charger (3053568) is included. - Page 160 . Its compact, flat folding design saves space in the equipment case. Also functions as filter holder fro glass, gelatin or plastic filters. ree different adapters available to suit all HC lenses. Other adapters available to fit Hasselblad V-system lenses.
- Page 161 H system CF lens adapter (3043500) Adapter to allow the use of all C-type lenses from the Hasselblad V-system. e automatic focusing system in the H1 camera can be used to guide the manual setting of focus. Light is measured at full aperture with all lenses which produces aperture and shutter speed informa- tion display in the camera for manual setting.
- Page 162 Hasselblad H1D...
-
Page 163: Appendix
Appendix Glossary of Terms P and Pv explanatory charts Technical specifications Equipment Care, Service & Guarantee Hasselblad H1D... -
Page 164: Glossary Of Terms
Bar code Some roll film brands have a Bar code which the H1D magazine can recognize and interpret. is automatically transfers the ISO rating and film length of the film to the camera and saves you from an incorrect setting. - Page 165 is is an international photographic standard upon which all exposure calculations must be based. e H1D has very accurate and sophisticated exposure measuring modes. Pre-programmed information is taken into account via the metering system when calculations are automatically made. is provides a...
-
Page 166: Quick Save
Roll film e H1D uses two sizes of roll film that has different lengths; 120 and 220. 120 film generally produces 16 exposures per film and 220 film produces 32 exposures per film. ( ‘Half-length 120’ film, that has a very limited availability, will produce 8 exposures per film). - Page 167 ‘on’ to ‘off’, you would start by pressing the function selector twice to access the film length setting. en, to change from ‘on’ you can press either the ‘change up’ or ‘change down’ button as both buttons have a ‘toggle’ Hasselblad H1D...
-
Page 168: Zone (System)
It was originally devised by Ansel Adams - the classic landscape photographer and Hasselblad user - and now exists in various forms for both black & white and colour photography. An integral part of the method includes the classification and grouping of any given scene into a range of nine (or ten) so-called zones, hence the name. - Page 169 True exposure ������� �������� ���� � ������ � ���� �������� �� � �� �� �������� �� ��� �������� ����� ������ �������� �� �������� ��� �������� �� �������� ��� �������� ���� ���� �������� Hasselblad H1D...
- Page 170 Hasselblad H1D Automatic exposure — P Mode 50-110 @ 50 50-110 @ 110 1000 Shutterspeed P-mode 50-110 @ 50 50-110 @ 110 1000...
- Page 171 Automatic exposure — Pv Mode A downloadable PDF version of these charts in colour is available from our website: www.hasselblad.com Shutterspeed Pv-mode Hasselblad H1D 50-110 @ 50 50-110 @ 110 1000...
- Page 172 Hasselblad H1D ������ �������� ��������� ������ �������� ��������� ������ �������� ��������� ���� ��������� ������ ����� ����������� ������ �� ����� ����������� ������ �� ����� ����������� ������ �� ������� ��������� ������� ��������� ������� ��������� ������� ��������� ������� ��������� ������ �������� ��������� ������ �������� ���������...
-
Page 173: Technical Specifications
Hasselblad HC lenses with built-in electronically controlled shutter and aperture. Automatic or manual focusing with instant manual focus override. All H1D lenses have been especially designed to meet the exacting requirements of digital photography. Lens shades can be mounted in reverse for transport. -
Page 174: Exposure Metering
SCA3902. Film speed range ISO16 to 6400. Flash output can be adjusted for fill-in purposes independent of ambient light. Flash measurement The H1D has a built-in measurement system that measures flash light from non-TTL flashes, such as studio flashes. Film back ( Interchangeable film backs available as optional accessory. - Page 175 Accessory connection Provided with two M5 threads and an electrical connector for accessories. Customization A large number of the H1D’s functions can be customized by the photographer to suit specific styles or situations through the built-in menu system. User interface Both basic and advanced functions are set using buttons and control wheels on the camera body in conjunction with the graphic interfaces.
- Page 176 Hasselblad H1D Technical Specifications — H1D sensor unit CCD size 36.9 x 49 mm CCD resolution 22,195.200 pixels (4080 x 5440) Bits per color 16 bit (65,536 levels) Output size 66 MB / 8 bit 132MB / 16 bit Light sensitivity ISO 50 –...
- Page 177 Technical Specifications — Image Bank Image Capacity 850 images Mac/PC Connection FireWire (IEE 1394) Battery - Type Sony InfoLithium L-series: NP-F550, NP-F750, NP-F960 Duration, constant shooting Up to 8 hours External Power Supply 24V DC Power Consumption 10 W Weight 0.68 kg Hasselblad H1D...
- Page 178 Hasselblad H1D approx. 135 mm approx. 155 mm approx. 207 mm (80 mm lens) 6.1 ins 8.2 ins...
- Page 179 H1D Data imprinting modes (with film magazine only) Type 1 Enhanced exposure information Basic exposure information Type 2 Type 3 Date & Time Type 4 Text & Date Type 5 Text & Info Type 6 Text Aperture Shutter speed Light metering mode...
- Page 180 Hasselblad H1D BODY DEFAULT SETTING (STANDARD PROFILE) Exp.mode A (Aperture priority) LM mode Centre weighted Exp. adjust Focus mode AF-S Drive mode Flash sync Normal (beginning of exp.) Flash adjust Self timer delay 10 sec Sequence Mirror up / Delay...
-
Page 181: Equipment Care, Service And Guarantee
Problems, Equipment Care, Service & Guarantee The H1D is a very sophisticated camera that relies on much informa- tion being passed and processed to and from each modular unit to produce the correct behaviour. It is therefore essential that reason-... - Page 182 If in any doubt, do not attempt to clean lens glass surfaces yourself but allow a “Hasselblad Authorized Service Center” to treat them.
-
Page 183: Warnings And Restrictions
• Store your H1D camera and Image Bank away from heat and moisture. • Keep all wires connected to or from your H1D camera, Image Bank, and computer out of the way where they will not be tripped over. • Never cover the devices ventilation openings. - Page 184 Hasselblad AB assumes no responsibility or liability for any errors or inaccuracies that may appear in this manual. Hasselblad AB assumes no responsibility or liability for loss or dam- age incurred during or as a result of using Hasselblad software or products. Hasselblad and FlexColor are trademarks of Hasselblad AB.
Need help?
Do you have a question about the H1D and is the answer not in the manual?
Questions and answers