Table of Contents
Advertisement
VR-345/VR-345T
VR-345B/VR-345BT
Flip-down/Detachable 3.4" Monitor
DVD/CD/MP3/MP4 Player
AM/FM Radio
Built-in TV tuner(only for VR-345T /VR-345BTmodel)
Support Bluetooth(only forVR-345B /VR-345BTmodel)
Owner's Manual
Take the time to read through this owner's manual.
Familiarity with installation and operation procedures will help you obtain the best
Performance from your new DVD-receiver.
Advertisement
Table of Contents

Related Manuals for Soundstream VR-345


Summary of Contents for Soundstream VR-345
- Page 1 VR-345/VR-345T VR-345B/VR-345BT Flip-down/Detachable 3.4” Monitor DVD/CD/MP3/MP4 Player AM/FM Radio Built-in TV tuner(only for VR-345T /VR-345BTmodel) Support Bluetooth(only forVR-345B /VR-345BTmodel) Owner’s Manual Take the time to read through this owner’s manual. Familiarity with installation and operation procedures will help you obtain the best...
-
Page 2: Important Safeguards
Important Safeguards Using the device at temperature below -10℃ m ay cause the breakage of the device. BEFORE USING PLEASE HEAT UP THE PASSENGER COMPARTMENT TO THE RECOMMENDED TEMPERATURE! Read carefully through this manual to familiarize you with this high-quality sound system. -
Page 3: Table Of Contents
Contenents Important Safeguards ......................2 Contenents ..........................3 Accessories ..........................4 Installation/Un-Installation ......................5 Wiring Connections ........................6 Front panel ..........................7 Inner panel ..........................7 Remote control .........................8 Remove battery ........................8 Main Menu ..........................9 General Operation ........................9 Radio operation ........................13 DVD/USB/SD/MMC Operation ....................14 TV Operations(Only for VR-345T /VR-345BTmodel) ............. 17 Bluetooth Section(Only for VR-345B/VR-345BTmodel) ............ -
Page 4: Accessories
Accessories Package contains the following accessories for installation and operation of the unit. (1) Washer, Spring 1 each Washer, M5 Nut (2) Mounting Strap (3) Bolt 5*20 (4) Screw 5*6 (5) Mounting Collar (6) Release Key (7) Screw 5*20 (8) Rubber Cushion ISO cable Remote Control Warranty card... -
Page 5: Installation/Un-Installation
Installation/Un-Installation First complete the electrical connections, and then check them for correctness. Installation This unit can be installed in any dashboard having an opening as (※) Lock lever shown on the picture. The dashboard should be 4.75 – 5.56 mm thick in order to be able to support the unit. -
Page 6: Wiring Connections
Wiring Connections Make sure you have good chassis ground. A good ground connection will eliminate most electrical noise problems. A good chassis ground requires a tight connection to the vehicle’s metal chassis. The area around the ground connection should be clean, bare metal without rust, paint, plastic, dust, or dirt for a good electrical connection. -
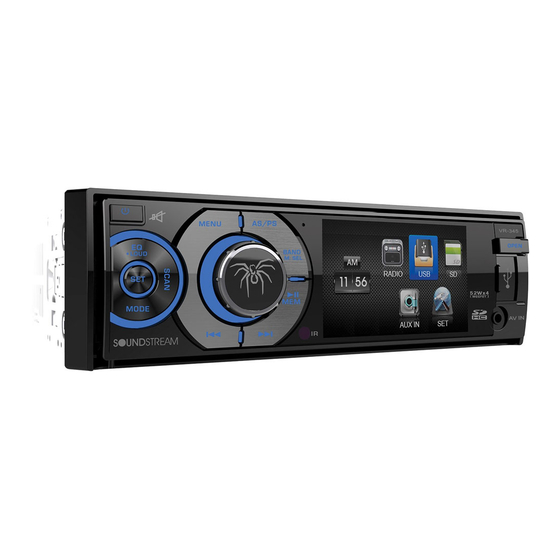
Page 7: Front Panel
Front panel 1) Power /Mute button 10) Play/Pause, Memory button 2) EQ /LOUD button 11) Previous / Reverse button 3) SEL button 12) Next / Forward button 4) Mode button 13) IR sensor 5) SCAN button 14) LCD Screen 6) MENU button 15)... -
Page 8: Remote Control
Remote control 1: MODE 2: POWER 3: BAND/RANDOM/Clear(Optional) 4: ENTER 5: UP/DOWN/LEFT/RIGHT 6: EJECT(Option without function) 7: STEREO/MONO/*(Optional) 8: P.SCN/RPT/#(Optional) 9: BACKWARD/SEEK- FAST BACKWARD 10:LOUD 11: OSD 12: PBC/STOP 13: Digit numbers 14: Play/Pause 15: Mute/Bluetooth (Optional) 16: MENU 17: SUBTITLE 18: SETUP 19: ANGLE/Accept (Optional) 20: INT/Eject(Optional) -
Page 9: Main Menu
Main Menu The best way to discover the program is to explore each screen in detail, and to find out how to move from one to another. Read this chapter for a guided tour. Unit starts by displaying the Main menu. This is the root of the screen hierarchy, you can simply take knowledge of the features. - Page 10 EQ: Select the digital sound effect FLAT→CLASSIC→POP→ROCK→USER. BASS: Bass up/down. TREBLE: Treble up/down. BALANCE: Left/right Balance control. FADER: Front/rear Fader control. BEEP: Keypad sound setting. LOUDNESS: Set the loudness on or off. Rotate Volume knob on the front panel or press up/down arrow on the RC to select any items and then press OK button on the panel or Enter button on the RC to confirm the item.
- Page 11 FADER: Front/rear Fader control. BEEP: Select keypad sound on or off. LONDNESS: Selecting loudness ON will emphasize the low frequency output. Display Screen:screen ratio control Backlight: set the LCD screen backlight. General Dual: dual function control(if you need) Key: current/DVD(if you need) Clock display: Select ON (clock is displayed) OFF (clock is not displayed).
- Page 12 [1].Subtitle Lang setting: With this option you can select the preferred language for the subtitles. When the selected language is recorded on the disc then this language will automatically be shown. If not, the first language recorded on the disc is displayed. [2].Audio Lang setting: With this option you can select the preferred language for the audio output.
-
Page 13: Radio Operation
Noted: RD8292-046_DUST is only for VR-345T/VR-345BT, RD8292-046_DUSA only for VR-345/VR-345B. AV IN Connect an optional AV cable to your external AV device (such as a video camera), then press the MODE button to switch to the AV mode. Note: If there is no external video input, the TFT displays “NO SIGNAL”. -
Page 14: Dvd/Usb/Sd/Mmc Operation
Scan Press SCAN button on the front panel to search station, it will playback 10 seconds when a station is found. Press SCAN button again to confirm the station. If you not confirm the station, it will continue to search. Auto store In tuner mode, Press the AS/PS on the panel or or RPT/P.SCN button on the RC and hold for 2 seconds to store radio stations with the best reception to the preset number automatically. - Page 15 Select track Press the M.SEL button on the front panel or RC to select the playback mode: MUSIC MODE PHOTO MODE VIDEO MODE. Then press the UP/DOWN button on the RC, also you can rotate the VOL knob or press the on the front panel to select the file you desired to playback.
- Page 16 OSD function During playback, press repeatedly to show display information. Such as: Number of title, number of chapter, TITLE elapsed => TITLE remain => CHAPTER elapsed => CHAPTER remain =>Display off. Zoom in/out Press it and hold for two seconds in Movie mode to zoom the image in or out in the sequence of 2×->...
-
Page 17: Tv Operations(Only For Vr-345T /Vr-345Btmodel)
TV Operations(Only for VR-345T /VR-345BTmodel) 1. Connect TV antenna, and then press MODE button to select TV mode. 2. In TV mode, press the Play/pause button once to enter TV menu setting. 3. Press the / buttons on the remote control or turning the knob clockwise or counterclockwise on front panel to select one of the setup pages: Auto program =>... -
Page 18: Bluetooth Section(Only For Vr-345B/Vr-345Btmodel)
When the unit have connect with phone, the BT icon will turn on and the Mobile phone name (if available) will be display on the panel. According to mobile pairing device manual, after searching new device (Soundstream), select it, input password "0000" and confirm ok, device paring is finished. - Page 19 NOTE: the phonebook only supports Western Characters. Any difference in character will be shown such as “ + , * or # ”. 2. (A2DP) Music Model press on the panel or / / / on the RC to select MUSIC icon and press VOL button on panel or enter button on the RC to confirm the selection to listen music in Bluetooth mode.
-
Page 20: Anti-Theft System
Select a number and press enter button to make a calling. Press the PB-DOWN button, phonebook will be updated and downloaded with new phonebook. Anti-theft system Remove the panel 1. Press the PWR button to turn the power off. 2. Press OPEN button to detach the panel. 3. -
Page 21: Troubleshooting Guide
Troubleshooting guide Symptom Cause Solution If the power supply is properly connected General The car ignition is not on. to the car accessory switch the ignition No power The fuse is blown. key to “ACC”. Replace the fuse. Inserting the disc in upside Insert the compact disc with the label down. -
Page 22: Specification
Specification General Power supply: 12 V DC Current consumption: Max. 10 A Maximum power output: 52W x 4 channels (Max.) DVD/SVCD/VCD/HDCD/MP3/MP4/WMA/CDDA/Picture-C Compatible formats: D/JPEG/CD-R/ -RW/DVD±R/±RW playback Dimensions (W x D x H) / 178 x 175 x 50 mm / 1.8 kg weight: ESP function: 40 sec.
Need help?
Do you have a question about the VR-345 and is the answer not in the manual?
Questions and answers