
Related Manuals for Soundstream VRN-DD7HB


Summary of Contents for Soundstream VRN-DD7HB
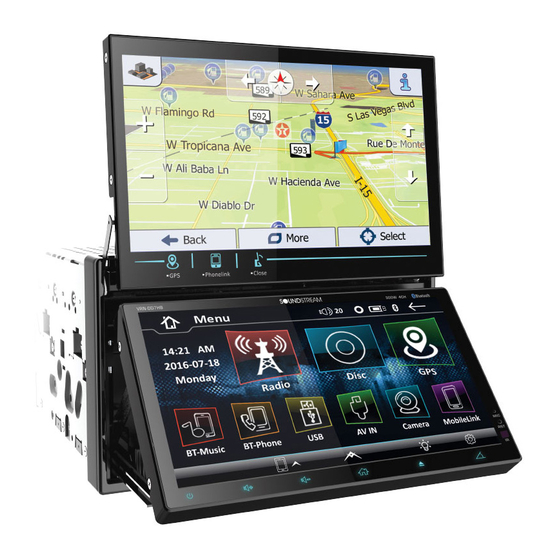
- Page 1 Owner’s Manual Creative 2-Screen Headunit 2 DIN 6.95'' with 7'' TFT LCD Monitor DVD/CD/MP3/MP4 Player AM/FM Radio Support Bluetooth Support Navigation Supportt USB PhoneLink 300W 4CH VRN-DD7HB...
-
Page 2: Warning
WARNING! To promote safety, certain functions are disabled unless the parking brake is on. The Unit is designed to detect parked status and must be connected to the power supply side of the parking brake switch. Improper connection or use of his connection may violate applicable law and may result in serious injury or damage. -
Page 3: Table Of Contents
Content WARNING!............................2 OPERATION PRECAUTIONS......................2 CONTENTS ..........................3 ACCESSORIES..........................4 INSTALLATION / UN-INSTALLATION ....................5 WIRING CONNECTIONS .........................5 PANEL............................7 REMOTE CONTROL........................8 MAIN MENU..........................9 •RADIO PLAYER..........................11 •USB INTERFEACE OPERATION.....................12 •SETTING CONTROL........................13 Audio Setting........................13 General Setting........................13 Radio Setting ........................14 Display Setting........................14 DVD Ratio Setting.........................14 Bluetooth Setting.........................14 System Information......................14 •GPS SECTION...........................15 •MOBILE PHONE LINK SCETION....................22... -
Page 4: Accessories
Washer, Spring Washer, M5 Nut 1 each Mounting Strap Bolt Screw Mounting Collar Release Key Screw Rubber Cushion VRN-DD7HB Owner’s Manual 2 DIN 6.95'' &7'' Double Monitor 300W 4CH English Remote Control User Manual Warranty card GPS cable Power cable... -
Page 5: Installation / Un-Installation
INSTALLATION / UN-INSTALLATION Note Before starting installation of the unit, make sure the wiring is connected properly. Figure.1 Use only the parts provided with the unit to ensure proper installation. Figure.4 The use of unauthorized parts may cause malfunction. Dashboard Install the unit where it does not get in the driver's way and will not injure the passenger in case there is a sudden stop, like an emergency stop. -
Page 6: Wiring Connections
WIRING CONNECTIONS NOTE: Never connect cable to the system while it (GND). The unit is using a BTL circuit and each is connected to the battery power. Whenever the l o u d s p e a k e r m u s t b e c o n n e c t e d w i t h unit is disconnected from the battery, the preset insulated cables according the diagram. -
Page 7: Panel
PANEL Home Button Touch this button to go back to main menu of bottom panel Eject Button Touch this button to eject a disc. If the disc is not removed for about 10 seconds a f t e r e j e c t , t h e d i s c i s r e i n s e r t e d automatically. -
Page 8: Remote Control
REMOTE CONTROL Press it to USB mode. VOL+ button Press to increase volume level. Cursor buttons Use the buttons to select the menu item, the title track or to show next frame. Cursor buttons Use the buttons to select the menu item, The title tracks it or to show next frame. -
Page 9: Main Menu
REMOTE CONTROL Note: OPEN/TILT Button The distance may vary according to the Press this Button to open and close the brightness of ambient light. TFT monitor. WARNING: Do not obstruct If the remote is not used for an extended the monitor while in the opening or period of time, remove the battery to prevent closing cycle, this may cause damage to possible damage from battery leakage and... - Page 10 MAIN MENU Bottom Panel Touch this key to decrease volume Touch this key to decrease volume Console Touch this key to switch the mute setting to on or off NAVI Mode NOTE: The unit can be operated under the following conditions Phone Link If top panel is open, operations of GPS mode and...
-
Page 11: Radio Player
ICON Operation MENU Disc To start Radio, tap Radio icon on main menu screen. Radio 87.50 03:45 07:45 SEEK SEEK GPS VOL MAIN VOL Console 98.10 106.10 107.90 87.50 87.50 90.10 RBDS PS RBDS PS RBDS PS RBDS PS RBDS PS RBDS PS Console Touch it to return to DVD menu... -
Page 12: Usb Interfeace Operation
ICON Operation Picture T 3/27 Note: 1. DVD Player will automatically start playing when you insert any DVD disc. 2. Warning displays if the vehicle is moving for driver's safety. 3. DVD Player will not only play video, but also picture and music files as well. File Management Touch it to go to previous page or next DVD mode plays files in a)Disc b)USB c) -
Page 13: Setting Control
ICON Operation Touch it to adjust the EQ, it can choose Touch it to return to TITLE MENU (you can USER → JAZZ → CLASSIC → POP → choose music, picture and video to play) ROCK → BEAT → FLAT Touch it to select previous or next track Touch it to enter DVD ratio setting Touch it to select previous or next track... -
Page 14: Radio Setting
ICON Operation Top Panel: Adjust the color / brightness / contrast Se ngs / tint display of top panel Background Bottom Panel: Adjust the color / brightness / Desktop contrast / tint display of top panel Colorful LED AUTO Time Setting DVD Ratio Setting Default Value Se ngs... -
Page 15: Gps Section
GPS SCETION To start GPS mode, please insert SD card in GPS slot on the front panel. Choose Navigation path and touch the Enter icon to enter the GPS (Navi path choose only for first using). You can choose road and run GPS. Navigation setup \SDMMC\20130513 When using the navigation software for the first... - Page 16 GPS SCETION After the initial setup, and whenever the software is started, the Navigation menu appears. You have the following options: to select your destination by entering an address or selecting a place of interest, a location on the map or one of your Favorite destinations.
- Page 17 GPS SCETION In the Navigation menu, tap then In the Navigation menu . The . In the US, the screen proposes only the Destination menu provides you with the following country while in other countries you can see the options: city or town where you are located to specify an address as your destination If needed, change the country or the state.
- Page 18 GPS SCETION 5. Quick Find Enter the street name: With the help of Quick Find, you can search for a location near to a known Place of Interest. Search Use the keyboard to enter a part for the Place by its name first and then find your of the street name.
- Page 19 GPS SCETION 6. Navigating to a place of interest to search around the current position or if it is not available, around the last know position to search for a place within a selected city or town. to search for a place around the destination of the active route to search along the active route, and not around a given point.
- Page 20 GPS SCETION At the top of the screen, you see your heading and the house numbers on left and right if you have The list of place categories appears. Tap not selected a route destination. When navigating slide your finger to browse the list, and tap a route, you see the next maneuver and the next street/road on your route.
- Page 21 GPS SCETION Change the function buttons in the Quick menu of the Map screen. Access the clothing size converter Select the type of vehicle you are driving, the road types used in r o u t e p l a n n i n g , a n d t h e r o u t e Access the fuel consumption monitor.
-
Page 22: Mobile Phone Link Scetion
Mobile phone name (if on front panel. available) will be display on the panel. According to mobile pairing device manual,after BT Phone searching new device (SoundStream), select it, Device not connected input password "0000" and confirm ok, device SoundStream paring is finished. - Page 23 BULETOOTH SCETION If you want to disconnect the Bluetooth BT Music connection, turn off the Bluetooth on the phone. IPHONE Dance All Night 1. DIAL BUTTON Ryan Adams Tap on Dial button to enter call mode. In Call mode, the unit can be used as your phone.
-
Page 24: Av-In Mode
OTHER MODE This unit is equipped with back view camera To start AV-IN Mode, tap on AV IN button output. The camera is used to observe the from main menu screen. situation behind the vehicle when you are backing the car. Connect the external audio/video signal Please connect your back view camera with... -
Page 25: Notes On Disc
NOTES ON DISC Only use groundless loudspeakers. Storing discs Use only loudspeakers of minimal 40Watt, Always place discs in their case and store them using fewer watts may result in damaging vertically. your loud speakers at higher volumes. Avoid storing discs in hot or humid places, places Use 4~8 Ω... -
Page 26: Troubleshooting
TROUBLESHOOTING Cause Symptom Remedy Replace with fuse of the same amperage. If Fuse is blown the fuse blows again, consult your store of GeneralPower does not purchase turn on.(No sound is produced.) Consult your local retailer. In correct wiring 1. Turn off the unit. 2. -
Page 27: Troubleshooting
TROUBLESHOOTING Symptom Cause Remedy IF THE POWER SUPPLY IS PROPERLY CONNECTED THE CAR IGNITION IS NOT TO THE CARACCESSORY SWITCH THE IGNITION NO POWER KEY TO “ACC”. THE FUSE IS BLOWN. REPLACE THE FUSE. REMOVE THE DISC IN THE PLAYER THEN PUT A DISC CANNOT BE LOADED. -
Page 28: Technical Specifications
TECHNICAL SPECIFICATIONS General Power supply: 11~16V DC Current consumption: max. 10 A Maximum power output: 4 x 50W channels (max) Compatible formats: DVD/VCD//MP3/MP4/VIDEO/CDDA/PICTURE CDCD- R/-RW/DVD±R/±RW PLAYBACK Dimensions (W x D x H) / weight: 178*170*100 mm/1.5 kg Working temperature range: Working temperature range: ESP function: 10 sec. -
Page 29: Bluetooth Connection Attention Instructions
“mute”/”Bluetooth” button on the Remote Control, or press “mode” button on remote or on front panel to select bluetooth mode. BT Phone Device not connected SoundStream Redial Transfer Console 2. At the 1st time when using BLUETOOTH, you need to pair the mobile phone first. - Page 30 Video File Conversion 101 File compression seems to be name of the game to see who can fit the most music and video onto ...
- Page 31 Video File Conversion 101 Otherwise, choose the file format you want to convert your movie to. May we recommend the AVI: ...
-
Page 32: Operating Instructions
If you have any questions or for the latest support information on this product, please visit the web site below: http://www.soundstream.com If you have any questions/problems regarding this product, try the following: Read Troubleshooting in these Operating Instructions. Please contact (U.S.A. only); http://www.soundstream.com http://www.soundstream.com ©2017 Soundstream Corporation Printed in USA...
Need help?
Do you have a question about the VRN-DD7HB and is the answer not in the manual?
Questions and answers