Table of Contents
Advertisement
Advertisement
Table of Contents

Related Manuals for Verbatim POWERBAY NAS Array


Summary of Contents for Verbatim POWERBAY NAS Array
- Page 1 PowerBay ™ 4- Bay DataBank NAS Array User Guide Version 2.0 English English...
-
Page 2: Table Of Contents
Contents Product Overview USB/eSATA Backup - Page Schedule LAN Backup - Page About this User Guide Real Time LAN Backup - Page Introduction Maintenance - Section Password - Page Package Contents System - Page System Requirements Firmware - Page E-Mail Settings - Page Features and Benefi... -
Page 3: Product Overview
• FAT32 (R/W) and NTFS (Read only) for External USB drive When confi guring the PowerBay NAS array, you can create users • FAT32 (R/W) and NTFS (Read only) for eSATA device and groups and assign them to folders with either read or read/write •... -
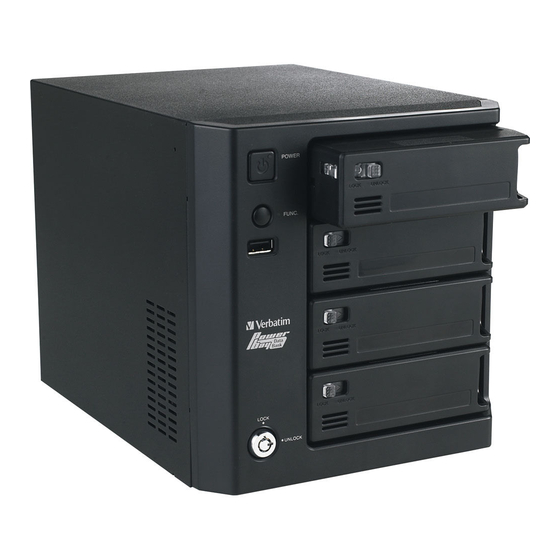
Page 4: Hardware Overview
11. RJ-45 Connectors Two Gigabit Ethernet ports. • Provides additional storage as a shared volume on the LAN • Port 1 (LAN): For connecting the PowerBay NAS array to LAN. (default name “USBDisk_1”) This port supports Wake-On-LAN function. • Supports USB Unlock Key for use with disk encryption •... -
Page 5: Factory Reset Button
3. Connect the supplied power cord to the rear of the PowerBay NAS array and to an AC power receptacle. 4. Press the Power button on the front of the PowerBay NAS array. 1. Open the Magical Finder Utility and allow it to search for the The green status LED will begin to fl... -
Page 6: Acronis Backup Software
Web Confi guration automatically (this option requires a DHCP Server in your network). The PowerBay NAS array has a web based confi guration tool. You can • Static IP - Allows you to assign an IP address to the device access the confi... -
Page 7: Home - Section
• DHCP Client - Allows an IP to be assigned to the device automatically (this option requires a DHCP Server in your network). • Static IP - Allows you to assign an IP address to the device manually. Home - Section Device Information - Page 5. -
Page 8: Lan Port - Page
Time Zone: Choose the Time Zone of where you are located from the drop-down menu. Set from Computer: To set the internal clock of the PowerBay NAS array to the same time as the client computer, select Set from Computer and hit Save. -
Page 9: Advanced Setup - Section
Name: Input a Domain Name Service (DNS) name for the PowerBay NAS array. If the device connecting to the PowerBay NAS array is a browser or logon server this will be the name that these services are advertised by. -
Page 10: Users - Page
Users - Page User/Groups: Select the users or groups and assign Read Only or Read/Write permissions to them. User Creation: This section contains required attributes for a new user, Folder: Select the folder to assign to the nominated users/ groups and including group, user name and password. -
Page 11: Nfs Server - Page
Rsync Server: Enable or disable the Rsync Server. from your router to the PowerBay NAS array. User Name: Enter the User Name allowed to connect to this Rsync Flow Control: Allows you to limit the amount of bandwidth available Server. -
Page 12: Lltd - Page
(in gigabytes) that you want to allocate for this service. AppleTalk: Enable or disable AppleTalk. AppleTalk allows the PowerBay NAS array to be discovered by Net Browser on Mac OS 9. LLTD - Page Link Layer Topology Discovery (LLTD) allows the PowerBay NAS array to be discovered by Windows Vista’s network map. - Page 13 EACH TIME you power cycle the PowerBay NAS array. If you power up the PowerBay NAS array fi rst, and later attach and power up the eSATA drive, be recovered from the other disk. The PowerBay NAS array implements...
- Page 14 Check the Auto Unlock box if you want the NAS always to power up in the UNLOCKED state. Use the feature with caution, since anyone who can access the PowerBay NAS array to power it off and back on can unlock a locked array.
-
Page 15: Disk Confi Guration - Page (Steps)
Step 3: Decide whether you want to attach an external eSATA drive for dedicated use in saving a full duplicate of the data stored on your PowerBay NAS array. If you choose to use this eSATA Disk Mirror feature, check the Mirror option button located below the eSATA Disk icon in this dialogue. -
Page 16: Power Management - Page
Power Management - Page Download/Backup - Section Enabling this feature will cause the hard disk drives to hibernate after Download fi les from a FTP server or web server or Backup shared fi les the specifi ed time of inactivity. The hard disk drives will wake-up when and folders from computer or NAS. -
Page 17: Schedule Status - Page
Real Time LAN Backup - Page Schedule LAN Backup - Page Here you can confi gure the PowerBay NAS array to backup fi les in real This section allows you to use Rsync to backup fi les to/from another time to Rsync. Any further changes to the fi les in the Source folder Rsync server. -
Page 18: Maintenance - Section
Destination Role: In order to confi gure this PowerBay NAS array in the Destination Role, Rsync needs to be enabled on this PowerBay NAS array. Rsync Server Ready: When enabling the Destination Role the PowerBay NAS array will only check if the Rsync Server is enabled and then reply if it is ready or not. -
Page 19: System - Page
System - Page Schedule Power On/Off: You can set what time you want to shutdown the PowerBay NAS array or to power on the PowerBay NAS array. Use The System menu provides options for system restarts, saving and ‘Mode’ to disable it or en¬able it. -
Page 20: E-Mail Alerts - Page
Look through devices in My Computer. Run Dialogue To fi nd the PowerBay NAS array using this method select Start in the system tray and select Run. In the Open: fi eld provided enter “\\” followed by the PowerBay NAS array’s IP and then press OK. If your IP has already been associated with the device name, then you may alternatively enter “\\PowerBay”... -
Page 21: Sharing Fi Les Using Windows
NAS array, you can map a drive letter to a folder. [You must assign a drive letter in order to save fi les to the PowerBay NAS array using the bundled backup software.] To do this, right-click on the folder and 1. -
Page 22: Hot-Swap Function
HDD status is ready. Please take note that removing a disk from the PowerBay NAS array and inserting it in another device is not advisable, even if it is another PowerBay NAS array. -
Page 23: Technical Specifi Cations
Although most of our customers fi nd this content suffi cient to put them back on the right track, this page also lists ways in which you can contact the Verbatim Technical Support Team directly. Europe: For technical support in Europe e-mail drivesupport@verbatim- europe.com or call 00 800 3883 2222 in the following countries: Austria,... -
Page 24: Limited Warranty Terms
Rights Verbatim Limited warrants this product to be free from defects Copyright © 2007 Verbatim Limited. No part of this document may in material and workmanship for a period of 2 years from date of be reproduced in any form or by any means, for any purpose, without purchase.
Need help?
Do you have a question about the POWERBAY NAS Array and is the answer not in the manual?
Questions and answers