Table of Contents
Advertisement
Quick Links
Advertisement
Table of Contents

Related Manuals for Siemens HM745516N


Summary of Contents for Siemens HM745516N
- Page 1 HM745516N Instruction manual 9000446565...
- Page 3 Making cooking as much fun as eating Please read this instruction manual. This will ensure that you make use of all the technical benefits the cooker has to offer. You will be given important safety information. You will then be introduced to the individual components of your new cooker and we will show you how to adjust it step by step.
-
Page 4: Table Of Contents
Important information ......Safety information ........Causes of damage . - Page 5 Table of contents Rapid heating ........Setting procedure .
-
Page 6: Important Information
Important information Transport damage Environmentally friendly disposal ó Electricity and gas connection... -
Page 7: Safety Information
Safety information This appliance is only intended for domestic use. The appliance should only be used for cooking. Adults and children who - have any physical, motor or mental impairment or - are not sufficiently informed about how to use the appliance or not familiar with the appliance must not operate the appliance without supervision. - Page 8 Overheated fat can catch fire quickly. There is a risk of Overheated fat (liquid or solid) fire. Never leave oil or fat unattended when it is heating up. Do not try to use water to put out burning oil or fat. Cover the pan immediately with a lid.
-
Page 9: Causes Of Damage
Do not move the appliance while holding the gas pipe; Moving the appliance by the gas line or door handle the gas pipe could be damaged. There is a risk of a gas leak. Do not move the appliance while holding it by the door handle. -
Page 10: Gas Connection
Only put a moderate amount of fruit into fruit cakes as they may become very juicy. The fruit juice that drops onto the oven tray will cause permanent stains. Do not step on or sit over the open oven door. Damage to the lower Do not place hot items in the lower drawer. -
Page 11: Problems With The Gas Installation / Smell Of Gas
Gas connection should be made with a rigid, non flexible connection (gas pipe) or an approved safety gas hose. If an approved safety hose is used then care must be taken to ensure that it is not squashed or crushed in any way. -
Page 12: Electrical Connection
Electrical connection Installation must be carried out by an authorised service employee. A 16A circuit breaker is required for the connection. The appliance has been designed to be used with 220 240V mains current. If the voltage drops below 180 V, then the electrical igniter system will not function. -
Page 13: Levelling The Cooker
Levelling the cooker Always place the cooker directly on the floor. The cooker has height adjustable feet. This allows you to raise the plinth by about 15 mm. Pull out the plinth drawer and lift it up and out. There are adjustable feet at the front and rear on the inside of the plinth. -
Page 14: Positioning The Appliance
Positioning the appliance The product must be installed in accordance with the dimensions provided and it must be placed directly on the kitchen floor. It should not be placed over another object. The distance between the top of the cooker and the lower part of the hood should be adjusted according to the guidelines provided by the hood manufacturers. -
Page 15: Your New Oven
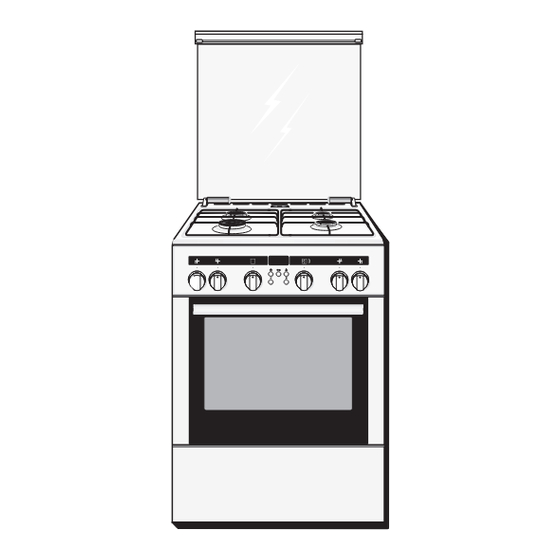
Your new oven This section will familiarise you with your new product. With the help of your user guide, you will learn about the hob, the oven and the accessories. Upper lid The upper lid must Steam outlet be open whilst the Important: when the oven appliance is in operation. -
Page 16: Hob
Steam outlet Caution: Hot air is released from here. Economy burner Normal burner Wok burner Normal burner Heating efficiency Diameters of pots and pans of the burners suitable for the burners Economy burner 1 kW 12 18 cm Normal burner 1.75 kW 18 24 cm Wok burner 3,6 kW... - Page 17 Hotplate controls You can use the four hotplate controls to control the level of heating provided by the hotplates. The symbol above the hotplate controls indicate which hotplate the switch controls. For the gas hotplates Settings Ignition position Å Large flame, highest power å...
-
Page 18: The Oven
The oven Function selectors Use the function selector to select the type of heating for the oven. You can turn the function selector clockwise and anti clockwise. Settings t Top/bottom for sponge cakes in tins on one heating level, bakes, lean roasts of beef, veal and game T 3D hot air* for cakes and pizzas on two levels,... - Page 19 Temperature selector Set the temperature or grill setting using the temperature selector. Turn the temperature selector to the right only. Temperature 50 270 Temperature range in ºC Grill x Level Low grill Medium grill High grill The indicator light above the temperature selector comes on while the oven is heating up.
- Page 20 Oven The shelf can be inserted at 5 different heights in the oven. You can remove the shelf two thirds of the way without it tipping. This makes it easier to take food out of the oven. Accessories Accessories may be purchased at a later date from the after sales service or from specialist shops.
- Page 21 Optional accessories*...
-
Page 22: Before Using For The First Time
Before using for the first time This section will tell you everything you need to do before using the cooker for the first time. Heat the oven and clean the accessories. Read the safety instructions in the Important information" section. Firstly, check to see if the j symbol and three zeros are flashing in the display. -
Page 23: Pre Cleaning The Burner Body And Upper Cover
Pre cleaning the Clean the burner covers (1) and bodies (2) with water burner body and and washing up liquid. Dry the parts thoroughly. upper cover Refit the burner body and cover in the burner channel (4) without damaging the spark plug (3) and flame safety pipe (4). -
Page 24: Setting Up The Hob
Setting up the hob There are 4 gas burners on the hob. This section explains how to use the gas burners. Please make sure that the burner covers are firmly in place on the top of the burner assemblies. All parts must be clean and dry. -
Page 25: Hotplate Settings Table
Hotplate settings table The base diameter of the saucepan or frying pan that you will place on the hotplate for cooking must not be smaller than the recommended value. Cooking times vary according to the type of meal, the type of ingredients used and the weight. You can determine the most appropriate cooking time from your observations. - Page 26 Example: Food Hotplate Heat settings Melting Chocolate, butter, Economy burner Small flame size margarine Heating Meat broths, canned Regular burner Small flame size vegetables Heating up and keeping warm Soups Economy burner Small flame size Steaming* Fish Regular burner Between large and small flame size Boiling* Potatoes and other...
-
Page 27: Setting The Oven
Setting the oven You have various options for setting the oven. Switching off the oven When your meal is ready, switch off the oven yourself. manually The oven switches off You can leave the kitchen for a long period. automatically The oven switches on and You can put your meal in the oven in the morning, for off automatically... -
Page 28: If The Oven Is To Switch Off Automatically
Switching off Switch off the function selector when the meal is ready. Changing the setting You may change the temperature or grill setting at any time. If the oven is to switch off automatically Example: Top/bottom heating t, 200 ºC, cooking time of 45 minutes Select the desired type of heating using the function selector. - Page 29 Press the j clock button. The cooking time symbol ? will flash. Set the cooking time using the + or - button. + button default value = 30 minutes. - button default value = 10 minutes. The oven switches on after a few seconds. The ? symbol lights up in the display.
-
Page 30: If The Oven Is To Switch On And Off Automatically
If the oven is to switch on and off Please remember that easily spoiled foods must not be allowed to remain in the oven for too long. automatically Example: Imagine - it's 10:45 a.m. The meal will take 45 minutes to cook and must be ready at 12:45 pm. - Page 31 Set the cooking time using the + or - button. + button default value = 30 minutes. - button default value = 10 minutes. Press the j clock button until the ! end symbol flashes. In the display you will see the time when the meal will be ready.
-
Page 32: Time
Time When the oven is first connected, or following a power cut, the j symbol and three zeros flash in the display. Set the time. The function selector must be switched off. Setting procedure Example: 13:00 Press the j clock button. 12.00 appears in the display and the j symbol flashes. - Page 33 Hiding the time You can hide the time. It will then only be visible when you are performing settings. To do this, you must change the basic setting. See the Basic settings section.
-
Page 34: Timer
Timer You can use the timer as a kitchen timer. It operates independently of the oven. The timer has a special signal. This means that you can tell whether the set timer period has elapsed or the cooking time is complete. You can also set the timer if the childproof lock is active. - Page 35 Press the a timer button. Change the time using the + Changing the timer period or - button. Press the a timer button. Press the - button until the Cancelling the setting display is at zero. The timer and cooking time The symbols light up.
-
Page 36: Basic Settings
Basic settings Your oven has several basic settings. You may change the basic settings for the time, the signal duration and the reset time for a setting. Basic setting Function Change to Time j Time display Time 0 = Time hidden 1 = Time in the foreground Signal duration a... - Page 37 Change the basic setting using the + or - button. Confirm with the j clock button. A 2 will appear in the display for the basic setting for the signal duration. Change the basic setting as described in step 2 and confirm with the j clock button.
-
Page 38: Childproof Lock
Childproof lock The oven has a childproof lock to prevent children from switching it on accidentally. Press the p key button until the p symbol appears Locking the oven in the display. This will take approximately 4 seconds. Press the p key button until the p goes out. Unlocking Notes You can set the timer and the clock even when the... -
Page 39: Rapid Heating
Rapid heating This allows you to heat up the oven particularly quickly. Setting procedure Switch the function selector to rapid heating z. Use the temperature selector to set the required temperature. The oven switches on after a few seconds. The indicator light above the temperature selector will come on. -
Page 40: Care And Cleaning
Care and cleaning Do not use high pressure cleaning equipment or a steam jet. Definitely do not use corrosive cleaning materials, sharp objects, a hard sponge or a corrosive cleaning cloth when cleaning. Otherwise, the surfaces of the appliance may become scratched and lose their shine. -
Page 41: Cleaning Equipment
Cleaning equipment Exterior of the appliance Wipe the external surfaces of the appliance with a cloth that has been dampened with hot water and washing up liquid. Dry with a soft cloth. Stainless steel surfaces Wipe with a cloth that has been dampened with water and washing up liquid. -
Page 42: Oven Back Wall
Knobs Do not remove the knobs for cleaning. Simply pull the knobs out a little and clean away the food remains that have accumulated underneath with a cloth that has been dampened with hot water and washing up liquid. The upper surfaces of the knobs must be cleaned using a cloth that has been dampened with hot water and washing up liquid. - Page 43 If splashes are still visible even after repeated use, proceed as follows: First clean the enamel surfaces in the oven. Then select 3D hot air T or top and bottom heating t. Heat up the empty oven for approximately 2 hours at maximum temperature.
-
Page 44: Removing The Door Panels
Removing the door panels The glass panel on the oven door can be removed for easier cleaning. Remove the oven door and lay it on a cloth with the handle underneath. Unscrew the cover at the top of the oven door. To do this, undo the right and left hand screws (Fig. -
Page 45: Detaching The Rails
Detaching the rails The rails can be removed for cleaning. To unhook the rails: Lift the front of the rails upwards and detach Then pull the rails forward and take them out. Clean the rails using either washing up liquid and a sponge or a brush. -
Page 46: Procedure To Be Applied In The Event Of A Fault
Procedure to be applied in the event of a fault Faults generally occur for simple reasons. Please note the following fault warnings before contacting the after sales service: Fault Possible reason Information/correcting Appliance is not operating. The plug is not connected Connect the plug to the power socket. - Page 47 Fault Possible reason Information/correcting The door seal is dirty. Clean the door seal. Oven door is not closed Oven door is not closed correctly correctly Door seal has come loose Check the position and fitting of the or is not correctly door seal, correct as required.
-
Page 48: Replacing The Oven Light On The Ceiling Of The Oven
Replacing the oven light on the ceiling If the oven light fails, it must be replaced. 25 watt heat resistant replacement bulbs can be obtained of the oven from the after sales service or specialist shops. Please specify the E number and FD number of your appliance. -
Page 49: After Sales Service
After sales service Our after sales service is there for you if your oven needs repairing.You will find the address and telephone number of your nearest after sales service centre in the phone book. The after sales service centres listed will also be happy to advise you of a service point in your local area. -
Page 50: Tables And Tips
Tables and tips This table contains a selection of dishes and the optimum settings at which to cook them. You can find out which type of heating and temperature is best for your dish, which accessories to use, and at which oven level the dish should be inserted. - Page 51 temperature setting to start with, since this allows more even browning. If necessary, use a higher temperature setting the next time. More information can be found in the Baking tips" section which follows the tables. Cakes in tins Tin on the wire rack Level Type of Tempera...
- Page 52 Cakes on the tray Level Type of Temperature Baking heating in ºC time in minutes Sponge or yeast pastry Baking tray 170 190 20 30 with dry topping Baking tray + Baking tray 150 170 35 45 Sponge or yeast pastry Baking tray 170 190 40 50...
-
Page 53: Baking Tips
Small baked Level Type of Temperature Baking products heating in ºC time in minutes Baking tips You wish to cook to your own recipe. How to check that a sponge cake is cooked properly. The cake collapses. The cake has risen in the centre but is lower at the edges. -
Page 54: Meat, Poultry, Fish
The bread or cake Next time you should add a little less liquid and cook for a little (e.g. cheesecake) looks fine, but longer at a lower temperature. Cakes with fruit topping: Precook is soggy on the inside (soft, with the base first of all. - Page 55 When the roast is ready, switch off the oven and leave the roast to stand for 10 minutes with the oven door closed. This allows the meat juices to distribute more favourably. Tips for grilling Always grill with the oven door closed. The pieces of food you are grilling should be equally thick.
- Page 56 Meat The table applies to insertion into a cold oven. The time specifications are provided as guidelines only and depend on the type and quality of the meat. Meat Weight Ovenware Level Type of Tempera Cooking heating ture in ºC, time in grill minutes...
- Page 57 Poultry The table applies to dishes placed in a cold oven. The weights indicated in the table refer to oven ready poultry (without stuffing). If you are grilling directly on the wire rack, you should also insert the baking tray at level 1. Pierce the skin of duck or goose under the wings to enable the fat to run off.
-
Page 58: Tips For Roasting And Grilling
Tips for roasting and grilling The table does not contain Select the next lowest weight from the instructions and extend information for the weight of the the time. roast. How can you tell when the roast Use a meat thermometer (available from specialist shops) or is ready? carry out a spoon test". -
Page 59: Bakes, Gratins, Toast
Bakes, gratins, toast The table applies to dishes placed in a cold oven. Meal Ovenware Level Type of Temperature Cooking heating in ºC, grill time in minutes Sweet bakes Casserole dish 180 200 40 50 (e.g. quark and fruit bake) Savoury bakes made from cooked Casserole dish, 210 230... -
Page 60: Frozen Foods
Frozen foods Please observe the instructions on the packaging. The values in the table apply to dishes placed in a cold oven. Meal Use for Level Type of Temperature Cooking time in heating in ºC minutes Pizza Pizza with a thin base 190 210 15 20 Pizza with a thick base... -
Page 61: Defrosting
Defrosting Remove the food from its packaging and place it in a suitable dish on the wire grill. Please observe the instructions on the packaging. The defrosting times depend on the type and amount of food. Meal Accessories Level Type of Temperature in heating ºC... -
Page 62: Tips For Saving Energy
Tips for saving energy in the oven Only preheat the oven if this is specified in the recipe or in the operating instructions table. Use dark, black lacquered or enamelled baking tins. They absorb the heat particularly well. It is best to bake several cakes one after the other. The oven is still warm. -
Page 63: Acrylamide In Foodstuffs
Acrylamide in foodstuffs Experts are currently discussing how harmful acrylamide is in food. We have compiled this information for you, based on the results of current research. Which foods are affected? Acrylamide is mainly produced in grain and potato products heated at high temperatures, such as potato crisps, chips, toast, rolls, bread, baked goods made from shortcrust pastry (biscuits, gingerbread, cookies). - Page 64 Tips for keeping acrylamide to a minimum when preparing food Deep-fat frying Fat should not be hotter than 175 ºC. Check the temperature with a fat thermometer. The ratio of fat to food should be between 1:10 and 1:15, e.g. 100 g chips in 1.5 l oil. Soak potatoes for one hour before deep frying.
-
Page 65: Test Dishes
Test dishes In accordance with DIN 44547 and EN 60350 Baking The values in the table apply to dishes placed in a cold oven. Meal Accessories and notes Level Type of Tempera Baking heating ture in ºC time in minutes Ø... - Page 66 Notes...
- Page 68 Siemens Electrogeräte GmbH 080489-01 Carl Wery Straße 34 81739 München GERMANY...
Need help?
Do you have a question about the HM745516N and is the answer not in the manual?
Questions and answers