ClearOne CHAT 160 User Manual
Group speakerphone for skype
Hide thumbs
Also See for CHAT 160:
- User manual (44 pages) ,
- Quick start manual (9 pages) ,
- Quick start manual (9 pages)
Table of Contents
Advertisement
Quick Links
Download this manual
See also:
User Manual
Advertisement
Table of Contents
Troubleshooting

Related Manuals for ClearOne CHAT 160


Summary of Contents for ClearOne CHAT 160
- Page 1 ® CHATAttach™ 160 - CHAT Group Speakerphone for Skype™ USER’S MANUAL...
- Page 2 CHATAttach 160 USER’S MANUAL CLEARONE PART NO. 800-000-012 - October 2010 (REV. 2.0) © 2010 ClearOne All rights reserved. No part of this document may be reproduced in any form or by any means without written permission from ClearOne. ClearOne reserves specific privileges.
-
Page 3: Table Of Contents
CHAT 160 CONTROLS ............. 4 led i ............... 4 ndicatorS ............4 olume and uttonS INSTALLING THE CHAT SOfTwARE fOR wINdOwS .... 5 CONNECTING THE CHAT 160 TO A PC ........5 cHata cHat d ......6 ttacH onnecting eviceS cHata .......... -
Page 4: Chapter 1: Introduction
Service and Support If you need additional information on how to set up or operate your CHAT 160 Group Speakerphone, please contact us. we welcome and encourage your comments so we can continue to improve our products and better meet your needs. -
Page 5: Important Safety Information
Important Safety InformatIon Read the safety instructions before using this product. This personal speaker phone is not designed for making emergency telephone calls when the power fails. you must make alternative arrangements for telephone access to emergency services. • Read and understand all instructions. follow all warnings marked on the product. •... -
Page 6: Unpacking
UNPACkING CHAT 160 Packout The illustration below shows the parts that shipped with each model of the CHAT 160. Contact your dealer for replacement parts and accessories. CHATAttach Packout for the CHAT 160 > NOTE: ClearOne is not responsible for product damage incurred during shipment. you must make claims directly with the carrier. -
Page 7: Chapter 2: Getting Started
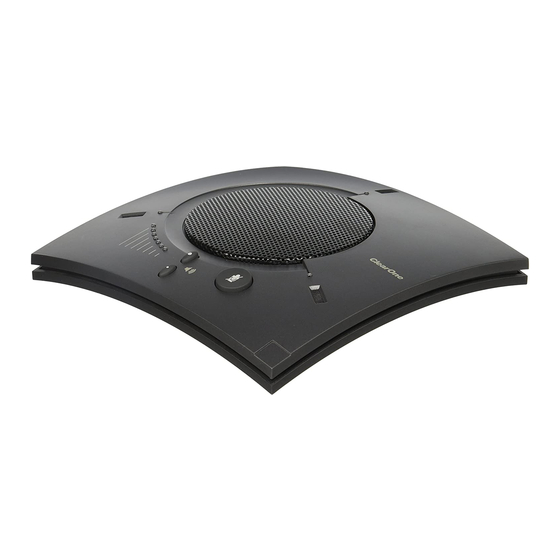
LED Indicators Several blue LEd lights show when the CHAT 160 is connected to a PC via USb or when the CHAT 160 is plugged into a breakout box. The three status indicator LEds above each microphone are blue when the unit is operational and change to red when mute is turned on. -
Page 8: Installing The Chat Software For Windows
NOTE: The install procedure is the same for windows XP , windows vista and windows 7 operating systems. The CHAT 160 can be used right out of the box and there’s no software to download or install if it is to be used only with a PC. -
Page 9: Chatattach: Connecting Two Chat Devices
In order to use the CHATAttach accessory, the following criteria must be met: both CHAT devices must be the same model number - both CHAT 150, both CHAT 160 or both CHAT 170 devices - mixing CHAT models using CHATAttach is not currently possible. -
Page 10: Chatattach Working Modes
CHATAttach Working Modes The following table outlines the CHATAttach working modes. Mode # Mode Code Description Condition Solid Red LEd on both CHAT devices are in MUTE mode. Normal CHAT devices Solid blue LEd on both CHAT devices are in UNMUTE mode. Normal CHAT devices No PC attached. -
Page 11: Chapter 3: Using The Chat Application
NOTE: In the Advanced screen, adjusting Microphone Level under USB Audio changes the CHAT 160 microphone volume for USb applications. Adjusting the Speaker Level under USB Audio changes the CHAT 160 speaker volume. Place a call using the device or application. Land lines provide the best audio for tuning purposes. -
Page 12: Update Firmware & Database
Check for updates button, or you can use the Select File button to manually load an existing firmware file. > NOTE: The computer your CHAT 160 is connected to must be connected to the Internet in order to use the Check for updates option. Check for Firmware Updates Perform the following steps to update your firmware and device database: Start up the CHAT 160 software as described earlier in this manual. - Page 13 > NOTE: If no new firmware or device database updates are available, the following messages will appear below the progress bar: “your device contains the most recent firmware” “your database contains the most recent updates” This indicates that your firmware and database are current. No updates are required. Click the Update button to install available updates.
- Page 14 “Update Successful! The database has been updated to < new revision level>” where <new revision level> is the new database version number. 10. your CHAT 160 now has the most recent firmware and/or device database updates available. Chapter 3: Using the Chat Application...
-
Page 15: Manual Updates
In most cases, you should use the automatic update procedure by pressing the Check for updates button. To manually change the firmware version or database package loaded into your CHAT 160, use the following procedure: Press the Select File button in the Update Firmware screen. The Open dialog window is displayed. -
Page 16: Help
Advanced screen to adjust audio settings for your CHAT 160, save your settings as a custom device, view and edit the CHAT 160 device database, and view the CHAT 160 log file. This section describes how to use each of these functions. -
Page 17: Advanced Settings: Audio Settings
Use the database tab to select a specific application setup that has been previously saved. Use the Log tab to view any CHAT 160 log files generated that describe issues that the device has encountered or updates that have been made to the CHAT 160 device. -
Page 18: Advanced Settings: Log
ADVANCED SETTINGS: LOG Log displays a list of actions taken by the CHAT 160, including a timestamp and a description of the action or even. To save the log to a text file, click the Save button. A standard windows save dialog appears. Name the file and choose the directory in which you wish to save the file (the default directory is the CHAT 160 Log directory). -
Page 19: Chapter 4: Maintenance
• Unplug the power supply from the wall outlet (Phone/vC only) before cleaning. • do not use liquid or aerosol cleaners. Use a damp cloth moistened with water to clean the outside of your CHAT 160 and power supply. TROUBLESHOOTING If you are having trouble with the audio from your CHAT 160, it might not be optimized (tuned) for the specific hardware device you are connected to. -
Page 20: Interrupted Firmware Update Recovery
The update then continues to completion. If the CHAT 160 attempts to recover from a programming error by booting up in the Generic (dfU) mode, a series of instruction windows will be displayed. follow the on-screen instructions to resolve this issue. -
Page 21: Chapter 5: Appendix
Microphone 910-156-225 CHATAttach Expansion kit bandwidth: 50 Hz - 7.75 kHz • Includes Cables, Power Supply and Quick Start Guide to Update Two (2) CHAT 160 devices to Environmental CHATAttach Operating Temperature: 41 - 104° f (5 - 40° C) -
Page 22: European Compliance
(2) this device must accept any interference received, including interference that may cause undesirable operation. WARRANTY ClearOne (the Manufacturer) warrants that this product is free of defects in both materials and workmanship. for complete warranty information including length, coverage, and limitations, visit ClearOne on the web @ www.ClearOne.com. ClearOne...
Need help?
Do you have a question about the CHAT 160 and is the answer not in the manual?
Questions and answers