Table of Contents
Advertisement
Quick Links
Advertisement
Table of Contents

Related Manuals for ORION TELESCOPES & BINOCULARS SpaceProbe 130ST EQ 9007


Summary of Contents for ORION TELESCOPES & BINOCULARS SpaceProbe 130ST EQ 9007
- Page 1 INSTRUCTION MANUAL Orion ® SpaceProbe 130ST EQ Equatorial Newtonian Reflector Telescope #9007 Customer Support (800) 676-1343 E-mail: support@telescope.com Corporate Offices (831) 763-7000 P.O. Box 1815, Santa Cruz, CA 95061 Providing Exceptional Consumer Optical Products Since 1975...
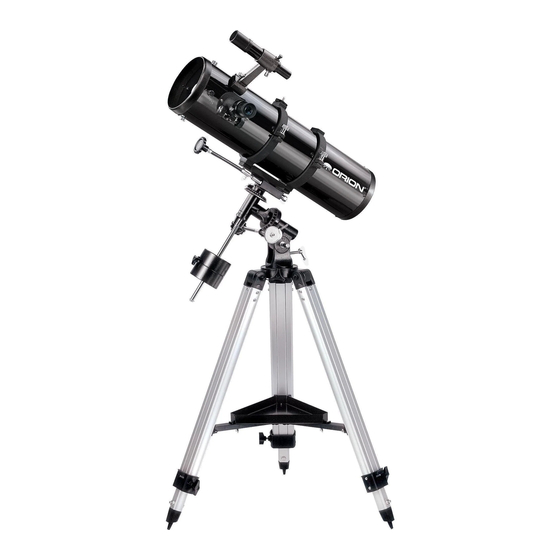
- Page 2 Alignment thumb screws(2) Finder scope Dovetail slot Spring-loaded tensioner Eyepiece Finder scope bracket Piggyback adapter Tube mounting rings Focuser Tube ring clamps Dec. slow-motion control cable Primary mirror cell Dec. setting circle Collimation screws(6) R.A. lock knob Counterweight R.A. setting circle Latitude adjustment t-bolt Azimuth lock knob Counterweight lock knob...
-
Page 3: Table Of Contents
ongratulations on your purchase of a quality Orion telescope . Your new SpaceProbe 130mm EQ is designed for high-resolution viewing of astronomical objects. With its precision optics and equatorial mount, you’ll be able to locate and enjoy hundreds of fascinating celestial denizens, including the plan- ets, Moon, and a variety of deep-sky galaxies, nebulas, and star clusters. -
Page 4: Assembly
3. Assembly Dec. slow- motion control cable Assembling the telescope for the first time should take about R.A. setting circle 30 minutes. No tools are needed other than the ones provid- Dec. lock knob ed. All bolts should be tightened securely to eliminate flexing Dec. -
Page 5: Getting Started
and cable should extend toward the front (open) end of the eyepiece with the thumb screws on the drawtube. the telescope optical tube. If it does not, you will need to Remember to always loosen the thumb screws before remove the tube from the mounting rings, rotate the mount rotating or removing the eyepiece. - Page 6 3. Retighten the counterweight lock knob. The telescope is retighten the R.A. and Dec. lock knobs. Use the slow-motion now balanced on the R.A. axis. control cables to center the object in the eyepiece. 4. To balance the telescope on the Dec. axis, first tighten Now, look in the finder scope.
-
Page 7: Setting Up And Using The Equatorial Mount
simply loosening the thumb screw on the dovetail slot. ily “track” the movement of astronomical objects, thereby Store the finder scope and bracket in an appropriate eye- keeping them from drifting out of the telescope’s field of view piece/accessory case. while you’re observing. - Page 8 pass and rotate the mount so the telescope points North. Optional Motor Drives for Automatic Tracking Retighten the azimuth lock knob. An optional DC motor drive can be mounted on the R.A. axis of the equatorial mount to provide hands-free tracking. The equatorial mount is now polar aligned for casual observ- Objects will then remain stationary in the field of view without ing.
- Page 9 Finding Objects With the Setting Circles finder scope, assuming the equatorial mount is accurately polar aligned. Use the slow-motion controls to center the Now that both setting circles are calibrated, look up in a star object in the finder scope, and it should appear in the tele- atlas the coordinates of an object you wish to view.
-
Page 10: Collimating The Optics
One thing you DO NOT do is make any adjustment to the lat- The key things to remember when pointing the telescope is that itude adjustment t-bolt. That will nullify the mount’s polar a) you only move it in R.A. and Dec., not in azimuth or latitude alignment. - Page 11 background behind the secondary mirror, making it easier to If the entire primary mirror reflection is not visible in the sec- distinguish the mirror holder from the background. ondary mirror (as it is not in Figure 8c), adjust the tilt of the secondary mirror by alternately loosening one of the three set Use a Collimation Tool screws a turn and tightening the other two (Figure 10).
-
Page 12: Using Your Telescope-Astronomical Observing
Each pair of collimation screws work together to adjust the 7. Using Your Telescope — tilt. The set screw pushes the mirror cell forward, while the Astronomical Observing Phillips head screw pulls the mirror cell back. One must be loosened and the other tightened by the same amount in order to adjust the tilt. - Page 13 ed, more stars will glimmer into view and you'll be able to see The best rule of thumb with eyepiece selection is to start with fainter details in objects you view in your telescope. a low power, wide field, and then work your way up in magni- fication.
- Page 14 Io, Callisto, Europa, and Ganymede. Higher-power eyepieces To star hop, only a minimal amount of additional equipment is should bring out the cloud bands on the planet's disk. necessary. A star chart or atlas that shows stars to at least mag- nitude 5 is required.
-
Page 15: Care And Maintenance
(Figure 13). Look in the telescope’s eyepiece, and the object oxidizing. These coatings normally last through many, many should be somewhere within the field of view. If it's not, sweep years of use before requiring re-coating (which is easily done). the telescope carefully around the immediate vicinity until the To clean the secondary mirror, remove the mirror in its holder object is found. -
Page 16: Specifications
9. Specifications Optical tube: Steel Primary mirror diameter: 130mm Primary mirror coating: Aluminum with silicon monoxide (SiO) overcoat Primary mirror figure: Parabolic Secondary mirror minor axis: 37mm Focal length: 650mm Focal ratio: f/5 Focuser: Rack and pinion, accepts 1.25" eyepieces Eyepieces: 25mm and 10mm Explorer II, fully coated, 1.25"...
Need help?
Do you have a question about the SpaceProbe 130ST EQ 9007 and is the answer not in the manual?
Questions and answers