Table of Contents
Advertisement
Quick Links
InSTRuCTIOn Manual
Orion StarSeeker 130 II
130mm GoTo Reflector
#8993
OrionTelescopes.com
Customer Support (800) 676-1343
E-mail: support@telescope.com
Corporate Offices (831) 763-7000
89 Hangar Way, Watsonville, CA 95076
Providing Exceptional Consumer Optical Products Since 1975
IN 473 Rev. A 10/12
Advertisement
Table of Contents

Related Manuals for ORION TELESCOPES & BINOCULARS StarSeeker 130 II


Summary of Contents for ORION TELESCOPES & BINOCULARS StarSeeker 130 II
- Page 1 InSTRuCTIOn Manual Orion StarSeeker 130 II 130mm GoTo Reflector #8993 OrionTelescopes.com Customer Support (800) 676-1343 E-mail: support@telescope.com Corporate Offices (831) 763-7000 89 Hangar Way, Watsonville, CA 95076 Providing Exceptional Consumer Optical Products Since 1975 IN 473 Rev. A 10/12...
-
Page 2: Table Of Contents
Table of Contents Introduction ..........3 Parts List . -
Page 3: Introduction
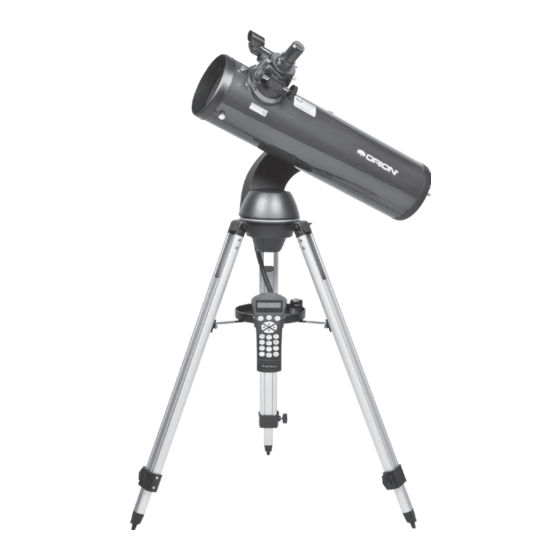
Introduction Congratulations on your purchase of the Orion StarSeeker 130 II GoTo telescope! Simple and friendly to use, the StarSeeker combines state-of-the-art GoTo pointing technology with space-penetrating Newtonian reflector optics in a package that makes observing the night sky both remarkably easy and wonderfully rewarding. - Page 4 EZ Finder II on optical tube reflex sight Eyepiece Focuser Optical tube Fork Fork arm Fork arm coupling knob Primary mirror collimation knob Accessory tray Hand controller Tripod Leg lock knobs (x3) Figure 1. The StarSeeker 130 II GoTo reflector...
-
Page 5: Parts List
Starry Night CD-ROM Fork arm Figure 2. In the box: Parts of the StarSeeker 130 II Parts list Open the shipping box and, referring to the above Parts List and Figure 2, check that all the parts are present. Remove all of the accessories from their individual boxes. - Page 6 Locate the accessory tray, and place it on top of the tripod center support brace in between the tripod legs (see Figure 3). Insert the locking bolt from underneath the tripod support brace and thread it into the hole in the center of the accessory tray.
- Page 7 into the focuser. The supplied 1.25" eyepieces fit in the 1.25" adapter (Figure 6). Optional 2" eyepieces would fit in the 2" focuser collar with the 1.25" adapter removed. The 12.5" and Eyepiece 2" designations refer to the barrel diameter of the eyepieces. To install one of the included eyepieces: 1.25"...
-
Page 8: The Hand Controller
Powering the StarSeeker This section describes the basic hand controller procedures The StarSeeker 130 II can be powered by the supplied bat- needed to operate the StarSeeker. These procedures are tery pack, or an optional AC-to-DC adapter or Dynamo Pro grouped into three categories: Alignment, Setup and Utilities. - Page 9 only move the telescope. They cannot be used to scroll through menu features. Object Type Buttons: Three separate buttons for accessing lists of Solar System objects; Stars, including variable and double stars; and Deep Sky objects. Identify: Allows search of any of the StarSeeker database catalogs or lists and display the name and offset distances to the nearest matching objects.
- Page 10 • Press the MOTOR SPEED button on the hand controller. closest to your current observing site. The city you choose The LCD will display the current speed rate in the upper will be remembered in the hand controller’s memory so right corner.
- Page 11 ment procedure. One common cause is inaccurate time/ Date – Enter the month, day and year of your observing session. The display will read: mm/dd/yy. site information input into the hand controller. Confirm that you have all the correct information before proceed- •...
- Page 12 Once the StarSeeker is powered on, Press ENTER to StarSeeker then asks you to center in the eyepiece the alignment star you selected. Use the directional arrow begin alignment. buttons to slew the telescope to the alignment star and Use the Up and Down scroll buttons to select Auto Two- carefully center it in the finder scope.
- Page 13 Solar System align pointing accuracy, especially on objects in that part of the sky. Solar System Align is designed to provide excellent tracking and GoTo performance by using solar system objects (Sun, • If you have aligned your telescope using the One-star Moon and planets) to align the telescope with the sky.
- Page 14 However, the tracking can be turned off for terrestrial many of the hand controller functions, such as displaying use. (We don’t recommend using the StarSeeker 130 II information about the object. reflector for terrestrial use, as the view will be rotated from...
- Page 15 Mode Toggle Bold Font – Pressing the ENTER button tog- gles between the bold and regular fonts. Alt-Az – This is the default tracking mode and is used Scope Setup when the StarSeeker has been properly aligned. EQ North – Used to track the sky when the telescope Setup Time-Site –...
- Page 16 zon when you are observing. You can customize the Utilities object database by selecting altitude limits that are Factory Setting – Returns the StarSeeker hand con- appropriate for your location and situation. For exam- troller to its original factory settings. Parameters such ple, if you are observing from a mountainous location as backlash compensation values, initial date and where the horizon is partially obscured, you can set...
- Page 17 and time it takes for the mount to complete its final slow and press ENTER. The display will ask you to enter a number between 1-25 to identify the object. Press GoTo when slewing to an object. Changing the balance of the telescope can prolong the time it takes to com- ENTER again to save this object to the database.
-
Page 18: Telescope Basics
When observing through a reflector such as truly sharp image, while in some cases, you may actually the StarSeeker 130 II, the image will appear upside down and see a double image. backwards. For this reason reflectors are not recommended for daytime terrestrial observing. -
Page 19: Celestial Observing
Planetary Observing Hints camera, however, you should always wear corrective • Remember that atmospheric conditions are usually the lenses to ensure the sharpest possible focus. If you have astigmatism, corrective lenses must be worn at all times. limiting factor on how much planetary detail will be visible. So, avoid observing the planets when they are low on the Celestial Observing horizon or when they are directly over a source of radiating... -
Page 20: Telescope Maintenance
Primary mirror center mark Figure 12. Collimating the optics. a) When the mirrors are properly aligned, the view down the focuser drawtube should look like this. b) Here, the secondary mirror is centered under the focuser, but it needs to be adjusted (tilted) so that the entire primary mirror is visible. - Page 21 The Collimation Cap Your StarSeeker 130 II comes with a “quick collimation cap” (Figure 13). This is a simple cap that fits on the focuser draw- tube like a dust cap, but has a tiny hole in the center and a reflective inner surface.
- Page 22 Recessed alightment screws (x3) Figure 15. Place a small sheet of white paper inside the Figure 16. To rotate the secondary mirror, grip the telescope tube opposite the focuser when collimating the secondary mirror holder with your fingers and loosen the center screw a quarter turn or so with a Phillips screwdriver.
-
Page 23: Specifications
If you try the star test and the bright star you have selected is Collimation not accurately centered in the eyepiece, the optics will always knob (x3) appear out of collimation, even though they may be perfectly aligned. It is critical to keep the star centered, so over time you may need to make slight corrections to the telescope’s position in order to account for the sky’s apparent motion. - Page 24 Alt-Azimuth Mounting: A telescope mounting using two inde- Celestial pole: The imaginary projection of Earth’s rotational axis north or south pole onto the celestial sphere. pendent rotation axes allowing movement of the instrument in Altitude and Azimuth. Celestial Sphere: An imaginary sphere surrounding the Altitude: In astronomy, the altitude of a celestial object is its Earth, concentric with the Earth’s center.
- Page 25 Meridian: A reference line in the sky that starts at the North a point source. A planet is far away but it can be resolved as a disk. Most stars cannot be resolved as disks, they are celestial pole and ends at the South celestial pole and passes through the zenith.
-
Page 26: Appendix B - Rs-232 Connection
appendix B – RS-232 Connection You can control your StarSeeker telescope with a computer via the RS-232 port located on the computerized hand control- ler using the included RS-232 serial cable. If your computer does not have a serial port (which many do not these days), you will also need to purchase a serial-to-USB adapter, avail- able from Orion. -
Page 28: Sky Maps
Sky Maps NORTH SOUTH SPRING Early March 1:00 AM Late March 12:00 AM Early April 12:00 AM* Late April 11:00 PM* Early May 10:00 PM* Late May 9:00 PM* Early June 8:00 PM (dusk)* *Daylight saving time... - Page 29 NORTH SOUTH SUMMER Early June 2:00 AM* Late June 1:00 AM* Early July 12:00 AM* Late July 11:00 PM* Early August 10:00 PM* Late August 9:00 PM* Early September 8:00 PM (dusk)* *Daylight saving time...
- Page 30 NORTH SOUTH AUTUMN Early September 2:00 AM* Late September 1:00 AM* Early October 12:00 AM* Late October 11:00 PM* Early November 9:00 PM Late November 8:00 PM Early December 7:00 PM *Daylight saving time...
- Page 31 NORTH SOUTH WINTER Early December 2:00 AM Late December 1:00 AM Early January 12:00 AM Late January 11:00 PM Early February 10:00 PM Late February 9:00 PM Early March 8:00 PM...
- Page 32 Two-Year limited Warranty The StarSeeker 130 II 130mm GoTo Reflector is warranted against defects in materials or workman- ship for a period of two years from the date of purchase. This warranty is for the benefit of the original retail purchaser only. During this warranty period Orion Telescopes & Binoculars will repair or replace, at Orion’s option, any warranted instrument that proves to be defective, provided it is returned postage...
Need help?
Do you have a question about the StarSeeker 130 II and is the answer not in the manual?
Questions and answers