Table of Contents
Advertisement
Quick Links
Advertisement
Table of Contents

Related Manuals for ORION TELESCOPES & BINOCULARS StarSeeker II 102 GoTo


Summary of Contents for ORION TELESCOPES & BINOCULARS StarSeeker II 102 GoTo
- Page 1 InSTRucTIOn Manual Orion StarSeeker II 102mm ™ GoTo Refractor #8991 OrionTelescopes.com Customer Support (800) 676-1343 E-mail: support@telescope.com Corporate Offices (831) 763-7000 89 Hangar Way, Watsonville, CA 95076 Providing Exceptional Consumer Optical Products Since 1975 IN 492 Rev. A 05/13...
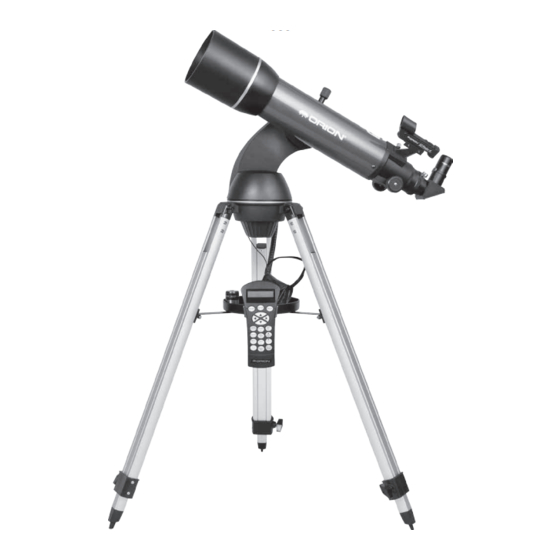
- Page 2 Dovetail bar on optical tube Dew/glare shield Tube lock bolt Fork EZ Finder Fork arm reflex sight Eyepiece Focuser Star diagonal Fork arm coupling knob Battery pack Accessory tray Hand controller Tripod Figure 1. The StarSeeker II 102 GoTo Refractor...
-
Page 3: Table Of Contents
Introduction Congratulations on your purchase of the Orion StarSeeker II 102 GoTo telescope! Simple and friendly to use, the StarSeeker combines state-of-the-art GoTo pointing technology with sharp, wide-field achro- matic refractor optics in a package that makes observing the night sky both remarkably easy and won- derfully rewarding. -
Page 4: Parts List
Optical Dust cap tube Accessory tray Serial cable Tripod Battery pack GoTo Hand Controller Star diagonal Eyepieces Fork arm Starry Night CD-ROM EZ Finder II Figure 2. In the box: Parts of the StarSeeker II 102 Parts list Battery Pack (batteries not included) Dust Cap Qty. -
Page 5: Assembly
assembly Your StarSeeker comes in three major sections: the optical tube, fork arm and the tripod. The assembly process entails first installing the fork arm on the tripod, then attaching the telescope tube to the fork arm. After that, you will attach the accessories. - Page 6 Inserting the Star Diagonal and Eyepiece The star diagonal diverts the light at a right angle from the EZ Finder II light path of the telescope. For astronomical observing with a refractor, the star diagonal allows you to observe in positions that are more comfortable than if you were to look straight Thumbscrew through.
- Page 7 ing shoe as shown and tighten the thumbscrew on the shoe to secure the mounting bracket. Thumbscrew Slide the base of the EZ Finder II bracket into the dovetail shoe Dovetail on the optical tube (Figure 9). The EZ Finder II should be ori- shoe ented so that the sight tube is facing the front of the telescope, as shown.
-
Page 8: The Goto Hand Controller
Powering the StarSeeker The StarSeeker II 102 can be powered by the supplied bat- tery pack, or an optional AC-to-DC adapter or Dynamo Pro 12V field battery. The battery pack requires 8 user-supplied AA alkaline batteries. To power the StarSeeker, insert the plug of your desired power supply into the 12V jack located on the side of the fork arm (Figure 11). - Page 9 astronomy software programs for controlling the Note: Before performing an alignment, be sure that the EZ Finder II is properly aligned with the telescope. telescope using the software interface. Motor Speed Button Initial Set-up The telescope can be controlled at nine different speed rates Power on the StarSeeker by plugging the power supply when using the directional buttons.
- Page 10 tude 36.95 N you would enter a latitude of 36°57’ N automatically selects the best slewing rate for aligning [.95x60=57]. objects in both the finder scope and the eyepiece). For the second alignment object, choose a bright star or Time – Enter the current time for your area. You can enter planet as far as possible from the first alignment object.
- Page 11 and up arrow buttons (the up/down arrows reverse at slew press ALIGN to accept this star as your second alignment star. When the telescope has been aligned to both stars the display rates of 6 or lower). Approaching the star from this direction will read Align Success, and you are now ready to find your when looking through the eyepiece will eliminate much of the backlash between the gears and assure the most...
- Page 12 To use One-Star Align: Press the BACK button until the display reads StarSeeker Ready. Select One-Star Align from the alignment options. Press the MENU button and use the scroll buttons to Press ENTER to accept the time/site information select the Utilities menu. Press ENTER. displayed on the display, or press BACK to enter new information.
- Page 13 Deep Sky. Pressing the button will call up that particular list or Pressing the SOLAR SYSTEM button will allow you to use catalog, or a submenu of catalogs. the scroll buttons to select any of the eight planets as well as the Moon.
- Page 14 constellation Tour Lunar – Used for tracking the Moon when observing the lunar landscape. In addition to the Sky Tour, the StarSeeker telescope has a Constellation Tour that allows the user to take a tour of all Solar – Used for tracking the Sun when solar observ- the best objects within a particular constellation.
- Page 15 is released and the direction moved is opposite to the effects of backlash. For example, if your telescope is front heavy from using heavy optical or photographic direction of travel. accessories attached to the back, you would want To set the anti-backlash value, scroll down to the anti- to set your altitude approach to the negative direc- backlash option and press ENTER.
- Page 16 User Objects – The StarSeeker can store up to 50 differ- Once the telescope is powered on again the display will read Wake Up. After pressing Enter you have the option ent user-defined objects in its memory. The objects can of scrolling through the time/site information to confirm be daytime land objects or an interesting celestial object the current setting.
-
Page 17: Telescope Basics
Precise GoTo – The Precise GoTo function assists in finding extremely faint objects and centering objects clos- er to the center of the field of view for astrophotography and CCD imaging. Precise GoTo automatically searches out the closest bright star to the desired object and asks the user to carefully center it in the eyepiece. -
Page 18: Celestial Observing
calculating Magnification • Never look across or over objects that are radiating heat waves. This includes asphalt parking lots on hot summer You can change the power of your telescope just by changing the eyepiece (ocular). To determine the magnification of your days or building rooftops. - Page 19 called variable polarizing filters, act something like a dimmer color seen in long exposure photographs. Instead, they appear grayish. And, because of their low surface brightness, they switch, permitting adjustment of the brightness to your liking. should be observed from a dark sky location whenever possi- Observing the Planets ble.
-
Page 20: Telescope Maintenance
Telescope Maintenance Specifications While your StarSeeker telescope requires little maintenance, Objective Lens: 102mm diameter doublet there are a few things to remember that will ensure your tele- Focal Length: 660mm scope performs at its best. Focal Ratio: f/6.5 care and cleaning of the Optics Focuser: 2"... -
Page 22: Sky Maps
Sky Maps NORTH SOUTH SPRING Early March 1:00 AM Late March 12:00 AM Early April 12:00 AM* Late April 11:00 PM* Early May 10:00 PM* Late May 9:00 PM* Early June 8:00 PM (dusk)* *Daylight saving time... - Page 23 NORTH SOUTH SUMMER Early June 2:00 AM* Late June 1:00 AM* Early July 12:00 AM* Late July 11:00 PM* Early August 10:00 PM* Late August 9:00 PM* Early September 8:00 PM (dusk)* *Daylight saving time...
- Page 24 NORTH SOUTH AUTUMN Early September 2:00 AM* Late September 1:00 AM* Early October 12:00 AM* Late October 11:00 PM* Early November 9:00 PM Late November 8:00 PM Early December 7:00 PM *Daylight saving time...
- Page 25 NORTH SOUTH WINTER Early December 2:00 AM Late December 1:00 AM Early January 12:00 AM Late January 11:00 PM Early February 10:00 PM Late February 9:00 PM Early March 8:00 PM...
- Page 26 Two-Year limited Warranty This Orion product is warranted against defects in materials or workmanship for a period of two years from the date of purchase. This warranty is for the benefit of the original retail purchaser only. During this warranty period Orion Telescopes & Binoculars will repair or replace, at Orion’s option, any warranted instrument that proves to be defective, provided it is returned postage paid.
Need help?
Do you have a question about the StarSeeker II 102 GoTo and is the answer not in the manual?
Questions and answers