Table of Contents
Advertisement
Quick Links
Advertisement
Table of Contents

Related Manuals for BenQ DC E610


Summary of Contents for BenQ DC E610
- Page 1 DC E610 Digital Camera User Manual Welcome...
-
Page 2: Taking Care Of Your Camera
Copyright Copyright 2006 by BenQ Corporation. All rights reserved. No part of this publication may be reproduced, transmitted, transcribed, stored in a retrieval system or translated into any language or computer language, in any form or by any means, electronic, mechanical, magnetic, optical, chem- ical, manual or otherwise, without the prior written permission of this company. -
Page 3: Table Of Contents
Table of Contents 1. Touring Your Camera ............3 1.1 Checking the Package Contents ..........3 1.2 Camera Components .............3 1.2.1 Front View ................3 1.2.2 Rear View ................4 1.2.3 LED Indicators ..............4 2. Preparing Your Camera for Use.......... 5 2.1 Installing the Battery ..............5 2.2 Charging the Battery ..............5 2.3 Inserting and Removing an SD Memory Card .....6 2.4 Setting the Date and Time .............6... - Page 4 3.3.3 Deleting Files ..............19 3.3.4 Playback Mode Menu Settings .........19 3.3.5 Playback Mode LCD Monitor Information (Video) ..21 3.3.6 Playing Back Video Clips ..........21 3.4 Setup Mode ................21 3.4.1 Setup Mode Menu ............22 4. PC Dependent Features ............. 25 4.1 Bundled Software ..............25 4.2 USB Mode ................26 4.3 Printer Mode ................26 5.
-
Page 5: Touring Your Camera
Touring Your Camera Checking the Package Contents Carefully unpack your kit box and ensure that you have the following items. User Manual Camera USB cable Lithium-ion battery Hand strap Software CD-ROM Battery charger (DLC-02) AC power adapter AV cable 10. Leather case If any of the items are missing or appear to be damaged, contact your dealer. -
Page 6: Rear View
1.2.2 Rear View LCD monitor Inst. Play button Inst. REC button USB / AV port Strap eyelet Navigator -- four-way and OK buttons Menu button DISP button 1.2.3 LED Indicators Indicators State Description Solid green • The camera is powered up and ready to be used. •... -
Page 7: Preparing Your Camera For Use
Preparing Your Camera for Use Installing the Battery We highly recommend that you use only the specified rechargeable lithium-ion battery for your camera. Make sure that the power of the camera is off before inserting or removing the battery. To insert the battery: 1. -
Page 8: Inserting And Removing An Sd Memory Card
• The camera must be used with the specified charger set. Damage caused by the use of an incorrect charger set is not covered under the warranty. Always make sure that the cam- era is off before removing the battery. •... -
Page 9: Using The Camera
Using the Camera Snapshot Mode 3.1.1 Getting started with capturing images 1. Press the [ ] button for more than one second to turn Press down halfway on the camera. 2. Compose your image in the LCD monitor under Snapshot Mode. 3. -
Page 10: Snapshot Mode Lcd Monitor Information
3.1.2 Snapshot Mode LCD Monitor Information Shooting Mode ] Auto ] Manual ] Portrait ] Landscape ] Night Scene ] Sport ] Back Light Flash mode ] Flash Auto ] Flash On ] Flash Off ] ISO 400 Metering ] Red Eye ] Center Avg. -
Page 11: Changing Camera Settings
3.1.3 Changing Camera Settings Camera settings can be changed with the following four-way and OK buttons. 1. Up/EV: • Scrolls upwards in menus. • Enables you to adjust the EV settings. 2. Left/Focus: • Scrolls left in menus. • Enables you to choose the appropriate focus settings. 3. -
Page 12: Using The Flash
Icon Shooting Mode Description Sport Select this mode when you want to capture fast-moving subjects. The flash is fixed at [ Back Light Select this mode while capturing images with the light coming from behind the subject. The flash is fixed at [ •... -
Page 13: Using The Self-Timer
3.1.6 Using the Self-timer The self-timer can be set in Snapshot Mode. This feature is useful for situations when you may wish to be part of the picture. 1. Secure the camera to a tripod or place it on a stable surface. 2. -
Page 14: Using The Digital Zoom
1. Press the [ ] button to enter Snapshot Mode or Movie Mode. 2. Compose the image with the zoom key. • Adjusting the key to the right zooms in on the subject, and enlarges the subject on the LCD monitor. •... -
Page 15: Snapshot Mode Menu Settings
• ] button and then press the OK button. To decrease the EV bias, press the [ 3.1.12 Snapshot Mode Menu Settings 3.1.12.1 Snapshot Mode Menu 1. In Snapshot Mode, press the [ ] button to access the menu, and then use the [ ] / [ ] buttons to select the menu settings you want to change. - Page 16 Icon Item Option Functional Description Metering Adjusts the region of the subject or frame on which the ] Center (Only camera measures light. Avg. available in – Center Avg.: The camera metering is set for the Manual average brightness of objects in the center region ] Spot mode) of the frame.
-
Page 17: Movie Mode
• Count: 2 ~ 99 counts (specifying how many shots can be taken). ] buttons to adjust the settings, and then press the OK button. 3. Use the [ To capture images with Interval Shoot function: 1. In Snapshot Mode, toggle the [ ] button to select Interval Shoot mode. -
Page 18: Movie Mode Menu Settings
3.2.2 Movie Mode Menu Settings 3.2.2.1 Movie Mode Menu 1. In Movie Mode, press the [ ] button to access the menu, and then use the [ ] buttons to select the menu settings you want to change. 2. Use the [ ] buttons to select the desired item in the menu, and then press the OK button. -
Page 19: Timer Recording
3.2.3 Timer Recording With the special “Timer Recording” feature, you can set recording session in advance, by following the steps below. 1. In Movie Mode, press the [ ] button to access the menu, and then scroll to [Timer REC]. 2. -
Page 20: Playback Mode Lcd Monitor Information (Image)
3.3.1 Playback Mode LCD Monitor Information (Image) 3.3.2 Viewing Images 3.3.2.1 Magnifying Images While reviewing your images, you may enlarge a selected portion of an image. This magnification allows you to view the details of the image. The camera provides 4X magnification during playback. -
Page 21: Deleting Files
1. Adjust the zoom key to the left. Nine thumbnail images are displayed simultaneously. 2. Use the [ ] buttons to select the image to be displayed at the regular size, and then press the OK button to display the selected image in the full screen mode. - Page 22 4. To exit from the menu, press the [ ] button. Icon Item Option Functional Description Protect Sets the files to the read-only status to prevent them from being erased by mistake. To protect your files, follow the steps below. 1.
-
Page 23: Playback Mode Lcd Monitor Information (Video)
Icon Item Option Functional Description Resize Allows you to change the size of a captured image. ] 2048 x 1536 To resize a captured image, follow the steps below. 1. In Playback Mode, choose Resize and then select the ] 1600 x 1200 desired option. -
Page 24: Setup Mode Menu
3.4.1 Setup Mode Menu 1. In whichever mode (Snapshot Mode, Movie Mode, or Playback Mode), press the [ ] button (Step A). 2. Press the [ ] button twice to enter Setup Mode (Step B and Step C). 3. Use the [ ] buttons to select the menu settings you want to change. - Page 25 Icon Item Option Functional Description Startup To set a startup image that is displayed every time Image you power on the camera, follow the steps below. 1. Select [ ], and then you will be prompted to select a startup image. Use the ] buttons to select the image you prefer.
- Page 26 Icon Item Option Functional Description Date/Time Allows you to adjust the camera’s date and time. 1. Use the [ ] buttons to select the item you want to change. 2. Press the OK button and then use the ] buttons to adjust the setting. Setting the date and time is important as the information is stored with the images you take, and is used if you have turned on...
-
Page 27: Pc Dependent Features
PC Dependent Features 4.1 Bundled Software The camera is supplied with the following software. To install the software, refer to the information supplied with respective CDs. Ulead Photo Ulead® Photo Express™ 5.0 SE is a complete photo project software Express for digital images. -
Page 28: Usb Mode
4.2 USB Mode 1. Connect the end of the smaller plug of the USB cable to the camera. 2. Connect the other end of the USB cable to an available USB port on your computer. 3. Turn on the camera. The USB screen is displayed. -
Page 29: Troubleshooting
Troubleshooting Refer to the symptoms and solutions listed below before shipping your camera for service. If the problem persists, contact your local reseller or service center. Symptom Cause Solution The camera cannot be There is no battery or the battery is Insert the battery correctly. - Page 30 Symptom Cause Solution The camera does not The battery is running low. Recharge the battery. shoot even when The camera is not in Shooting Switch to Shooting Mode. pressing the shutter Mode. button. The shutter button was not pressed Press the shutter button all the way all the way down.
-
Page 31: Specifications
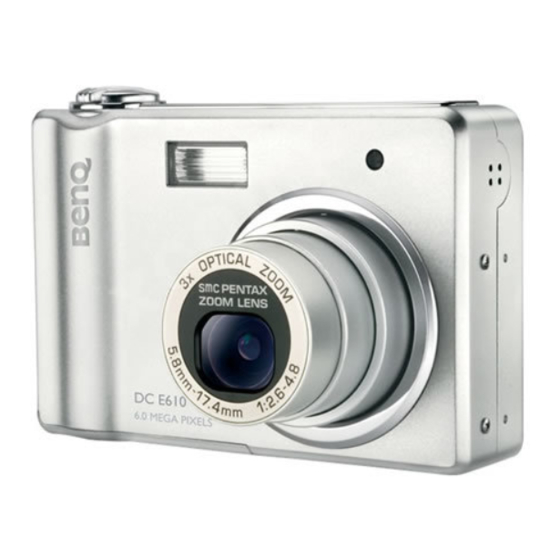
Specifications Image Sensor 1/2.5-inch CCD Effective Pixels: 6.1 Mega pixels LCD Display 2.4" TFT LCD Lens Focal Length: f = 5.8 - 17.4 mm (35 mm - 105 mm; 35 mm Equivalent) F No.: F2.6/F4.8 Focusing TTL Auto Focus Range: Macro: 6 cm ( Zoom 4), Normal: 40 cm ~ infinity Shutter Mechanical shutter: Up to 1/2000 sec. -
Page 32: Service Information
Technical Support If you have any problem or question regarding the camera, you can visit the following web site for further assistance: http://support.BenQ.com For free driver updates, product information and news releases, visit the following web site: http://www.BenQ.com Service Information...
Need help?
Do you have a question about the DC E610 and is the answer not in the manual?
Questions and answers