Table of Contents
Advertisement
Available languages
Available languages
Quick Links
Description
The HMYDV thermostat is designed to control the temperature of a
floor heating system. The thermostat can be used with a maximum
load of 15 A (1800 W @ 120 VAC or 3600 W @ 240 VAC).
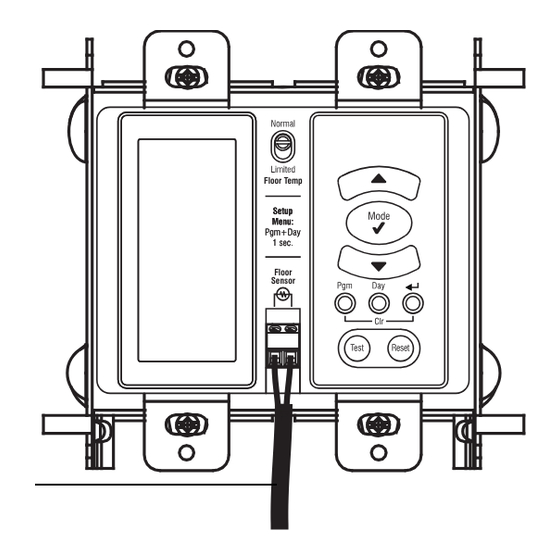
Temperature limit
selection switch
Display
Temperature sensor
terminals
SUPPLIED PARTS
•
One (1) thermostat
•
One (1) floor temperature sensor
•
Four (4) 6-32 mounting screws
•
Four (4) solderless connectors
Installation
TURN OFF POWER TO THE HEATING SYSTEM AT THE MAIN
POWER
PANEL
TO
AVOID
thermostat does NOT protect against electrical shocks resulting
from contact with both conductor wires.
The thermostat's housing is not watertight. Do NOT install the
thermostat in an area where it can be exposed to water or rain.
Connect the thermostat
wires to the power and
to
the
load
using
solderless
connectors
for copper wires.
Power
Connect the grounding
supply
braid
of
the
floor
heating system to the
supply ground.
NOTE: All cables and connections must
conform to the local electrical code.
This thermostat has tinned copper wires
for line and load connections. Special
CO/ALR solderless connectors must be
used if these wires are to be connected
to aluminium conductors.
HMYDV
Adjustment buttons
Mode button
Floor Temp
Day selection
button
Floor
Sensor
Return button
Program button
GFCI test and
reset buttons
ELECTRICAL
SHOCK.
Load
1.
Mount the thermostat onto the electrical box using the provided
screws.
Connect the temperature sensor
to the terminals as shown.
NOTE: The temperature sensor
wires must not come in contact
with the electrical wires and
must be routed outside the elec-
trical box.
WARNING: THE FLOOR TEMPERATURE LIMIT MUST BE SET TO
'LIMITED' FOR ALL LAMINATE AND ENGINEERED WOOD FLOOR
APPLICATIONS (SEE SECTION 5.2).
If there is a sticker on the display, peel it off.
Apply power to heating system.
Programming
NOTE: Interactive programming tutorial available at www.nuheat.com
3.1 Clock and Day Setting
The clock must be set when the time display flashes on the screen.
Press and hold the Day button for 1 second.
2.
The day display will flash.
Set the day using the
This
Press the Mode button. The hour display will flash.
Set the hours using the
Press the Mode button again. The minute display
will flash.
Set the minutes using the
Press the
3.2 Customizing the Schedule
You can customize your thermostat's schedule using either:
•
5+2 day programming - easier to set as you enter only two pro-
grams: one program for weekdays (Monday to Friday) and
another program for weekends (Saturday and Sunday).
•
7-day programming - more flexible as you can set a different
program for each day of the week.
See section 5.1 to learn how to switch between the two different pro-
gramming methods.
You can program up to 4 periods in a day. To program a period, you
must enter the starting time and the temperature setpoint for the
period.
5+2 day programming
5-day programming allows you to enter one program for weekdays
(Monday to Friday) and another program for weekends (Saturday
and Sunday). Use the following grid to record your new settings.
Electronic Thermostat
sensor
wires
buttons.
buttons.
buttons.
button to end.
HMYDV
User Guide
Floor Temp
Floor
Sensor
3.
1/12
Advertisement
Table of Contents

Related Manuals for Nuheat HMYDV


Summary of Contents for Nuheat HMYDV
-
Page 1: User Guide
Description Mount the thermostat onto the electrical box using the provided The HMYDV thermostat is designed to control the temperature of a screws. floor heating system. The thermostat can be used with a maximum load of 15 A (1800 W @ 120 VAC or 3600 W @ 240 VAC). -
Page 2: Basic Operation
The thermostat normally displays the current floor temperature. Start Time • To view the programmed temperature, press either of the Temperature buttons once. Start Time • To change the programmed temperature, press either of the Temperature buttons until the desired temperature is displayed. HMYDV 2/12... -
Page 3: Automatic Mode
The thermostat re-assesses the start time daily based on the pre- vious day’s results. • You wish to control the heating power without accounting for the floor temperature. • To exit the configuration settings, press the button. • The temperature sensor is defective. HMYDV 3/12... -
Page 4: Troubleshooting
This product is guaranteed against workmanship defects for a three-year period following the initial date of purchase. During this period, NUHEAT WARNING: If the Test and Reset buttons illuminate during normal will repair or replace, at our option and without charge, any defective operation, check if the fault was caused by external interference such product which has been used under normal conditions. -
Page 5: Guide De L'utilisateur
Description Connecter la sonde de température aux bornes tel qu’illustré ci-contre. Le thermostat HMYDV a été conçu pour contrôler la température d’un Floor Temp NOTA : S’assurer que les fils de la plancher chauffant. Le thermostat peut être utilisé avec une charge maxi- sonde de température ne sont pas... -
Page 6: Utilisation De Base
Pour visualiser la température de consigne, appuyer une fois sur l’un des boutons Température • Pour modifier la température de consigne, appuyer sur l’un des Heure boutons jusqu’à ce que la valeur désirée soit affichée. Température Heure Température HMYDV 6/12... - Page 7 MISE EN GARDE : La limite de température du plancher DOIT être pla- Le thermostat affichera le pourcentage de puissance du chauffage au cée à « LIMITED » pour les planchers en bois laminé ou en bois d’ingé- lieu d’afficher la température. nierie. HMYDV 7/12...
-
Page 8: Panne De Courant
Panne de courant pagnie aurait pu prendre. En aucun cas NUHEAT n’est lié à des dommages consécutifs ou fortuits causés avant, durant et après l’installation de ce produit. Le produit Si la panne de courant dure plus de 4 heures, seule l'horloge du défectueux ainsi que la facture originale doivent être retournés au lieu... -
Page 9: Instalación
Descripción Conectar la sonda de temperatura a los terminales, como en la ilustración. El termostato HMYDV sirve para controlar la temperatura de un sistema Floor Temp NOTA: asegurar que los cables de la eléctrico de calefacción del piso. Puede usarse con una carga máxima sonda de temperatura no estén en... -
Page 10: Funcionamiento Básico
El termostato indica generalmente la temperatura actual del piso. • Para visualizar la temperatura programada, presionar una vez uno Hora de los botones Temperatura • Para modificar la temperatura programada, presionar uno de los Hora botones hasta que aparezca el valor deseado. Temperatura HMYDV 10/12... - Page 11 Cuando se desea controlar el nivel de calefacción sin tomar en cuenta la temperatura del piso. • Cuando la sonda de temperatura está defectuosa. El termostato indicará el porcentaje de poder calorífico en lugar de indicar la temperatura. HMYDV 11/12...
-
Page 12: Problemas Y Soluciones
Este producto está garantizado contra defectos de fábrica por un periodo de y no ofrece ninguna protección. Los botones seguirán parpadeando tres años desde el primer día de adquisición. Durante este periodo, NUHEAT hasta que se reemplace el termostato. reparará o reemplazará, según elección de la compañía y sin ningún recargo...
Need help?
Do you have a question about the HMYDV and is the answer not in the manual?
Questions and answers