Advertisement
Quick Links
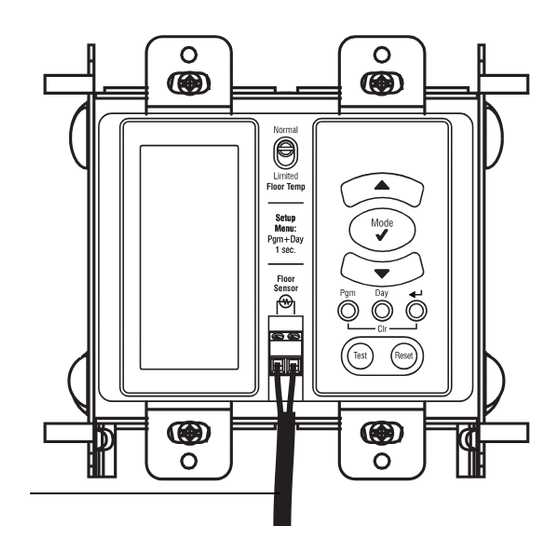
Description
The HMY110/HMY220 thermostats are designed to control the
temperature of a floor heating system. The thermostats can be used
with a maximum load of 15 A (1800 W @ 120 VAC or 3600 W @ 240
VAC).
Temperature limit
selection switch
Display
Temperature sensor
terminals
SUPPLIED PARTS
•
One (1) thermostat
•
One (1) floor temperature sensor
•
Four (4) 6-32 mounting screws
•
Four (4) solderless connectors
Installation
TURN OFF POWER TO THE HEATING SYSTEM AT THE MAIN
POWER
PANEL
TO
AVOID
thermostat does NOT protect against electrical shocks resulting
from contact with both conductor wires.
The thermostat's housing is not watertight. Do NOT install the
thermostat in an area where it can be exposed to water or rain.
Connect the thermostat
wires to the power and to
the load using solderless
connectors
for
copper
wires.
Connect the grounding
braid of the floor heating
system
to
the
supply
ground.
NOTE: All cables and connections
must conform to the local electrical
code. This thermostat has tinned cop-
per wires for line and load connec-
tions. Special CO/ALR solderless
connectors must be used if these
wires are to be connected to alumin-
ium conductors.
Mount
the
thermostat
onto
electrical box using the provided
screws.
HMY110/HMY220
Adjustment buttons
Mode button
Floor Temp
Day selection
button
Floor
Sensor
Return button
Program button
GFCI test and
reset buttons
ELECTRICAL
SHOCK.
Power
supply
Load
the
Connect the temperature sensor
1.
to the terminals as shown.
NOTE: The temperature sensor
wires must not come in contact
with the electrical wires and
must be routed outside the elec-
trical box.
WARNING: THE FLOOR TEMPERATURE LIMIT MUST BE SET TO
'LIMITED' FOR ALL LAMINATE AND ENGINEERED WOOD FLOOR
APPLICATIONS (SEE SECTION 5.2).
If there is a sticker on the display, peel it off by pulling the tab marked
with an arrow.
Apply power to heating system.
Programming
3.1 Clock and Day Setting
The clock must be set when the time display flashes on the screen.
Press and hold the Day button for 1 second. The
day display will flash.
Set the day using the
Press the Mode button. The hour display will flash.
Set the hours using the
2.
Press the Mode button again. The minute display
will flash.
Set the minutes using the
This
Press the
3.2 Customizing the Schedule
You can customize your thermostat's schedule using either:
•
5+2 day programming - easier to set as you enter only two pro-
grams: one program for weekdays (Monday to Friday) and
another program for weekends (Saturday and Sunday).
•
7-day programming - more flexible as you can set a different
program for each day of the week.
See section 5.1 to learn how to switch between the two different pro-
gramming methods.
You can program up to 4 periods in a day. To program a period, you
must enter the starting time and the temperature setpoint for the
period.
5+2 day programming
5-day programming allows you to enter one program for weekdays
(Monday to Friday) and another program for weekends (Saturday
and Sunday). Use the following grid to record your new settings.
HMY110/HMY220
Electronic Thermostats
sensor
wires
buttons.
buttons.
buttons.
button to end.
400-619-000-E
User Guide
Floor Temp
Floor
Sensor
3.
4/20/07
1/4
Advertisement

Related Manuals for Nuheat HMY110


Summary of Contents for Nuheat HMY110
-
Page 1: User Guide
Electronic Thermostats Connect the temperature sensor Description to the terminals as shown. Floor Temp The HMY110/HMY220 thermostats are designed to control the NOTE: The temperature sensor temperature of a floor heating system. The thermostats can be used Floor Sensor wires must not come in contact... -
Page 2: Basic Operation
The thermostat normally displays the current floor temperature. Temperature • To view the programmed temperature, press either of the Start Time buttons once. Temperature • To change the programmed temperature, press either of the Start Time buttons until the desired temperature is displayed. Temperature HMY110/HMY220 400-619-000-E 4/20/07... - Page 3 The temperature sensor is not connected to the thermostat. vious day’s results. • You wish to control the heating power without accounting for the • To exit the configuration settings, press the button. floor temperature. • The temperature sensor is defective. HMY110/HMY220 400-619-000-E 4/20/07...
-
Page 4: Specifications
This product is guaranteed against workmanship defects for a one-year as a halogen light or an electric motor. In this case, reset and test the period following the initial date of purchase. During this period, NUHEAT GFCI. However, if the fault occurs again for unknown reasons, cut...
Need help?
Do you have a question about the HMY110 and is the answer not in the manual?
Questions and answers