
Related Manuals for Lucent Technologies 8510T


Summary of Contents for Lucent Technologies 8510T
- Page 1 Integrated Services Digital Network (ISDN) 8510T Voice Terminal Feature Package 3 User’s Manual 555-021-736 Comcode 107964504 Issue 2 December 1996...
- Page 2 December 31, 1996, which retain their original AT&T titles. HERITAGE Lucent Technologies — formed as a result of AT&T’s planned restructuring — designs, builds, and delivers a wide range of public and private networks, communication systems and software, consumer and business telephone systems, and microelectronics components.
- Page 3 INTERFERENCE WARNING INFORMATION If the apparatus code on the bottom of your voice terminal is marked with the suffix “(RS)” (for example, 8510TND03A(RS)-003), then it complies with electromagnetic interference criteria specified by the FCC as suitable for residential (or business) installation. As such, the FCC requires us to provide the following warning for Class B residential installations.
-
Page 5: Important Safety Instructions
IMPORTANT SAFETY INSTRUCTIONS Only the most careful attention has been devoted to quality standards in the manufacture of your new telephone. Safety is a major factor in the design of every set. But, safety is YOUR responsibility too. Please read carefully the helpful tips listed below and on the next page. These suggestions will enable you to take fullest advantage of your new voice terminal. -
Page 6: Save These Instructions
Slots and openings in the housing must not be blocked or covered. The openings should never be blocked by placing the telephone on a sofa, rug or other similar surface. This product should never be placed near or over a radiator or heat register. This product should not be placed in a built-in installation unless proper ventilation is provided. -
Page 7: Table Of Contents
Introduction……………………………………………………………1 Organization of this Manual ………………………………………1 Conventions Used in this Manual …………………………………2 A Note on the Term, System Manager …………………………2 Your ISDN 8510T Voice Terminal …………………………………3 Feature Descriptions ………………………………………………7 Voice Features………………………………………………………7 Features Accessed with the Display and Softkeys………………8 Voice Features ………………………………………………………10 Answering and Placing a Call ……………………………………10... - Page 8 Setting the Number of Names on the Directory Page …………67 Tones and Their Meanings ………………………………………68 Voice Terminal Tones ……………………………………………68 Labeling and Installing the Designation Card and the Telephone Number Card ………………………………69 Installation……………………………………………………………71 Contents of the 8510T Package …………………………………71 Desktop Installation ………………………………………………71 Attaching Adjunct Equipment ……………………………………73 Technical Description ……………………………………………74...
-
Page 9: Introduction
Introduction The Lucent Technologies 8510T voice terminal can be added to your Integrated Services Digital Network (ISDN) communications system. In order to provide you with excellent quality and reliability, Lucent Technologies has designed this new voice terminal with the latest advances in telecommunications technology. -
Page 10: Conventions Used In This Manual
Technical Description — provides information on the technical aspects of the 8510T voice terminal. CONVENTIONS USED IN THIS MANUAL A rectangular box containing a feature name, such as... -
Page 11: Your Isdn 8510T Voice Terminal
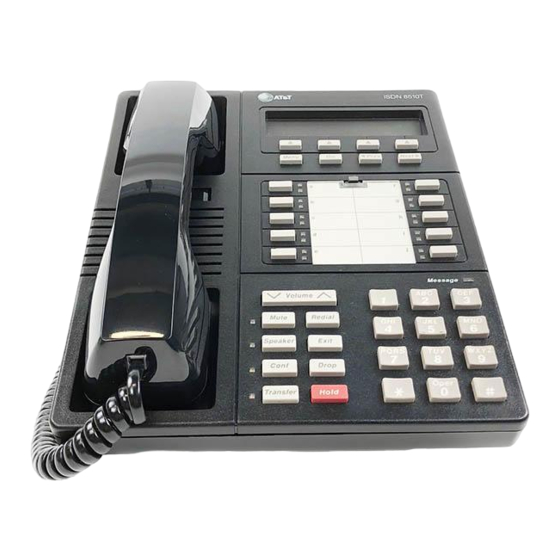
Before you begin using your ISDN 8510T voice terminal, familiarize yourself with the voice terminal features, lights, jacks, and other components that are available to you. To help you do this, Figures 1 and 2 show you the top and bottom views of the 8510T voice terminal. Telephone Handset... - Page 12 The 8510T voice terminal components pictured in Figure 1, the top view, are described below and on the next page. For your convenience, they are listed alphabetically. These 10 buttons are devoted either to Call appearance/feature buttons handling incoming and outgoing calls (call appearances) and are labeled...
- Page 13 A red light which goes on steadily when a message has Message light been left for you. See your System Manager for instructions regarding your local message retrieval procedures. For turning off (and then back on again) the microphone of Mute button the handset or the speakerphone so the other person on the call cannot hear you.
- Page 14 FIGURE 2 8510T Voice Terminal (Bottom View With Kickstand) The various components which appear on the bottom of the 8510T voice terminal are shown in Figure 2 and listed and explained below. Used for connecting an external speakerphone, a headset Adjunct jack adaptor, or other adjunct equipment.
-
Page 15: Feature Descriptions
Feature Descriptions Here are brief descriptions of the voice features and the features accessed with the softkeys, including what each one does and how you might want to use it. VOICE FEATURES Allows you to add an additional party to a call so that you Conference can conduct a conversation with more than one party. -
Page 16: Features Accessed With The Display And Softkeys
The Speakerphone feature allows you to place and answer calls or access other voice features without lifting the handset. (Press .) You may use the softkeys on the voice terminal to set or Speaker reset the speakerphone. When you set the built-in speakerphone, it performs a test of the surrounding environment and adjusts itself for optimal performance. - Page 17 Allows you to view either Number of Names (on a Directory Page) 4 names or 3 names + Quit on the second line of an individual Directory page. If you choose to have 4 names on the Directory screen at one time, you can leave the Directory or cancel calling a name in your Directory only by pressing (rather than using Quit).
-
Page 18: Voice Features
Voice Features The procedures which follow give short, step-by-step instructions for using each feature. For your convenience, the features are listed alphabetically. Unless otherwise noted, the calling procedure assumes that the handset is off-hook. ANSWERING AND PLACING A CALL To answer a call Lift the handset. -
Page 19: Conference
CONFERENCE To add another party to a call While on a call, press to add the next party. Conf The current call is placed on hold. The red Conference light flutters. If an idle call appearance button is not automatically NOTE: selected, press one yourself. -
Page 20: Hold
HOLD To put a call on hold while you answer another call The green light is flashing beside the call appearance button of NOTE: the incoming call. Press Hold The red light goes off, and the green light flutters (next to the call appearance button of the held call). -
Page 21: Mute
You can resume your conversation with the other party. REDIAL (LAST NUMBER DIALED) To automatically redial the last number you dialed manually (this can be an extension, outside number, or trunk/feature code) The 8510T voice terminal redials numbers consisting of up to NOTE: 37 digits. Lift the handset. -
Page 22: Speakerphone And Speaker
SPEAKERPHONE AND SPEAKER Your voice terminal is set for the Speaker (listen-only) or for the NOTE: Speakerphone (listen and speak) function or for neither. Check with your System Manager to see how your voice terminal is set. Speaker Use the following procedures if your voice terminal is set for the Speaker (listen only) feature. - Page 23 Speakerphone Use the following procedures if your voice terminal is set for the Speakerphone (listen and speak) feature. If your voice terminal is set for the Speakerphone feature, you NOTE: can adjust the speakerphone to the surrounding room acoustics to provide optimal performance.
-
Page 24: Transfer
Speakerphone (Continued) To change from handset to speakerphone Press Speaker goes on. The red light next to Speaker The speaker is active, and the handset is turned off. Hang up the handset. TRANSFER To send a call to another extension Press Transfer The present call is put on hold. -
Page 25: Features Accessed With The Display And Softkeys
Display ISDN 8510T Softkeys Display control buttons FIGURE 3 The 8510T Voice Terminal Display, Softkeys, and Display Control Buttons You can use the softkeys and display control buttons to access the following features: Setting the clock; Setting the speakerphone;... -
Page 26: Entering And Exiting Softkey Mode (Using The Menu And The Exit Buttons)
Initiating a self-test of the voice terminal’s lights, ringer, buttons, and dial pad keys; Selecting the contrast level for the display; Selecting a personalized ringing pattern; Setting the rate at which the display messages are shown on the screen; Adding confirmation or error tones to display messages; Setting the number of names on a Directory page. -
Page 27: The Voice Terminal Self-Test Feature
THE VOICE TERMINAL SELF-TEST FEATURE If you press while the Main Menu shown above is on the display Next > screen, the following menu screen appears: < MENU Test If you press the softkey below Test, you can perform a test of your voice terminal’s lights, ringer, display, and dial pad keys. -
Page 28: A Softkey Display Screen Flowchart
A SOFTKEY DISPLAY SCREEN FLOWCHART Review the display screen flowchart in Figure 4 before you begin using the softkey features. A more detailed flowchart appears in the ISDN 8510T Voice Terminal Quick Reference Guide . - Page 29 FIGURE 4 A Flowchart of the Softkey Display Screens...
-
Page 30: Setting The Clock
SETTING THE CLOCK When your voice terminal is first installed, when it is unplugged and then plugged in again, or after a power outage, this display is shown: PRESS Menu THEN Option TO SET THE CLOCK. To set the clock Press Menu The display shows:... - Page 31 Press (the softkey) below Clock. The display shows the date and time, such as: Sep 24, 1992 10:00 AM Quit The display format for the clock is: MMM DD, YYYY HH:MM AM or PM in which MMM = month abbreviation, such as "Oct" DD = day of the month such as "02"...
-
Page 32: Setting The Speakerphone
SETTING THE SPEAKERPHONE When you set the speakerphone on your voice terminal, you hear a set of tones as the speakerphone performs an acoustic test of the environment. When the tones stop, your speakerphone has finished adjusting itself for optimal performance and is ready for use. You must set the speakerphone when you initially set up your voice terminal, and reset it when you move the voice terminal to a different location (even if it’s in the same room), or after a power outage. - Page 33 The following procedure is an alternate way of using the softkeys to set the speakerphone. Press Menu Press the softkey below Option. The display shows: OPTIONS > Spkr Clock Lock Done Press the softkey below Spkr. The display shows: OPTIMIZING PERFORMANCE OF THE SPEAKERPHONE.
-
Page 34: Adding, Editing, And Deleting A Number And Name In The Directory
ADDING, EDITING, AND DELETING A NUMBER AND NAME IN THE DIRECTORY The 8510T voice terminal supports up to 30 Directory entries. The telephone numbers entered in the Directory can be up to 24 digits, and associated names can be up to 5 characters in length. Directory entries can be changed by deleting or editing. - Page 35 The display shows: ENTER PHONE #:_ Quit Pause Enter the telephone number you want to be added to the Directory. (You can enter up to 24 digits. A pause counts as 1 digit.) To place a 1.5 second pause between an access code, such NOTE: as "9,"...
- Page 36 Use the dial pad keys to enter the name of the person whose number you have just added to the Directory. Pressing the softkey below Quit now will abandon the procedure. The number you entered will not be saved. You may need to press the dial pad key more than IMPORTANT: once to enter the correct character.
- Page 37 When you are finished entering the name, press the softkey below Done. The display confirms your entry. Editing Entries in the Directory To edit a Directory entry Press Menu Press the softkey below Directory. Press the softkey below Add/Del. If the directory is locked, you must enter your 3-digit NOTE: password in order to modify your Directory.
- Page 38 Press to page backwards through the names in the < Prev Directory. Press the softkey below the name of the entry you want to edit. The display shows: EDIT 5-CHAR NAME: Harv_ Backspace Done If the phone number is correct and you don’t wish to edit it at this time, press the softkey below Done.
- Page 39 To move back and erase a number, press the softkey below Backspace. When you have completed editing the telephone number, press the softkey below Done. The display confirms your choice. Deleting an Entry from the Directory To delete an entry from the Directory Press Menu Press the softkey below Directory.
- Page 40 Do the following: to page forward through the names in the Press Next > Directory. to page backwards through the names in the Press < Prev Directory. Press the softkey below the name of the entry you want to delete. The display shows: 5551234 Delete Quit...
-
Page 41: Viewing A Directory Entry (And Placing A Call)
VIEWING A DIRECTORY ENTRY (AND PLACING A CALL) Directory entries can be viewed and changed, or you can exit the directory and have the voice terminal automatically dial the telephone number you are presently viewing. To view a Directory entry (and, if desired, call that number) You can also use the button to call a number in your NOTE:... - Page 42 Press the softkey below the Directory entry of the name you want to view. The display shows: 5551234 HarvW Call Edit/Del Done The name of the person associated with this telephone NOTE: number, such as HarvW, is shown in the lower left corner. Do one of the following: To call this number, press the softkey below Call.
-
Page 43: Using The Dir Button To Place A Call
USING THE DIR BUTTON TO PLACE A CALL button to place a call to a number entered in You can also use the your Directory. When you press the softkey under the name in the IMPORTANT: Directory you wish to call, the call is placed immediately . The menu does not ask you to respond to a screen before the call is placed. -
Page 44: Using The Call Log
USING THE CALL LOG The voice terminal Call Log stores the 10 most recent unanswered incoming calls, the 10 most recent answered incoming calls, and the 10 most recent calls that were placed at the voice terminal. If multiple calls from the same telephone number are received, NOTE: only the most recent call from that number appears in the Call Log. - Page 45 The display shows: UNANSWERED CALL LOG Done The words, "New" or "Old" appear on the second line only NOTE: if you have new or old calls in your voice terminal’s Call Log. Press the softkey below New or below Old according to the unanswered calls you want to view at this time.
- Page 46 Setting the Call Log To turn on or to turn off, or to set the Call Log Press Menu Press the softkey below Option. Press twice to view the third Option screen. Next > The display shows the third option screen: <...
- Page 47 Do one of the following: If you do not want your voice terminal to collect Call Log information, press the softkey below Off. If you want to have only unanswered calls entered into the Call Log, press the softkey below Unansw. If you want both unanswered and answered incoming calls and all outgoing calls to be entered into your Call Log, press the softkey below All.
- Page 48 Press the softkey below CallLog. If the Call Log is locked, you will need to enter your 3-digit NOTE: password before you can use the Call Log. (See the information in "Locking and Unlocking the Directory, Call Log, and All Softkeys" later in this section.) The display shows: CALL LOG OPTIONS...
- Page 49 When the display shows the CallBack setting you prefer (Yes or No), press the softkey below Done. If you activate the CallBack feature, the display message asks you for your area code: ENTER AREACODE:_ Pause Backspace Done or, if the voice terminal has already determined the area code from past calls which you have placed, the display message asks you to confirm your area code: IS YOUR AREACODE 607 ?
- Page 50 The display shows the third option screen: < OPTIONS Tones CallLog Names Done Press the softkey below CallLog. If the Call Log is locked, you will need to enter your 3-digit NOTE: password before you can use the Call Log. (See the information in "Locking and Unlocking the Directory, Call Log, and All Softkeys"...
- Page 51 If you select the Yes option, the names and numbers of NOTE: incoming callers will automatically be added to your Directory until you change the AutoAdd setting to No. When the display shows the AutoAdd setting you prefer (Yes or No), press the softkey below Done.
- Page 52 Seeing Indication of New Unanswered Incoming Call(s) Under the Date and Time on Your Display Screen You can set your display so that you receive an indication when a new unanswered incoming call is placed into your Call Log. Sep 24, 1992 10:00 AM (TWO NEW CALLS LOGGED.) To set your display so that you receive indication of new...
- Page 53 Press the softkey below Indicator. The display shows: SHOW NEW CALL INDICATOR? Explain Press the softkey below Yes or No. If you press the softkey below Explain, you can read more NOTE: information on the indicator feature. If you press No, the display returns you to the original "Call Log Options"...
- Page 54 Viewing Unanswered Incoming Calls in the Call Log (When Call Log is set to All Calls) Use the following procedures when the Call Log is set for "All Calls." To view the 10 most recent unanswered calls (when the Call Log is set to "All Calls") Press Menu...
- Page 55 Press the softkey below Unanswered. The display tells you the number of new unanswered calls added to your Call Log. Then the display shows you the number (and name, if it is an internal call) such as: 555-1235 K.Smith > Time Delete More If you want to see the time at which the call rang at your voice...
- Page 56 Viewing Answered Incoming Calls in the Call Log To view the list of the 10 most recent answered calls Press Menu Press the softkey below CallLog. If the Call Log is locked, you must enter your 3-digit password NOTE: to modify your Call Log. (See the information in "Locking and Unlocking the Directory, Call Log, and All Softkeys"...
- Page 57 If you want to see more of the most recent calls you have answered, press the softkey below More or press < Prev Next > The display again shows you the telephone number of the next or previous incoming call. The display informs you when you have viewed all of the answered calls in your Call Log.
- Page 58 555-1236 > Time Call Save More The telephone number shown here is the number of the NOTE: call placed from this voice terminal, such as 555-1237 or 555-1236. The name of the person associated with that number, such as in the first example directly above, is shown at the right of the first line (if one has been entered into the personalized Directory).
-
Page 59: Locking And Unlocking The Directory, Call Log, And All Softkeys
LOCKING AND UNLOCKING THE DIRECTORY, CALL LOG, AND ALL SOFTKEYS The 8510T voice terminal allows you the option of locking the following: You can lock the Directory so that no one can make unauthorized changes to it; You can lock the Call Log so no one can view your incoming or outgoing calls or change your Call Log options;... - Page 60 The display shows: LOCK Select-Item Done Press softkey below Select-Item. The display shows: SELECT ITEM TO LOCK > CallLog Directory Done or if you press , the display shows the next "Select Item" Next > screen: < SELECT ITEM TO LOCK Softkeys Done Press the softkey below CallLog or Directory or Softkeys according...
- Page 61 The display confirms that you have locked the feature of your choice. To unlock your Directory If you have lost your password, see your System Manager. NOTE: Press Menu Press the softkey below Option. The display shows: OPTIONS > Spkr Clock Lock Done Press the softkey below Lock.
- Page 62 < SELECT ITEM TO LOCK Softkeys Done Press the softkey below CallLog or Directory or Softkeys according to which one you want to unlock. The display message tells you that the feature is locked and asks you to confirm your choice (Yes or No) in order to unlock the Directory, Call Log, or softkeys.
-
Page 63: Changing Or Removing Your Password
CHANGING OR REMOVING YOUR PASSWORD To change or remove a 3-digit security password Press Menu Press the softkey below Option. The display shows: OPTIONS > Spkr Clock Lock Done Press the softkey below Lock. The display shows: LOCK Select-Item Pswd Done Press softkey below Pswd. - Page 64 When you have done this, the display confirms that the new password is now active. If you want to remove your 3-digit password, press the softkey below Remove. The display asks you to enter your 3-digit password. When you have entered the password, the display confirms that the password is removed and everything is unlocked.
-
Page 65: Self-Test
SELF-TEST To make sure your voice terminal is working properly The handset must be on-hook when you test the voice terminal. NOTE: Performing the self-test terminates any call in progress, and prevents you from receiving calls until the test is completed. The self-test also clears the Call Log and the last number dialed from Redial, and the volume setting is returned to the default. - Page 66 Message light goes on. — The display shows you the Feature Package number and the — Self-Test passed message. If these events do not occur, contact your System NOTE: Manager. After you hear repeated tone, press any button on the voice terminal. Terminal emits a key click.
-
Page 67: Choosing The Contrast Level For The Display
CHOOSING THE CONTRAST LEVEL FOR THE DISPLAY You can use the softkeys to set the darkness or lightness of the voice terminal display. You can also use the kickstand on the bottom of the voice NOTE: terminal to adjust the viewing angle of the display. To choose the contrast level of the display Press Menu... - Page 68 Press the softkey below to make the contrast lighter. < Prev Each button press decreases the number of arrows by one. to make the contrast darker. Press the softkey below Next > Each button press increases the number of arrows by one. Press the softkey below Done when you are finished.
-
Page 69: Selecting A Personalized Ring
SELECTING A PERSONALIZED RING You can use the softkeys to choose a personalized ringing pattern for your voice terminal so you can distinguish the ringing pattern at your voice terminal from others in your office. There are 8 different ringing patterns to choose from. -
Page 71: Setting The Rate At Which You View The Display Messages
SETTING THE RATE AT WHICH YOU VIEW THE DISPLAY MESSAGES You can use the softkeys to set the length of time the display message stays on the screen. When you receive your voice terminal, the rate is set at Medium. However, there are actually 3 rate settings: Slow, Medium, and Fast. - Page 72 Press the softkey below either Slow, Medium, or Fast, according to the rate at which you want the display messages to be shown. The display reflects the choice you have made. When the display screen shows the display message rate you want, press the softkey below Done.
-
Page 73: Turning On Or Off Softkey Information Tones
TURNING ON OR OFF SOFTKEY INFORMATION TONES Along with timed confirmation screens, the voice terminal also provides softkey mode confirmation tones (sequential low and high tones). Also available are error tones (one beep) to alert you if you have made a mistake in your softkey entries. - Page 74 Press the softkey below Off to turn off the softkey mode information tones, or press the softkey below On to turn on the information tones. The display changes to reflect your choice (On or Off). When the display screen reflects your choice (On or Off), press the softkey below Done.
-
Page 75: Setting The Number Of Names On The Directory Page
SETTING THE NUMBER OF NAMES ON THE DIRECTORY PAGE to locate the When you view the names in your Directory or use name of someone in your Directory whom you want to call, you will initially see 3 names and the word Quit on the second line of each Directory page, such as in the following 2 screens. - Page 76 To set the number of names (3 or 4) on an individual Directory page Press Menu Press the softkey below Option. Press twice to view the third Options screen. Next > The display shows: < OPTIONS Tones CallLog Names Done Press the softkey below Names.
-
Page 77: Tones And Their Meanings
Tones and Their Meanings VOICE TERMINAL TONES busy signal—A low-pitched tone repeated 60 times a minute; indicates the number dialed is in use. confirmation tone—Two rising tones; indicates a feature activation or cancellation has been accepted. dial tone—A continuous tone; indicates dialing can begin. error tone—An alternating high and low tone;... - Page 78 To label and install the designation card and telephone number card Tear the button designation card, along with the telephone number card and attached "tail," from the user’s manual along the perforated edges. (You may choose to take out one card at a time and leave the remaining cards in the manual for future use, or you may choose to tear out all four at one time.) Label the button designation card with the appropriate number,...
-
Page 79: Installation
NOTE: voice terminal on a desk or table. If you choose, instead, to mount the voice terminal on the wall, use the instructions included in the 8510T Voice Terminal Wall Mounting Kit (COMCODE: 106614894). The tasks of setting the terminal resistor jumpers and the... - Page 80 Correct cord types must be used when connecting WARNING: terminals and associated components. Failure to use the correct cord and/or to properly insert the cord into the jack may cause voice terminal malfunction or equipment damage. Thread the line (and adjunct cord if applicable) through the routing channel leading to the top of the voice terminal desktop stand, as shown in Figure 5.
-
Page 81: Attaching Adjunct Equipment
Turn the voice terminal right side up, with the front facing you. Decide whether you want the kickstand up, lifted from the desktop stand, or whether you want the kickstand down, level with the desktop stand. Check which of these kickstand adjustments allows you the best viewing angle of the display. -
Page 82: Technical Description
Technical Description Physical Dimension and Weight The 8510T voice terminal is convertible for either desktop or wall mounting. The desktop-mounted voice terminal measures 7.8 inches (19.8 cm) wide 9.5 inches (24.1 cm) long 5.3 inches (13.4 cm) high (with handset) 6.1 inches high with kickstand up... - Page 83 Index turning on or off, 38 adding numbers and names unlocking, 53 into the Directory, 26 viewing calls adjunct equipment answered incoming, 48 attaching, 73 outgoing, 49 Adjunct jack unanswered incoming, 36, 46 connection, 71, 73 calls description, 6 answering, 10 location, 73 Conference, 11 adjusting the volume...
- Page 84 display contrast level kickstand, 6 setting the, 59 using kickstand, 59 control buttons, 4, 17, 19 labeling the designation card, 69 messages, 18 labeling the telephone Done number card, 69 responding to, 19 Line jack Drop, 7, 11 connection, 71, 73 description, 6 location, 73 editing the Directory, 29...
- Page 85 speakerphone, 24 Quit unlocking, 53 responding to, 19 softkeys display screens flowchart, 20 Speaker, 7, 14 adjusting the volume, 10, 14 Speakerphone, 7, 14, 24 rate adjusting the volume, 10, 15 setting viewing time setting, 24 of display messages, 63 Redial (Last Number Dialed), 7, 13 removing the password, 55 Ring...
Need help?
Do you have a question about the 8510T and is the answer not in the manual?
Questions and answers