Table of Contents
Advertisement
Advertisement
Table of Contents

Related Manuals for WMF 500


Summary of Contents for WMF 500
-
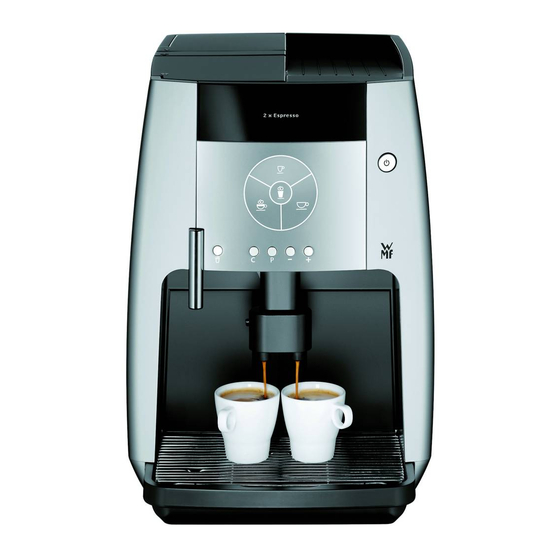
Page 1: User Manual
User manual Coffee machine WMF 500 en - Type 030 300... - Page 2 Press briefl y: 1x Espresso Ready-to-operate display Keep pressed down: 2x Espresso The descriptions in this user manual always assume that coffee-machine is ready to operate. Press briefl y: 1x Café Crème Keep pressed down: 2x Café Crème Press: 1x Capuccino Preparing milk Start: Press button Stop: Press button...
- Page 3 Legend 1 Cup storage 2 On/Off -switch 3 Function keys 4 All-in-one spout 5 Cover for mains plug 6 Water tank 7 Drip tray with drip tray grid 8 Coffee grounds container 9 Hot water spout 10 Beverage buttons 11 Display 12 Bean container lid Leave this page folded out while reading the user manual.
-
Page 4: Table Of Contents
... . . 67 Insert the WMF water fi lter ... . . 7 Customer Care programmes ... . 32 Filling the water tank . - Page 5 Preliminary comments Congratulations on choosing your new WMF 500 coffee machine. The WMF 500 is equipped with the key components of a professional WMF coffee machine - the basis for your enjoyment of a perfect coffee. Before starting Read this user manual before you start preparing the coffee. Only then you can use all the functions, operate your WMF 500 safely and treat yourself to a wonderful cup of coffee.
-
Page 6: For Your Safety
Intended use The WMF 500 coffee machine is a single-cup coffee machine for espresso and café crème as well as milk coffee specialities such as cappucino, for private use. Each portion is freshly brewed at the touch of a button. -
Page 7: Hazard Instructions
> Do not clean your automatic coffee machine under running water, with steam cleaners or with steam jets. > Appliance must not be immersed. > Do not use any tools or similar instruments. > In case the mains cable gets damaged, it must be replaced by a special mains cable that is available from WMF. - Page 8 For your safety Hazard! Probable risk of burns or scalding due to hot components or steam and hot liquids! The all-in-one spout and the hot water spout are very hot while in operation and on contact can cause burns. Hot beverages and escaping steam can scald you. >...
- Page 9 Cleaning agents and descaling agents can affect your health. Cleaning agents and descaling agents can damage the plastic parts of the automatic coffee machine and other articles and textiles. > Use only the WMF cleaning agent and descaling agent. > Avoid any contact with cleaning agent or descaling agent.
-
Page 10: Initial Setup
Initial setup Initial setup Now you are only few steps away from preparing a perfect cup of coffee. In this chapter you can learn step-by-step how you can start operating your WMF 500. Scope of supply > Check the scope of supply for completeness. -
Page 11: Installation And Connection
Initial setup Installation and connection > Unpack the automatic coffee machine. > Place the automatic coffee machine on a stable, horizontal surface that is waterproof and heat-resistant. > Remove the cover (5a) from the back. > Connect the mains cable (5b) provided with the automatic coffee machine. >... -
Page 12: Insert The Wmf Water Fi Lter
Enter this value during setup. Insert the WMF water fi lter The optional WMF water fi lter protects your automatic coffee machine from scaling. There is no need for a water fi lter if the water hardness range is between 0 and 4. -
Page 13: Filling The Water Tank
Initial setup > Clip the cartridge adapter (6c) onto the water outlet spout from above. > Press the locking device on the cartridge adapter downwards. > Attach the new water fi lter cartridge (6d) to the cartridge adapter. Filling the water tank Caution! Possible damage to your automatic coffee machine due to unsuitable liquids! Liquids other than drinking water can damage your coffee machine or can result in clogging. - Page 14 Initial setup Each coffee machine is thoroughly inspected and tested before delivery, therefore there may be coffee grounds in the grinders. Hazard! Possible injuries due to the grinders! As long as your automatic coffee machine is switched on and connected to the power supply, the grinder of your automatic coffee machine can start up and you may suffer injury.
-
Page 15: Initial Setting
Initial setup > Open the lid (12a) of the coffee bean hopper. > Fill the hopper (12b) with coffee beans. Cup volume: max. 250 g > Close the lid (12c). Initial setting > Press the On/Off switch for about 3 seconds. The setup program begins. - Page 16 Initial setup > Set the current date with – Setting the date (dd = day in two digits, mm = Month in two digits, yyyy = Year in four digits). > Confi rm the date with button. > Set the time after which the machine automatically switches off Switch off time after the last beverage preparation with –...
- Page 17 Initial setup The WMF 500 is equipped with 4 different energy saving modes: Energy saving mode Method of working of the WMF 500 Percentage of maximum consumption (determined as per SAFE*) Both heaters are continuously ready for use. Coffee, milk, milk foam and hot water can be dispensed without having to wait.
- Page 18 Initial setup > Is water fi lter used? With – , select whether you use a water fi lter (recommended for water hardness greater than 5 °dKH). > Confi rm your selection with button. If water fi lter is set to "Yes", the fi lter will then be rinsed: >...
- Page 19 Place an appropriate suitable drinking vessel under the all-in-one spout. > Confi rm with The test brewing starts. During this test brewing, coffee grinder is fi lled with coffee beans. > Throw this fi rst cup of coffee away. The WMF 500 is now ready for use.
-
Page 20: Operation
Operation Operation In this chapter, you can learn all about the easy method of coffee preparation with the WMF 500 and how you can individually customise your WMF 500 - entirely according to your preferences! Hazard! Possible risk of burns or scalding due to hot components or steam and hot liquids! The all-in-one spout and the hot water spout are very hot while in operation and on contact can cause burns. -
Page 21: Switching On
Operation 3.1.1 Switching on > Press the on/off switch. > Make sure that the drip tray is in place. You will be reminded about this every time you switch on by a From switch-on to operational readiness message on the display. in about 2 minutes Your automatic coffee machine heats up and performs a coffee system rinse. -
Page 22: Switching Off
Operation Your automatic coffee machine is now ready for operation. 3.1.2 Switching off > Press the on/off switch for about 3 seconds. > Place a collecting vessel for the rinse water (approx. 60 ml) under the all-in-one spout. Tip: For quick switching off: Press the on/off switch fi rst, even after adding milk, then you will be prompted to actuate milk system rinsing. -
Page 23: Preparing Milk
Operation 3.2.1 Preparing milk Milk is a very sensitive foodstuff. Always ensure cleanliness when using milk. Open the packing only with clean hands and tools. Always ensure that the milk is germ-free. We recommend always storing the milk in a refrigerator and removing it only for immediate use by connecting to your coffee machine. -
Page 24: Set The Coffee Strength For The Next Beverage
Operation The milk needs to be prepared Press briefl y: 1x Espresso Press briefl y: 1x Café Crème (Chapter 3.1.1) Keep pressed down: Keep pressed down: Press: 1x Cappuccino 2x Espresso 2x Café Crème The name of the beverage appears on the display. The selected beverage is prepared. 3.2.3 Set the coffee strength for the next beverage Prior to each coffee preparation, you can decide on the desired strength of your next speciality coffee. -
Page 25: Coffee Preparation Using Ground Coffee
Operation 3.2.4 Coffee preparation using ground coffee In addition to the coffee bean hopper, you can prepare a second type of coffee (for example, a decaffeinated coffee) using the ground coffee feed. Caution! Possible malfunction of your automatic coffee machine! Improperly ground coffee or water soluble coffee powder can block the feed chute in your automatic coffee machine. -
Page 26: Preparing Milk And Milk Foam
The procedure can be cancelled with button. 3.2.5 Preparing milk and milk foam The WMF 500 prepares hot milk and milk foam at the touch of a button. Hot milk (All-in-one spout in the uppermost position) > Place an appropriate drinking vessel under the All-in-One spout. -
Page 27: Hot Water Dispensing
Operation > Press the milk button. The preparation starts. > Press the milk button again to stop the delivery. 3.2.6 Hot water dispensing You can dispense hot water, for example for tea, using the hot water function. > Place a suitable drinking vessel under the hot water spout. >... -
Page 28: Beverage Settings
Operation 3.3.1 Beverage settings Here, the recipe for your coffee specialties are set according your personal coffee preferences. You can adjust the following settings: Water volume Coffee strength Milk quantity Pre-brew (for perfect aroma) > Press button. Select the beverage >... - Page 29 Operation > Select the beverage for which you want to change the taste and the composition with the help of beverage buttons. > Adjusting the water Set the desired water volume with – in steps of fi ve. > volume Confi...
-
Page 30: Basic Settings
Operation Basic settings Following settings can be adjusted: Basic settings Language* Display of time/date Time* Special information tone Date* Brewing temperature Switch off time* Factory settings Water hardness* Display contrast Water fi lter* Energy saving mode* Warm-up rinse The basic settings marked with a * have already been set during the commissioning. However, you can subsequently change these values too. The description for this can be found under the chapter “2 Initial setup”on page 10. - Page 31 Operation > Confi rm your selection with button. Allow display of date/time > Set the display of date and time on or off with – > Confi rm your selection with button. Special information > tone Switch on or off the special information tone for pressing the control keys and beverage buttons with –...
- Page 32 Operation > Use the – buttons to set whether a war-up rinse should be Warm-up rinse carried out when you brew an Espresso again after an interval in dispensing. > Confi rm your selection with button. All the basic settings and beverage settings are reset to factory Factory setting setting with the setting of "Yes".
-
Page 33: Set The Grinding Degree
Operation Set the grinding degree With the help of grinders, adjustable in 5 steps, you can adjust your WMF 500 to suit your type of coffee. Caution! Possible malfunction due to false setting of the grinding degree! The setting of the grinding degree of your automatic coffee machine in idle mode can lead to the grinder being set too tight and cannot start. -
Page 34: Read Counters
Operation The factory setting of the grinding degree is based on the characteristics of average coffee beans. The effects of a change in the degree of grinding can only be assessed after the second cup after re-setting. There are the following limits to the settings: Degree of grinding too fi... - Page 35 Operation > Browse with for counters. Select the counters > Confi rm your selection with button. Allow display of the You can choose to display the number of beverages prepared. number of prepared > Browse with – buttons for individual beverages. beverages? Reset counters? You can reset the counters as soon as all beverages have been...
-
Page 36: Care
Care The care of your WMF 500 is especially important to ensure that your coffee is always prepared perfectly. The display notifi es you about how soon the WMF 500 must be rinsed, cleaned or descaled. Care overview Steps for care Care interval - Automatic for each switch on and switch off. -
Page 37: Customer Care Programmes
Cleaning agents and descaling agents can affect your health. Cleaning agents and descaling agents can damage the plastic parts of the automatic coffee machine and other articles and textiles. > Use only the WMF cleaning agents and descaling agents. > Avoid any contact with cleaning agents or descaling agents. -
Page 38: Calling Up The Customer Care Programmes
> Clean your coffee machine at regular intervals, with the help of the cleaning programmes, immediately after the request on the display. > Use only the WMF cleaning agents and descaling agents. 4.2.1 Calling up the customer care programmes >... -
Page 39: Warm-Up Rinse
4.2.3 Milk system rinse In the milk system rinse, the WMF easy clean, the milk system is rinsed with hot water. The water is drained out via the All-in-One spout. The All-in-one spout is cleaned via a pulse of steam. -
Page 40: Machine-Cleaning - Cleaning Programme
Care > Push the All-in-One spout slightly downwards. Hazard! Possible scalding due to hot rinsing water! After rinsing, some hot water will remain in the milk hose. > Hold the open end of the milk tube over the drip tray so that the remaining hot water can run out. 4.2.4 Machine-cleaning - Cleaning programme Hazard! Possible health hazard due to accidental ingestion of cleaning solution! - Page 41 Care Machine-cleaning > Call up the customer care programmes (see Chapter 4.2.1). > Start the machine cleaning with button. Duration of the cleaning program: 7 minutes > Follow the instructions in the display.
- Page 42 Care > Place a suitable vessel (2 litres' capacity) under the All-in-One spout. > Open the lid (13a) on the ground coffee inlet. > Place a cleaning tablet (13b) along with the yellow sponge in the ground coffee inlet. > Close the lid (13c).
-
Page 43: Replace Water Fi Lter
Care > Start the machine cleaning with button. The cleaning programme starts. A minute countdown indicates how long the cleaning still has to go. The machine cleaning process ends after 6 minutes. The display calls for a manual milk system cleaning. >... - Page 44 Care > Take out the water tank from the automatic coffee machine. > Replace the old fi lter by a new one as described under in Chapter 2.4. > Fill the water tank with cold tap water. > Place the lid on the water tank. >...
-
Page 45: Descale Automatic Coffee Machine
> Then empty the water tank of your automatic coffee machine. > Ensure that nobody drinks the cleaning solution that is dispensed. If the WMF 500 needs to be descaled, you will be requested to do so in the display. You can postpone the descaling with , but a descaling process must be carried out within the next 50 brew cycles. - Page 46 Care > Release the milk hose from the milk foamer. > Press the release button (4a) at the back of the All-in-One-spout and pull the milk foamer (9b) off downwards.
- Page 47 Remove the fi lter cartridge and the fi lter adapter if a water fi lter water fi lter is used. > Pour half a bottle of WMF liquid descaling agent (375 ml) into the water tank. > Fill the water tank with 750 ml water and cover it with the lid.
- Page 48 Care The following displays appear before the end of the descaling process: > Empty the water tank. > Rinse the water tank thoroughly with clear water. > Press button. > Fill the water tank with cold drinking water. > Place the lid on the water tank. >...
- Page 49 > Replace the fi lter adapter and the water fi lter - if used - in the water tank (”2.4 Insert the WMF water fi lter” on page 7). > Check the correct location of the red steam nozzle (“4.3.2 Clean the steam nozzle” on page 47).
-
Page 50: Manual Cleaning
Care Manual cleaning 4.3.1 Clean the milk system > Push the All-in-One spout slightly upwards. > Press the release button (4a) at the back of the All-in-One-spout and pull the milk foamer (4b) off downwards. > Release the milk hose (4c) from the milk foamer. >... - Page 51 Unscrew the black cap (4h) from the air intake pipe. > Mix one measuring cap of WMF milk system cleaner with 200 ml water in a container. > Place all parts of the milk system in the cleaning solution for minimum 5 hours or overnight.
-
Page 52: Clean The Steam Nozzle
Care 4.3.2 Clean the steam nozzle > Remove the milk foamer (4a). > Press the red steam nozzle (4b) with your index fi nger away to the left. > Carefully clean the steam nozzle with one of the small cleaning brushes provided. >... -
Page 53: Clean The Brewing Unit
The brewing unit of our automatic coffee machine is very hot while under operation and can cause burns. > Allow the brewing unit to completely cool down before starting the cleaning procedure. > Switch off the WMF 500 with the On/Off switch. > Remove the mains plug If it is diffi... - Page 54 Care > Turn the thread (15d) on the brewing unit head with the Multitool in an anticlockwise direction. The scraper (15e) folds out forward and the brewing sieve is now visible. > Clean the brewing sieve (15f) under running water. >...
- Page 55 Care > Pull out the water tank (7a) and the coffee grounds container (8a). > Remove the residues of ground coffee in both openings using a vacuum cleaner (7b, 8b), for example. > Turn the thread on the brewing unit head with the Multitool in a clockwise direction until the black scraper folds in again.
-
Page 56: General Cleaning
Bleeding should be carried out after removing the water fi lter and cartridge adapter. Draw off hot water until a steady water stream comes out. Heavy calcium deposits can be removed with the WMF descaling agent. After descaling, the water tank must be thoroughly rinsed to removed the descaling residues. - Page 57 Remove the mains plug bean hopper > Clean the empty bean hopper with a dry, lint-free cloth. > Switch off WMF 500 with the On/Off switch (press for about 3 seconds). Clean the > Remove the mains plug housing and >...
-
Page 58: Lubricating The O-Rings
Lubricating O-Ring on the water tank If it is diffi cult to remove and insert the water tank and if "fl ow fault" is displayed frequently, you must slightly lubricate the O-ring on the water spout supports with the WMF "Gasket grease". >... -
Page 59: Lubricating O-Ring Of Brewing Unit
Pull the brewing unit (15a) upwards out of the brewing chute. > Mildly lubricate the O-Rings (15b) in the brewing chute with the WMF "Gasket grease". > In addition, you should clean and grease the O-ring on the brewing unit (15c). -
Page 60: Display Messages And Malfunctions
Display messages and malfunctions Display messages and malfunctions If you should have a fault with your WMF 500 you can read off the exact problem on the display. In this chapter you will fi nd out how to resolve the problem. - Page 61 Display messages and malfunctions The water tank is nearly empty. Refi lling water tank The water tank is never emptied completely so that no air enters the coffee system. > Remove the water tank from the automatic coffee machine. > Completely empty the water tank.
- Page 62 This message can appear when there is a large amount of steam being emitted, for example if several cappuccinos have been dispensed. > Switch off the WMF 500 with the On/Off switch. > Clean the display with a soft damp cloth. >...
- Page 63 Display messages and malfunctions Replace brewer The brewing unit is not inserted. > Switch off the WMF 500 with the On/Off switch. > Insert the brewing unit. > Check if the brewing unit is inserted correctly. The brewing unit can only be inserted with diffi culty or it cannot be inserted at all: >...
- Page 64 Remove the grinding dust with a vacuum cleaner. > Switch off WMF 500 with the On/Off switch Motor driver (press for about 3 seconds). > Switch on the WMF 500 with the On/Off switch. On recurrence, the malfunction must be rectifi ed by the WMF Service-Center.
- Page 65 Display messages and malfunctions The grinder is blocked by a foreign body. Grinder > Switch off the machine and pull out the mains cable. > Clean the bean hopper. > Turn the grinder clockwise with the Multitool so that the foreign bodies can escape if needs be.
- Page 66 Display messages and malfunctions > Switch off the coffee machine. Temperature sensor > Allow the coffee machine to cool down. > Switch the coffee machine on again. On recurrence, the malfunction must be rectifi ed by the WMF Service-Center.
- Page 67 Display messages and malfunctions This message appears for the fi rst time after 6,000 brews and Service reminds you 2 weeks from heating up that a service by the WMF Service Center is recommended. > Then you should contact the Service Center.
-
Page 68: Problems Without Error Display
Display messages and malfunctions Problems without error display Problem Rectifi cation measure > No milk foam - / milk Check whether the milk hose is kinked or squashed. > output, although there is Re-fi t the milk hose again. > milk in the container Clean the All-in-one spout (see Chapter 4.3.1). - Page 69 > Check all connections and seals of the All-in-one spout. > It is diffi cult to insert the Apply WMF grease from the accessories to the O-ring on the water spout water tank supports (see Chapter 4.4.1). > Pump is very noisy Check whether the water tank is completely pushed in.
- Page 70 Display messages and malfunctions Problem Rectifi cation measure > It is diffi cult to remove Apply WMF grease from the accessories to the O-ring on the brewing the brewing unit and unit (see Chapter 4.4.2). reinsert it. > The brewing unit cannot...
-
Page 71: Transport And Disposal
Transport and Disposal Transport and Disposal > Retain the original packing as protection during transportation. > Empty the water tank, drip tray, grounds box and the bean hopper before moving. > Always dispatch or transport the machine in the original carton with the expanded polystyrene shells. Disposal options for the device at the end of its service can be found out from your local municipal authority. -
Page 72: Guarantee, Warranty And Customer Service
If you need more information or if any problems arise, please contact your WMF dealer or contact the Service Center in your country. Phone number and other information is shown on the supplementary... -
Page 73: Technical Data
Technical data Technical data Power rating 1550 Watt Mains power connection 1/N/PE ~ 50/60 Hz; 220 - 240 V On site circuit protection maximum 16 A Daily output 20 Cups Coffee bean hopper 250 g Variable brewing chamber 6 to 15 g Capacity of water tank (without fi... -
Page 74: Index
Index Index Coffee-system rinse, automatic .......15 Adjusting the water volume ........24 Counter readings Adjust the coffee strength reading ................29 adjusting (permanent) ..........24 Customer service ............67 Allow display of date/time .........26 Descaling .................40 Beverage settings ............23 Display messages ............55 Brewing temperature Disposal ................66 setting ..............25, 26 Energy saving mode .............12... - Page 75 Index Milk system rinse ............34 Hot water dispensing ...........22 Pre-brew ................24 Initial setting ..............10 Preparing coffee beverages ........17 Initial setup programme ..........10 Preparing hot milk ............21 Intended use ..............1 Preparing milk foam ............ 21 Preparing the milk hose ..........18 Language .................
- Page 76 Index Switching off the automatic coffee machine ........15, 17 Switching on the automatic coffee machine ........15, 16 Technical data ..............68 Testing the water hardness .......... 6 Transport ................66 Warm-up rinse ............27, 34 Water fi lter ................ 7 Water tank fi lling ................8...
-
Page 77: Publisher Information
Publisher Information Publisher Information © 2011 wmf consumer electric GmbH All rights, especially the right of reproduction, publication and translation, are reserved. No part of this manual may be reproduced in any form or processed, duplicated or distributed electronically without written consent. - Page 78 WMF 500 Instructions for Use wmf consumer electric GmbH Messerschmittstraße 4 89343 Jettingen-Scheppach www.wmf-ce.de BAL_WMF_500_GB_01_082011...
Need help?
Do you have a question about the 500 and is the answer not in the manual?
Questions and answers