Table of Contents
Advertisement
Advertisement
Table of Contents

Related Manuals for WMF 5500 Series


Summary of Contents for WMF 5500 Series
- Page 1 User Manual English Series 01.00.01 Series 5500 33 4071 8010 10.2019...
- Page 2 Technical Data chapter, no Maintenance w starting on page 75 liability is accepted for any resultant damage. > Follow the User Manual. > Initial start-up, maintenance and repairs may only be carried out by the WMF Service, using original spare parts. User Manual WMF espresso...
- Page 3 Changing the seals ..............User Manual WMF espresso...
-
Page 4: Table Of Contents
HACCP export ..............User Manual WMF espresso... - Page 5 Error messages and malfunctions Troubleshooting 10 Safety and warranty 10.1 Hazards to the coffee machine 10.2 Directives 10.3 Duties of the owner / operator 10.4 Warranty claims Appendix: Technical data Technical data for coffee machine Appendix: Accessories and spare parts Index User Manual WMF espresso...
- Page 6 > Follow all the safety instructions. General safety instructions Hazards to the operator At WMF, safety is one of the most essential product features. The effectiveness of safety devices can only be ensured if the following points are observed: >...
- Page 7 > Children must not play with the device. > Cleaning and user maintenance must not be performed by children. User Manual WMF espresso...
- Page 8 > Avoid damage to the mains cable. Do not kink or crush it. > Never use a damaged mains cable. A damaged mains cable must be replaced by the manufacturer or a service representative in order to prevent a hazard. User Manual WMF espresso...
- Page 9 Pull out the plug to do so. The person performing the maintenance or repair must always be able to check, with a clear line of sight, that the power supply has been disconnected. User Manual WMF espresso...
- Page 10 > Do not reach beneath the spouts during the heating-up phase. > Do not touch the spouts immediately after dispensing. > Immediately after dispensing, touch only the handle of the portafilter. > Always place an appropriate cup under the spout before dispensing a beverage. User Manual WMF espresso...
- Page 11 • Closing the cup storage cover can cause a crushing hazard. > Always switch off the coffee machine and unplug the mains plug before reaching into the coffee grinder or the opening of the brewing unit. > Close the cup storage cover carefully. User Manual WMF espresso...
- Page 12 Health hazard CAUTION • Cleaning agents are irritants. > Follow the protective measures on the packaging of the cleaning agent. > Insert the cleaning tablet only when requested by the display. User Manual WMF espresso...
- Page 13 • Fluids can be discharged from the coffee machine if used improperly or if errors occur. These fluids can cause a slipping hazard. > Regularly check the coffee machine for leaks, and make sure no water is coming out. User Manual WMF espresso...
- Page 14 > The coffee machine must only be used as intended. • The WMF espresso is designed for dispensing various types of coffee beverages and milk beverages. • This WMF espresso is intended for industrial and commercial use and should be operated by experts or trained users in stores, offices, restaurants, hotels, or similar places.
- Page 15 • The set of hoses provided with the new coffee machine and/or the new water filter must be used. Do not use the old set of hoses. Ambient temperature • Ambient temperature +5 °C to a maximum of +35 °C User Manual WMF espresso...
- Page 16 The manufacturer shall not be liable for any damage resulting from this. • Under no circumstances may the WMF espresso be used to dispense and heat liquids other than coffee, hot water (beverages, cleaning) or milk (cooled, pasteurised, homogenised, UHT).
- Page 17 The work must be carried out by authorised installation technicians in compliance with general, country-specific and local regulations. The WMF Service engineers must only connect the coffee machine to existing prepared connection points. WMF Service is neither authorised nor responsible for carrying out any on-site installation work prior to connection.
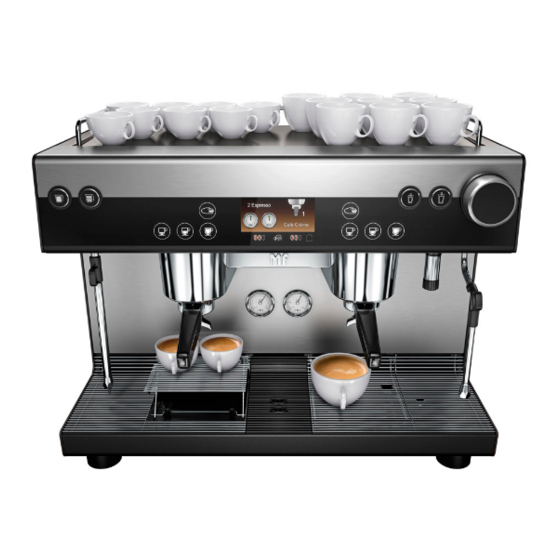
- Page 18 Introduction | Parts of the coffee machine Introduction Parts of the coffee machine Display Left brewing group Right brewing group DI_01_01_01_00 Café Crème Ristretto Espresso Lungo Status bar User Manual WMF espresso...
- Page 19 Menu pad (opens the main menu) SteamJet cup warmer Message pad Selectable beverages Right brewing group display (Example shows right brewing group beverage dispensing state) Left brewing group display (example shows left brewing group ready to operate) User Manual WMF espresso...
- Page 20 Introduction | Parts of the coffee machine Options 28 29 Large bean hoppers (optional) Milk button (optional) Milk foam button (optional) Second Autosteam outlet (optional) User Manual WMF espresso...
- Page 21 Follow the Warranty chapter • to the installation location w starting on page 85 > Always follow the User Manual. Technical data w starting on page 86 Note / tip INSTRUCTIONS • Instructions for safe use and tips for easier operation. User Manual WMF espresso...
- Page 22 Water stop valve, angle valve Pre-infusion Prior to brewing cycle, coffee is briefly infused in order to ensure a more intense release of its aromatic substances. Preparation test Testing Tampers Pressing the ground coffee prior to brewing cycle. User Manual WMF espresso...
- Page 23 > When dispensing beverages and steam, do not reach beneath the spouts. > Do not reach beneath the spouts during the heating-up phase. > Do not touch the spouts immediately after dispensing. > Immediately after dispensing, touch only the handle of the portafilter. User Manual WMF espresso...
- Page 24 • An empty portafilter must be inserted before dispensing a beverage. • The display indicates which portafilter is currently inserted in which brewing group. The number indicates the type of portafilter. Single portafilters (1) or double portafilters (2). Optional XL double portafilter (3). User Manual WMF espresso...
- Page 25 > Do not remove the portafilter until the brewing process is complete. A message appears on the display. > The brewing cycle can be interrupted by touching the beverage button again. User Manual WMF espresso...
- Page 26 The coffee beans are ground directly into the portafilter. The ground coffee is tamped automatically by the brewing piston. Beverage dispensing begins. ™ ™ Empty the portafilter after beverage dispensing Cancel beverage ™ ™ Touch the flashing beverage button again User Manual WMF espresso...
- Page 27 > Do not use distributor sieve rinsing to rinse the portafilters. Hot water dispensing ™ ™ Place a cup of the appropriate size beneath the hot water spout ™ ™ Touch the desired water button Dispensing occurs. User Manual WMF espresso...
- Page 28 > Do not overheat milk when foaming, otherwise milk foam volume decreases. The standard version of the coffee machine is equipped with Auto Steam, Basic Steam, and SteamJet. It is not possible to dispense steam from the Auto Steam and the Basic Steam at the same time. User Manual WMF espresso...
- Page 29 Steam dispensing ends after reaching the set temperature, or when the Auto Steam button is For example Cromargan® jug, WMF order no. 03 9090 1001 pot set touched again. ™ ™ Put the jug away and press the Autosteam button until steam flows out Residues in the steam outlet are rinsed out.
- Page 30 ™ ™ Immerse steam nozzle deep into the jug For example Cromargan® jug, ™ ™ Open the Basic Steam knob and use the steam to WMF order no. 03 9090 1001 pot set heat up the beverage until the desired temperature is reached ™ ™ Close the Basic Steam knob ™...
- Page 31 > Do not touch the adjacent surfaces immediately after dispensing. > Do not touch the spouts immediately after dispensing. > Never use the SteamJet function without the drip grid in place or without the cup warmer insert. User Manual WMF espresso...
- Page 32 • Foreign objects can damage the grinders. IMPORTANT Such damage is not covered under the Follow the Warranty chapter warranty. w starting on page 85 > Ensure that no foreign objects land in the coffee bean hopper. User Manual WMF espresso...
- Page 33 The top cover of the coffee machine is a heated cup storage tray. The cup storage can be slid back to access the interior of the coffee machine. The cup heater can be activated and deactivated by the software. User Manual WMF espresso...
- Page 34 85 damage. ™ ™ Press the ON/OFF switch briefly (approx. 1 second) Coffee machine switches off. ™ ™ Disconnect mains plug ™ ™ Turn off main water supply tap User Manual WMF espresso...
- Page 35 Grinding degree 1 Grinding degree 10 g fine g coarse The new values are not used until the second IMPORTANT brewing cycle after the new settings are made. Follow the Warranty chapter w starting on page 85 User Manual WMF espresso...
- Page 36 The pads and buttons on the display are available, depending on the settings and the machine model. Ristretto Espresso Lungo Crème Small Café Crème Status bar page 38 Barista (coffee strength) SteamJet cup warmer page 38 page 48 User Manual WMF espresso...
- Page 37 45 page 47 page 56 Menu control pads To the main menu Confirm value / setting To previous menu Delete value / setting PIN entry Preparation test Next / start Back Load settings Show keyboard Save settings Messages on the display Error message User Manual WMF espresso...
- Page 38 1x 3 beans 15 % stronger than the setting * touch 2x 1 bean 15 % weaker than the setting * * Maximum quantity of ground Single portafilter 11 g coffee per brewing cycle Double portafilter 16 g XL portafilter 21 g User Manual WMF espresso...
- Page 39 Cleaning ground coffee chute w Care page 63 Changing the seals DS_05_04_05 Changing the seals This starts the display-guided “Changing the seals” for the distributor sieve. Changing the seals w Care page 71 User Manual WMF espresso...
-
Page 40: Beverages
Recipes for manually adding ground coffee manual insert. w Manual insert ™ ™ Touch the manual insert button briefly page 51 ™ ™ Touch the desired beverage button w Manual insert page 38 ™ ™ Proceed as described above User Manual WMF espresso... - Page 41 All other beverage settings are based on the values of this reference. The reference beverage can be changed by service. Espresso or Café Crème is set as the reference beverage at the factory. Follow the messages on the display. Indicate yes/no User Manual WMF espresso...
-
Page 42: Load Recipes
Factory: 3 Menu control pads w Overview page 37 Text Ristretto Note Text The beverage name is adjusted here. Activate the keyboard by touching the keyboard pad. Note A note about the beverage can be saved here. User Manual WMF espresso... -
Page 43: Information Pad
™ ™ Touch the “Dispensing test” pad The beverage is dispensed using the newly changed values. ™ ™ If the beverage is as desired, touch the Save symbol The recipe is saved. Save recipes The modified recipe is saved here. User Manual WMF espresso... -
Page 44: Information
Last brewing cycle DS_05_06_01 Last brewing cycle Information about the last brewing cycle. Service DS_05_06_02 Service Contact data for WMF Service. Serial number of the coffee machine. QR code DS_05_06_05 QR code Displays a QR code with a link to the “Coffee Connect” website. -
Page 45: Accounting
Standard setting Counter 1 = day counter Counter 2 = week counter Counter 3 = month counter Counter 4 = year counter Each counter can be reset. Waiter accounting DS_05_07_05 Waiter accounting Information about the waiter accounting. User Manual WMF espresso... -
Page 46: Free Of Charge Settings
Beverage free of charge Options: • active • inactive Default value: inactive Message display When “All free of charge” is set to active, a text can be saved here. (e.g., “Free of charge”) The text is displayed in the header bar. User Manual WMF espresso... -
Page 47: Pin Rights
On entering the valid PIN, access granted to: Care System Language Beverages Operating options Accounting Settings (without “delete”) Accounting PIN DS_05_07_04 Accounting On entering the valid PIN, access granted to: System Care Language Beverages Operating options Accounting Settings (with “delete”) PIN rights User Manual WMF espresso... -
Page 48: System
SteamJet is set here. Options: Off, 3 to 10 seconds Default value: 6 seconds Barista pad w Barista pad - coffee strength page 38 Options: • active • inactive Default value: active active The pad is displayed when ready for operation. User Manual WMF espresso... -
Page 49: Brewing Time Regulation
Sensitive Only recommended for operators Notifications are sent even for minor changes, such as changes in humidity. who need to respond to the minor Such fluctuations may arise several changes with in-depth barista knowledge. times a day. User Manual WMF espresso... -
Page 50: Display Text
• inactive Default value: inactive End of brewing signal tone The acoustic signal sounds when brewing cycle is finished, indicating the point in time when the portafilter may be removed. Options: • active • inactive Default value: active User Manual WMF espresso... -
Page 51: Auto Start
Starting point is the beverage menu; the appropriate Manually adding ground coffee w Operation portafilter must be placed. page 38 ™ ™ Press the manual insert button, followed by the beverage button The editable beverage settings will appear. User Manual WMF espresso... -
Page 52: Right Manual Insert
Do not remove portafilter! the display which prevents the portafilter from being Milk foam Fine Espresso Lungo removed too early after brewing. DI_05_08_01_02 Options: • active • inactive Default value: inactive Remove portafilter now! Milk foam Fine Espresso Lungo User Manual WMF espresso... -
Page 53: Settings
• Quick colour change • Off • Amber • Blue The current setting is displayed immediately. Display brightness The brightness of the display is adjusted here. Options: 0 to 100 %, in 5 % increments. Default value: 80 % User Manual WMF espresso... -
Page 54: Cup Heating
The touchscreen can be recalibrated here. When selected, it asks whether the calibration should be started. Water filter Instructions We recommend using a water filter. Your WMF service partner will be Options: • active • inactive happy to advise you on the right water filter to use. -
Page 55: Automatic Switch-Off
The time zone can be set here. Daylight saving time Set whether to switch to daylight saving time automatically here. This menu is displayed providing a telemetry module is not installed. Options: • active • inactive Default value: inactive User Manual WMF espresso... -
Page 56: Electrical Grinding Degree Setting
The newly entered and modified recipes are exported from the coffee machine to the USB stick here. Save recipes as pdf files DS_05_10_10 Save recipes as pdf files The active recipes, all customer recipes, or all factory recipes can be exported as PDF files. User Manual WMF espresso... -
Page 57: Export Counters
Data settings, such as machine data, beverage data, etc. are loaded here. Load language DS_05_10_07 Load language If available, another display language can be loaded via the USB connection here. Firmware update DS_05_10_09 Firmware update For Service only. User Manual WMF espresso... -
Page 58: Care
Health hazard / hygiene CAUTION • All cleaning agents are perfectly tuned to the Follow the Safety chapter cleaning programs. w starting on page 6 > Use only WMF cleaning agents. User Manual WMF espresso... - Page 59 • Hot liquids can irritate the skin, and the heat poses a scalding hazard. > Never reach under the spouts while cleaning. > Always lock out the touch display with “CleanLock” before cleaning. > Ensure that no one ever drinks the cleaning solution. User Manual WMF espresso...
-
Page 60: Cleaning Intervals Overview
Clean the catch pan under the bean hopper w page 71 x Changing the seals w page 71 Daily = Daily, at least once per day and as required Weekly = Weekly cleaning Regularly = Regularly as required Automatic = Automatic processing User Manual WMF espresso... -
Page 61: Cleaning Programs
The brewing groups cleaning is an automatic cleaning Instructions as animation w Coffee machine program and cleans the coffee system of the coffee w Main menu machine with a WMF cleaning tablet. w Care w Instructions Total duration is approx. 8 minutes. Health hazard / ... -
Page 62: Distributor Sieve Rinsing
™ ™ Remove the portafilters ™ ™ Remove the brewing sieves from the portafilters ™ ™ Insert the blind sieves in the portafilters ™ ™ Place one WMF special cleaning tablet in each portafilter Instructions: Do not add any water. ™ ™ Insert the portafilters The program always cleans both ™... -
Page 63: Manual Cleaning
Care | Manual cleaning Manual cleaning Order numbers for the WMF care program w Accessories and spare parts page 90 Scalding hazard CAUTION • If a beverage is initiated accidentally, there is Follow the Safety chapter a hazard of being injured. w starting on page 6 >... -
Page 64: Clean The Brewing Goup Manually
Place the portafilter in a container and clean it weekly. ™ ™ Place a cleaning tablet in the container ™ ™ Fill the container with hot water and dissolve the cleaning tablet ™ ™ Remove the brewing sieve and the sieve retaining ring User Manual WMF espresso... -
Page 65: Clean The Drip Tray
Follow the Warranty chapter like. w starting on page 85 > Use only very mild cleaning agents. > Do not use any severely alkaline, alcoholic, or degreasing cleaning agents. > Use soft cloths for cleaning. > We recommend a damp microfiber cloth. User Manual WMF espresso... -
Page 66: Clean The Touchscreen (Cleanlock)
IMPORTANT > Clean the display with a clean, damp cloth. Follow the Warranty chapter Do not use any cleaners or implements. w starting on page 85 > Use soft cloths for cleaning. > We recommend a damp microfiber cloth. User Manual WMF espresso... -
Page 67: Clean The Housing
> When dispensing beverages and steam, do not reach beneath the spouts. > Do not reach beneath the spouts during the heating-up phase. > Do not touch the spouts immediately after dispensing. > Always place a suitable receptacle underneath when dispensing. User Manual WMF espresso... - Page 68 ™ ™ Rinse thoroughly with clean water ™ ™ Screw the steam nozzle onto the Auto Steam outlet ™ ™ Immerse steam nozzle in a jug with clear water ™ ™ Briefly touch a foam button ™ ™ Wipe the steam outlet with a damp cloth User Manual WMF espresso...
- Page 69 ™ ™ Screw the steam nozzle onto the Basic Steam outlet ™ ™ Immerse steam nozzle in a jug with clear water ™ ™ Briefly open the Basic Steam knob all the way ™ ™ Wipe the steam outlet with a damp cloth User Manual WMF espresso...
-
Page 70: Clean The Bean Hopper
™ ™ Remove the bean hoppers ™ ™ Remove all beans underneath the bean hoppers, and vacuum them out when needed ™ ™ Empty all the rest of the coffee beans out of the hopper Lock is open User Manual WMF espresso... -
Page 71: Changing The Seals
™ ™ Remove the sieve from the portafilter ™ ™ Insert the portafilter without the sieve ™ ™ Confirm execution with The brewing piston moves to the correct position for changing the seals. ™ ™ Wait for the next message User Manual WMF espresso... - Page 72 ™ ™ Remove the portafilter ™ ™ Replace the sieve in the portafilter ™ ™ Insert the portafilter with the sieve The sensors on the coffee machine detect that the portafilter has been inserted again and “Changing the seals” is completed. User Manual WMF espresso...
-
Page 73: Haccp Cleaning Schedule
With correct installation, care, maintenance, and cleaning, WMF coffee machines meet the requirements described above. If care and cleaning of the coffee machines is not carried out properly, dispensing milk beverages will constitute a food hygiene hazard point. - Page 74 HACCP cleaning schedule User Manual WMF espresso...
-
Page 75: Maintenance And Descaling
WMF Service, as page 76 in this instance components affecting safety must be replaced. WMF Service You can reach WMF Service if the local service point is Important. not known. For other maintenance work and repairs, please contact your local WMF Service. -
Page 76: Messages And Instructions
™ ™ Remove, empty, and correctly replace the portafilter Change water filter ™ ™ Call WMF Service Follow water filter instructions. ™ ™ Call WMF Service when needed Please consult the User Manual Error messages and malfunctions w page 77 Error number is displayed Call WMF Service... -
Page 77: Error Messages And Malfunctions
If this does not rectify the error or if the error indicated is not listed please call WMF Service. Some messages lead to blocking of individual functions. You will notice this by the fact that the beverage button illumination goes out. -
Page 78: Troubleshooting
Setup error, left ™ ™ Check whether the ground coffee chute needs to be 9543 cleaned ™ ™ Switch the coffee machine off and on again Setup error, right If error not remedied ™ ™ Call WMF Service User Manual WMF espresso... - Page 79 ™ ™ Set the grinding degree to the old level while the grinder is running If error not remedied ™ ™ Switch off the coffee machine ™ ™ Call WMF Service 9560/9561 ™ ™ Check whether the correct sieve insert is loaded in the portafilter...
- Page 80 ™ ™ In the recipe for the beverage that was last dispensed, reduce the ground coffee quantity by 0.1 grams If error not remedied ™ ™ Switch off the coffee machine ™ ™ Call WMF Service 9880 ™ ™ Check the time and set the clock Check the time and ™...
-
Page 81: 10 Safety And Warranty
Coffee grinder • Foreign objects can damage the grinders. Such damage is not covered under the warranty. > Ensure that no foreign objects land in the coffee bean hopper. User Manual WMF espresso... - Page 82 • For drinking water with carbonate hardness from 5 °dKH or higher, a WMF water filter must be fitted. Failing to use the water filter recommended by WMF Service may damage the coffee machine (e.g.
-
Page 83: 10.2 Directives
Safety and warranty 10.2 Directives Manufacturer: WMF GmbH, 73312 Geislingen (Germany) The device fulfils the requirements of all applicable regulations in the directives MD (MRL) 2006/42/EC, EMV directive (EMC) 2014/30/EU and RoHS 2011 / 65 / EU. The manufacturer indicated above declares that this machine conforms to all applicable provisions of the directives listed. -
Page 84: 10.3 Duties Of The Owner / Operator
These measures are conducted by WMF Service or by WMF authorised service personnel as part of the maintenance work. Machine cleaning must be carried out using only the WMF special cleaning agent w Accessories and spare parts WMF special cleaning agent intended by WMF for the... -
Page 85: 10.4 Warranty Claims
Important modifications undertaken without the consent of Maintenance w page 75 WMF, or by repair or reconditioning work on the part of the purchaser or by third parties. • With respect to faults caused by inappropriate or improper use. User Manual WMF espresso... -
Page 86: Appendix: Technical Data
Do not use the old set of hoses. Water quality For drinking water with carbonate hardness from 5 °dKH or higher, a WMF water filter must be fitted. Water drain tube Hose a minimum of DN 19, minimum downward slope of 2 cm/m Use at elevation above <... - Page 87 We reserve the right to make technical modifications. A-evaluated sound pressure level Lpa (slow) and Lpa (impulses) at operating personnel workplace is under 70 dB(A) in any working mode. User Manual WMF espresso...
- Page 88 Installation clearances For operating, service, and safety reasons the machine should be installed with a clearance from the building or non-WMF components of not less than 50 mm at the sides and 50 mm at the back. A minimum working space of 800 mm in front of the coffee machine is recommended.
- Page 89 ErfüllenIn order to avoid possible faults from arising in our shielded data lines due to potential equalisation currents between the devices, an additional potential equalisation unit should be planned for devices connected to the vending system (see DIN EN 50310 VDE 0800–2-310). User Manual WMF espresso...
-
Page 90: Appendix: Accessories And Spare Parts
Designation Order No. WMF customer care program WMF Special cleaning tablets (100 pieces) 33 2332 4000 Bottle WMF Special cleaner for milk foamer 33 0683 6000 Cleaning brushes 33 0350 6000 Brewing group brush 33 1475 4000 Brush for cleaning the ground coffee chute... - Page 91 Steam outlet handle, Auto Steam 33 2071 9000 SteamJet SteamJet steam plate, complete 33 2898 6000 Accessories Pot set 03 9090 1001 Auto Steam from Peek 03 5598 4001 This Operation Manual is available in various languages. Download from https://coffeeconnect.wmf.com User Manual WMF espresso...
-
Page 92: Index
Installation clearances 88 Clearance height 31 Installation dimensions of the water filter 88 Comments on the recipe 42 Installation surface 87 Conditions for use and installation 17 Intended use 14 Counter 45 Introduction 18 Cup grid 19, 26, 31 Cup heating 54 Cup illumination 53 Cup storage 33 Journal 44 Cup warmer 31 User Manual WMF espresso... - Page 93 User Manual Symbols 21 Parts of the coffee machine 18 PIN rights 47 Waiter accounting 45 Portafilter 24 Warm beverages 30 Portafilter state displays 25 Warranty 81 Pre-infusion 22, 41 Warranty claims 85 Preparation test 37 Water filter 54 Water quality 86 Water quantity 41 Water supply 86 WMF Service 75 QR code 44 User Manual WMF espresso...
- Page 94 User Manual WMF espresso...
- Page 95 User Manual WMF espresso...
- Page 96 Your nearest WMF Service: © 2014–2019 WMF GmbH All rights reserved, in particular duplication, distribution and translation rights. No part of this manual may be reproduced in any form or processed, duplicated or distributed using electronic systems without written consent. Design and production / typesetting and print presentation: TecDoc GmbH;...
Need help?
Do you have a question about the 5500 Series and is the answer not in the manual?
Questions and answers