Hyundai Veloster Owner's Manual
Car av system
Hide thumbs
Also See for Veloster:
- Owner's manual (406 pages) ,
- User manual (140 pages) ,
- Brochure & specs (27 pages)

Related Manuals for Hyundai Veloster


Summary of Contents for Hyundai Veloster
- Page 1 ENGLISH Car AV System OWNER’S MANUAL Veloster Please read this manual carefully before operating your set and retain it for future reference. Designs and specifi cations are subject to change without prior notice.
-
Page 2: Table Of Contents
General information Table of contents Safety notes ............8 NOTES ON COPYRIGHTS . - Page 3 INFO/SETUP Table of contents General operations of "INFO/SETUP" menu ......16 Sound ............16 Fader/Balance.........................
- Page 4 Bluetooth handsfree (Optional) Table of contents Understanding Bluetooth wireless technology ......24 Pairing and connecting the unit and a bluetooth phone ....24 When there is no paired phone on the unit ............
- Page 5 Audio system (CD/MP3/WMA/USB/iPod) Table of contents Selecting a source ..........34 Playing an audio CD and MP3/WMA/USB/iPod files .
- Page 6 Photo system (USB) Table of contents Viewing a photo ..........42 Viewing slideshow .
- Page 7 Image encoder Table of contents Image conversion program ......... 48 Installing the image conversion program .
-
Page 8: General Information
General information Safety notes Always operate the vehicle in a safe manner. Do When driving your vehicle, be sure to keep the not become distracted by the vehicle while driving volume of the unit low enough to allow you to CAUTION and always be fully aware of all driving conditions. - Page 9 General information CAUTION: CAUTION: CAUTION: Do not disassemble or modify this system. If you CLASS 1M VISIBLE AND INVISIBLE LASER do, it may result in accidents, fi re, or electrical RADIATION WHEN OPEN DO NOT VIEW DIRECTLY shock. WITH OPTICAL INSTRUMENTS. ...
-
Page 10: Notes On Copyrights
General information NOTES ON COPYRIGHTS Types of Playable Discs It is forbidden by law to copy, broadcast, show, This unit plays CD-R or CD-RW containing audio broadcast via cable, play in public, or rent titles, MP3 or WMA fi les. copyrighted material without permission. -
Page 11: Handling Discs
General information Handling discs Clean the disc before playback. Wipe the disc from the center outward with a cleaning cloth. A defective or soiled disc inserted into the unit Never use solvents such as benzine or alcohol can cause sound to drop during playback. -
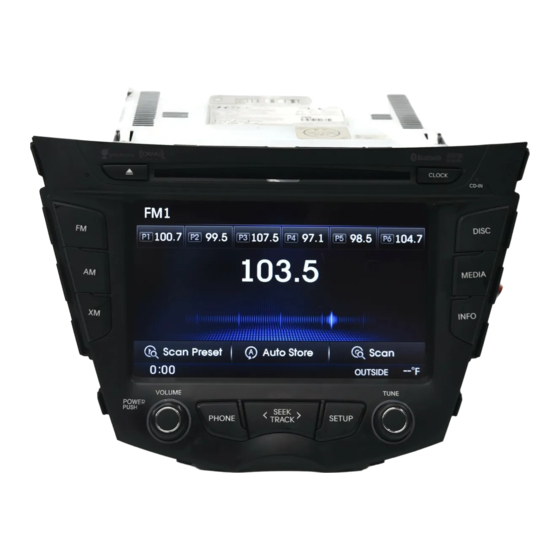
Page 12: Name Of Each Component
Name of each component Control panel without Bluetooth function Control panel with Bluetooth function 1. Disc slot 5. AM Button - Power off Selects the AM band. Press and hold this button for power ON status. 2. Disc eject (Z) Button •... - Page 13 Name of each component 9. INFO Button 15. MEDIA Button Press to display the [Info] menu screen. Press to display the [Media] menu screen. 10. PHONE Button 16. DISC Button Press to operate Bluetooth Hands-Free Press to play a disc. function.
- Page 14 Name of each component Steering wheel remote control without Steering wheel remote control with Bluetooth function Bluetooth function MODE MODE 1. MODE Button 3. Seek up/down (W/S) Button Button Press to select a source. • Press to: Press to operate Bluetooth Hands-Free - Automatic tuning: USB or iPod RADIO...
-
Page 15: Basic Operation
Basic operation Start-up screen Turning the unit on Adjusting the volume The unit starts after ignition switch is in ACC or ON Press "POWER" on the control panel when the Rotate the volume knob (VOLUME) on the control position. system is off . panel. -
Page 16: General Operations Of "Info/Setup" Menu
INFO/SETUP General operations of "INFO/ Sound Bass/Mid (Middle)/Tre (Treble) SETUP" menu Press [SETUP] > [Sound] > [Bass/Mid/Tre]. This menu describes sound settings. Select the desired options. The system can be customized to make it easier for Fader/Balance you to use. Press [SETUP] >... -
Page 17: Variable Eq (Optional)
INFO/SETUP Variable EQ (Optional) Beep Display This menu describes the Variable EQ settings when Press [SETUP] > [Sound]. This menu describes display settings. using the external amplifi er. Touch [Beep] to play a beep sound when you Display Setup Press [Setup] > [Sound] > [Variable EQ]. operate the touch screen. -
Page 18: Brightness Setup
INFO/SETUP Brightness Setup Screen Ratio Display Off Press [SETUP] > [Display] > [Brightness Setup]. Press [SETUP] > [Display] > [Screen Ratio]. Press [SETUP] > [Display]. Touch a or d to adjust the day and night Select the desired options. Touch [Display Off ] to turn off the screen. brightness settings. -
Page 19: Bluetooth (Optional)
INFO/SETUP • Touch [User Selected Phone] to connect a Bluetooth (Optional) Auto Download specifi c phone automatically by selecting This allows you to transmit phonebook and This function is an option to consumers. the desired phone, then touch [Settings]. recent call list from phone automatically when This menu describes bluetooth settings. -
Page 20: Streaming Audio
INFO/SETUP Device Information Streaming Audio Advanced setup This enables you to play the phone music through Press [SETUP] > [Bluetooth] > [Advanced setup]. You can check and change the device information. bluetooth streaming. This function may not be Press [SETUP] > [Bluetooth] > [Advanced supported in some mobile phone. -
Page 21: Screensaver
INFO/SETUP Delete Entire Car Contacts Screensaver Clock You can delete all the entries stored in the car This menu describes screensaver settings. This menu describes clock settings. phonebook. Press [SETUP] > [Screensaver]. Time Setup Press [SETUP] > [Bluetooth] > [Advanced Select the desired options. -
Page 22: Date Setup
INFO/SETUP Date Setup Valet Mode Temperature Press [SETUP] > [Clock] > [Date Setup]. This allows you to protect users private This allows you to set the unit of temperature information. displayed. Touch w or s to set the date. When this function is enabled, only the power Press [SETUP] >... -
Page 23: Gracenote
INFO/SETUP Gracenote Software Information Help This function accesses the Gracenote Media This menu option allows you to view the system This allows you to view the Help menu. Database and loads the music information for all of information. Press [INFO] > [Help]. the music contents in the iPod/iPhone. -
Page 24: Understanding Bluetooth Wireless Technology
Bluetooth. After search is completed in your phone, Any inquiries regrading your phone's Bluetooth select "Veloster". functionality, refer to the device manual. You can check the Bluetooth phone compatibility list on the web-site (http://www. -
Page 25: When There Is A Paired Phone On The Unit
In your phone, initiate a search for Bluetooth must fi rst delete one of the previously paired devices. phones. After search is completed in your phone, Some functions may not be supported due to select "Veloster". limited Bluetooth compatibility between the car system and mobile phone. -
Page 26: Viewing The Connected Device
Bluetooth handsfree (Optional) Viewing the connected device Disconnecting the bluetooth Connecting the bluetooth phone phone Touch [Connections] on the "Phone" screen. .1. Touch [Connections] on the "Phone" screen. Touch [Connections] on the "Phone" screen. Check the connected device on the "Connections"... -
Page 27: Deleting A Connected Phone
Bluetooth handsfree (Optional) Deleting a connected phone Making a call by entering Making a call by redialing phone number If you no longer need to use a phone, you can Press and hold [ Send] on the "Phone" screen or delete it from [Connections] list. -
Page 28: Answering/Rejecting A Call
Bluetooth handsfree (Optional) Answering/Rejecting a call Switching call to the mobile Ending a call phone When you receive a call, your phone rings and To end a call, press [ End] on the "Phone" the “Incoming Call” window is displayed on the screen or on the steering wheel remote If you want to switch the call to the mobile... -
Page 29: Using Your Phone Book
Bluetooth handsfree (Optional) Using your Phone Book Searching for phone book Searching by number entries Touch [Contacts] on the "Phone" screen. The system may begin to slow down when downloading the phone book in some mobile Touch [Search] on the “Contacts” screen. phones. -
Page 30: Call History List
Bluetooth handsfree (Optional) Call History List Making a call with speed dial Saving phone number numbers Enter the phone number using the keypad on Making a call from Call history the “Phone” screen and select [ Save]. Press and hold speed dial number using the keypad Touch [ Send] on the “Phone”... -
Page 31: Adding Phone Number
Bluetooth handsfree (Optional) If all the phone number already been saved, Input the phone number. Adding phone number proceed to step 8. Touch [Contacts] on the "Phone" screen. If you want to add the phone number, touch Touch [Add to] on the "Contacts" screen. [Number]. -
Page 32: Editing Phone Book
Bluetooth handsfree (Optional) Editing phone book Deleting phone book Downloading phone book Touch [Contacts] on the "Phone" screen. Touch [Contacts] on the "Phone" screen. Touch [Contacts] on the "Phone" screen. Touch the desired contact to edit the phone Touch the desired contact to delete the phone Touch [Download] to download the phone book. -
Page 33: Phone Music
Bluetooth handsfree (Optional) Phone Music Starting Phone Music Selecting Phone music fi les Press [MEDIA] on the control panel. Play/Pause Before playing Phone music Press [Phone Music] on the “Media” screen. Touch M/d to play/pause the musuc. Music saved in the mobile phone can be played in the car through Bluetooth audio streaming. -
Page 34: Selecting A Source
Audio system (CD/MP3/WMA/USB/iPod) Selecting a source Playing an audio CD and MP3/WMA/USB/iPod fi les Press "MEDIA" on the control panel. The [Media] menu appears on the screen. Disc Select the desired source. Insert a disc into the disc slot and playback will start automatically. -
Page 35: Play/Pause
Audio system (CD/MP3/WMA/USB/iPod) Note Play/Pause Intro scanning You can play 12-cm audio CDs on your CD Disc - Audio CD USB (MP3/WMA) player. We strongly recommend only playing 12- Disc - MP3/WMA Touch "d" or "M" to play/pause the music. cm CDs. -
Page 36: Repeat Function
Audio system (CD/MP3/WMA/USB/iPod) Repeat function Random function Browsing through folders/fi les using (the) "List" menu Disc - Audio CD USB (MP3/WMA) Disc - MP3/WMA The current playing track/fi le or folder is played Disc - Audio CD repeatedly. All trac1s/fi les are played randomly. Disc - MP3/WMA Touch [ Menu] during playback, then touch... -
Page 37: Selecting An Ipod Song
Audio system (CD/MP3/WMA/USB/iPod) • Touch w/s to scroll up or down one page. Viewing detail information for • In case of MP3/WMA/movie fi le, touch the MP3/WMA/iPod fi le button to move to upper folder. Touch [ Menu] during playback, then touch •... -
Page 38: Using The Gracenote
Touch the desired subcategory list. Note Touch the desired song. Hyundai is a licensee of Gracenote technology and is not responsible or liable for information from the Gracenote Media Database. If the music information is not in the Gracenote Media Database, the [Auto Playlist] menu is deactivated. -
Page 39: Usb Device Requirement/Compatible
Audio system (CD/MP3/WMA/USB/iPod) CD-R/CD-RW physical format should be “ISO For Discs formatted in Live fi le system, you can USB device requirement 9660” not it on this unit. This unit supports only USB Flash Drive and USB ... -
Page 40: Radio Operation
Radio operation Listening to FM/AM radio Storing FM/AM broadcast Auto store frequency The 6 frequencies with the most superior reception Press "FM" or "AM" on the control panel. is stored automatically as preset buttons in The FM/AM radio band of the most recent corresponding order. -
Page 41: Scanning Fm/Am Broadcast Frequency
Radio operation Scanning FM/AM broadcast Scanning preset frequencies frequency This function scans the 6 frequencies stored as preset frequencies in the current band for 10 seconds each. Scanning all frequencies Touch [ Scan Preset]. This function scans all frequencies and plays only frequencies with superior reception for 10 seconds each. -
Page 42: Photo System (Usb)
Photo system (USB) Viewing a photo Viewing slideshow Rotating a photo You can view photo fi les contained in the USB Touch [ Menu] > [ SlideShow] on the Touch [ Menu] > [ Rotation] on the device. menu buttons screen. menu buttons screen. -
Page 43: Enlarging A Photo
Photo system (USB) Enlarging a photo Copying photo fi les to the Viewing the copyed photo storage device of the system fi les to the storage device of Touch [ Menu] > [ Imagescale] on the menu buttons screen. the system Select the desired photo fi le on the menu buttons screen. -
Page 44: Viewing Photo File Information
Photo system (USB) Viewing photo fi le information Browsing through photo fi le using (the) "List" menu Displays the title, resolution, and type of the photo fi le Touch [ List] on the menu buttons screen. Touch [ Menu] > [ Info] on the menu buttons screen. -
Page 45: Auxiliary Device Operation (Audio/Video)
Auxiliary device operation (Audio/Video) Using an AUX source Connect an auxiliary device to the AUX terminal. Play the auxiliary device. Note Some auxiliary devices that do not have the video source may not produce output to the video screen. ... -
Page 46: Video Encoder
Video Encoder The user presets can be saved. - If the original fi le is damaged. Video conversion program To maintain the quality of the original, the - Video fi le that frame rate of the original fi le is ... -
Page 47: Settings
Video Encoder Settings Setting the [Subtitle] option Setting the [Others] option After selecting [ Settings] on the screen, click After selecting [ Settings] on the screen, click Setting the [CODEC] option [Subtitle]. [Others]. Click [ Settings] on the screen. If you want to put the subtitles in the video ... -
Page 48: Image Encoder
Image Encoder 12. Preview window Image conversion program GUI screen 13. Progress bar This program is a image conversion program. 14. “Stop” button If you have a image (photo) fi le that can not view on the unit, convert the fi le by using the 15. -
Page 49: Using The Image Conversion Program
Image Encoder Using the image conversion Checking the converted image program Click the “Working directory” button. Double click the video conversion program icon on your desktop. Click the “Source directory change” button. The converted image fi les are displayed. Select Select the source directory. -
Page 50: Troubleshooting
Troubleshooting Symptom Cause Correction Power does not turn on. The ignition switch is NOT turned ON. Turn the ignition switch to ON. The unit does not operate. The ignition switch is NOT set to ACC. Set the ignition switch to ACC. The power of the unit is turned OFF. -
Page 51: Index
Index Adding phone number ......31 Saving phone number ......30 Advanced setup. -
Page 52: Trademarks And Licenses
Trademarks and Licenses YOU AGREE NOT TO USE OR EXPLOIT GRACENOTE The Gracenote Software and each item of DATA, THE GRACENOTE SOFTWARE, OR Gracenote Data are licensed to you “AS IS. ” GRACENOTE SERVERS, EXCEPT AS EXPRESSLY Gracenote makes no representations or warranties, PERMITTED HEREIN. - Page 53 Trademarks and Licenses iPod and iPhone is a trademark of Apple Inc., registered in the U.S. and other countries. “Made for iPod” means that an electronic accessory has been designed to connect specifi cally to iPod and has been certifi ed by the developer to meet Apple performance standards.
- Page 54 P/N: SAC35115010 (for NORMAL)
Need help?
Do you have a question about the Veloster and is the answer not in the manual?
Questions and answers