Advertisement
Owner's Manual
Hammer Drill
241-0738
IMPORTANT:
Read through this Owner's Manual carefully before using this tool. Pay
close attention to all Safety Instructions, Warnings, and Cautions. Use this
tool properly, and only for its intended use.
Safety symbols in this Manual are used to flag possible dangers. The safe-
ty symbols and their explanations require your full understanding. The safety
warnings do not eliminate any danger by themselves, and they are not a sub-
stitute for proper accident prevention measures.
This Safety Alert Symbol indicates caution, warning, or danger. Failure to
obey a safety warning can result in serious injury to yourself or others. To reduce
the risk of injury, fire, or electric shock, always follow the safety precautions.
Advertisement
Table of Contents

Related Manuals for MasterForce 241-0738


Summary of Contents for MasterForce 241-0738
- Page 1 Owner’s Manual Hammer Drill 241-0738 IMPORTANT: Read through this Owner’s Manual carefully before using this tool. Pay close attention to all Safety Instructions, Warnings, and Cautions. Use this tool properly, and only for its intended use. Safety symbols in this Manual are used to flag possible dangers. The safe- ty symbols and their explanations require your full understanding.
-
Page 2: Table Of Contents
Assembly and Adjustments………………………………………..Page 9 Operating Instructions…..………………………………………..Page 10 Maintenance……………………………………………………..Page 12 Trouble Shooting…..……………………………………………..Page 13 Warranty……………..…………………………………………..Page 14 SPECIFICATIONS Model: 241-0738 Motor: 120 V, 60 Hz, 7.5 A Keyed chuck: 1/2” (13 mm) Variable speed ranges: 0–1080 & 0–3000 RPM Hammer: 0–18,000 &... -
Page 3: Rules For Safe Operation
RULES FOR SAFE OPERATION KNOW THE TOOL To operate this tool, carefully read this Owner’s Manual and all labels affixed to the hammer drill before using it. Keep this Manual for future reference. IMPORTANT This tool should only be serviced by a qualified service technician. For more information, call the toll-free helpline, at 1-866-917-4374. -
Page 4: Personal Safety
• Avoid body contact with grounded surfaces such as pipes, radiators, ranges and refrigerators. There is an increased risk of electric shock if your body is grounded. • Don’t expose power tools to rain or wet conditions. Water entering a power tool will increase the risk of electric shock. - Page 5 Tool Use and Care • Use clamps or another practical way to support and secure the workpiece to a stable platform. Holding the work by hand or against your body is unstable and may lead to loss of control. • Do not force the tool. Use the correct tool for your application. The correct tool will do the job better and more safely at the rate for which is designed.
- Page 6 SPECIFIC SAFETY RULES FOR THE HAMMER DRILL • Hold the tool by its insulated gripping surfaces when performing any operation where the tool may come into contact with hidden wiring or its own cord. Contact with a “live” wire will make exposed metal parts of the tool “live”...
-
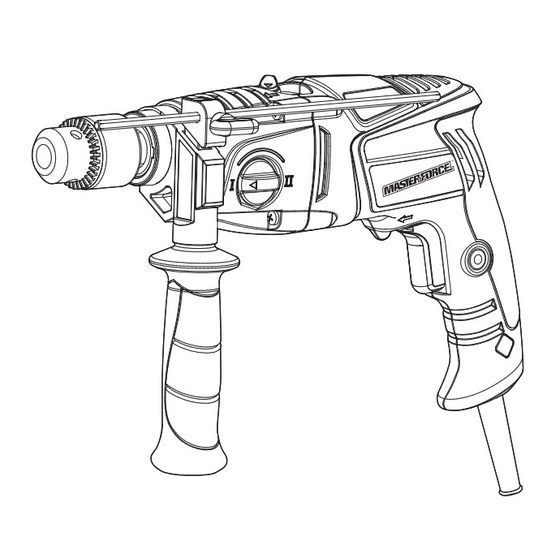
Page 7: Know The Hammer Drill
Total length of cord in feet Cord size in A. W. G.(minimum) Tool’s Ampere rating Volts 25’ 50’ 100’ 150’ 6-10 10-12 12-16 Not Recommended KNOW THE HAMMER DRILL (See Fig. 2) Before attempting to use this hammer drill, become familiar with all of its operating features and safety requirements. - Page 8 1. To open the chuck jaws, insert the chuck key into one of the three holes located on the chuck. Turn the key counter-clockwise. 2. Insert the bit into the chuck jaws. Center the bit in the chuck jaws. 3. To close the chuck jaws, insert the chuck key into one of the three holes in the chuck.
-
Page 9: Assembly And Adjustments
ASSEMBLY AND ADJUSTMENTS MECHANICAL SPEED-ADJUSTMENT KNOB (Fig. 6) Adjust the mechanical variable- Fig. 6 speed knob in either direction. The speed ranges for the two directions are as follows: On setting “I”, the speed range is 0-1080 RPM and 0-18000 BPM. On setting “II”, the speed range is 0-3000 RPM and 0-48000 BPM. -
Page 10: Operating Instructions
ON/OFF SWITCH AND LOCK-ON BUTTON (Fig. 9) To start the drill: Fig. 9 1. To turn the tool “ON”, depress the trigger switch (1). Increase the pressure on the trigger switch to increase the speed. 2. To turn the tool “OFF”, release the trigger switch (1). - Page 11 To begin drilling 1. When starting a hole, make a mark on the surface of the workpiece, and then drill a small hole. 2. Hold the drill firmly with both hands. 3. Depress the trigger switch to start the drill, gradually increasing speed. For continuous or extended operation, hold the Lock-On button while depressing the trigger switch.
-
Page 12: Maintenance
MAINTENANCE WARNING: When servicing, use only identical replacement parts. Use of any other parts may create a hazard or cause product damage. For more in- formation, call the toll-free helpline, at 1-866-917-4374. WARNING: To ensure safety and reliability, all repairs should be performed by a qualified service technician. -
Page 13: Troubleshooting
TROUBLESHOOTING CAUSE OF THE PROBLEM SUGGESTED CORRECTIVE ACTION PROBLEM Tool is not Check that all cords are plugged in. Motor does not plugged in start. Check the time-delayed fuse or Fuse circuit breaker. Drilling is Bit is damaged Replace the bit. difficult. -
Page 14: Warranty
WARRANTY 3-MONTH MONEY BACK GUARANTEE: This MASTERFORCE™ brand power tool carries our 3-Month Money Back Guarantee. If you are not completely satisfied with your MASTERFORCE™ brand power tool for any reason within three (3) months from the date of purchase, return the tool with your original receipt to any retail store, and we will provide you a refund –...
Need help?
Do you have a question about the 241-0738 and is the answer not in the manual?
Questions and answers
How do I get a replacement chuck key? I went to Menards and none fit.