Table of Contents
Advertisement
Quick Links
Advertisement
Table of Contents

Related Manuals for HIKVISION DS-8100HDI-S Series


Summary of Contents for HIKVISION DS-8100HDI-S Series
- Page 1 DS-8100HDI-S Series DVR USER’S MANUAL...
- Page 2 Hikvision except where specifically permitted under US and international copyright law. The information in this document is subject to change without notice. Hikvision assumes no responsibility or liability for any errors or inaccuracies that may appear in this book.
-
Page 3: Table Of Contents
Contents C H A P T E R 1 Introduction ........................6 Overview ..............................7 Preventive and Cautionary Tips ......................7 DVR Specifications ..........................7 Connecting Your DVR ..........................9 Operating Your DVR ..........................10 Using the Front Panel Controls ......................10 Using the IR Remote Control ........................ - Page 4 Playing Back Recorded Files ........................37 Playing Back Multiple Channels ......................38 C H A P T E R 6 Backup ........................39 Backing Up Video Clips ..........................40 Selecting Video Clips ........................... 40 Backing Up Video Clips ..........................41 Backing Up Recorded Files ........................
- Page 5 Enabling Disk Overwrite ........................63 Managing Files ............................63 Searching for Recorded Files ....................... 63 Locking and Unlocking Recorded Files ....................65 C H A P T E R 1 0 DVR Management ....................66 Managing System ............................ 67 Upgrading the System Firmware ......................67 Restoring Default Settings ........................
-
Page 6: Chapter 1 Introduction
C H A P T E R 1 Introduction... -
Page 7: Overview
Overview Thank you for your purchase of the DS-8100HDI-S Series Digital Video Recorder (DVR). To get the most out of your DVR, please read through the Installation’s Manual and this User’s Manual thoroughly. The DS-8100HDI-S Series DVR, shown in Figure 1 ushers in the next generation of hybrid digital video recording technology from Hikvision. - Page 8 Support live view group switch, manual switch and automatic cycle, the interval of automatic cycle can be adjusted. • Supports shielding of an assigned live view channel. Supports various PTZ protocols, PTZ preset, patrol and pattern. • Supports multi-level user management, each user can have individual DVR access rights. •...
-
Page 9: Connecting Your Dvr
Connecting Your DVR You may follow the diagram below (Figure 2) in connecting your DVR to its peripherals. Figure 2. DVR Connection Diagram... -
Page 10: Operating Your Dvr
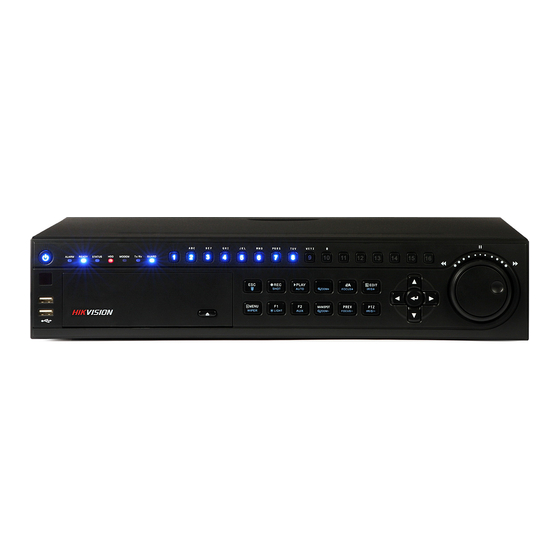
Operating Your DVR There are numerous ways to navigate and operate your DVR. You may use the Front Panel Controls, the included IR (Infra-Red) Remote, a Mouse and the Soft-Keyboard. Using the Front Panel Controls Your DVR comes with built-in front panel controls, as shown in Figure 3. Figure 3. - Page 11 REC/SHOT Button: The REC/SHOT button is used to enter the Manual Record interface. If used when controlling a PTZ, pressing the REC/SHOT button and then a Numeric button will call a PTZ preset. • PLAY/AUTO Button: The PLAY/AUTO button is used to enter the Playback menu. It is also used to turn audio on/off in the Playback menu and auto scan in the PTZ Control menu.
-
Page 12: Using The Ir Remote Control
Using the IR Remote Control Your DVR may also be controlled with the included IR remote control, shown in Figure 4. Batteries (2x AAA) must be installed before operating. -
Page 13: Using A Usb Mouse
The keys on the remote control closely resemble the ones found on the front panel. Referring to Figure 4, they include: Figure 4. IR Remote Control 1. POWER Button: Same as POWER button on front panel. 2. DEV Button: Enables/Disables Remote Control. 3. -
Page 14: Using The Soft Keyboard
Using the Soft Keyboard When a mouse is used to perform task on the DVR, clicking on a text input field will bring up the Soft Keyboard, shown in Figure 5. Figure 5. Soft Keyboard The buttons on the soft keyboard represents: Switch to Lowercase: Switch to lowercase input. -
Page 15: Chapter 2 Getting Started
C H A P T E R 2 Getting Started... -
Page 16: Starting And Shutting Down Your Dvr
Starting and Shutting Down Your DVR Proper startup and shutdown procedures are crucial to expanding the life of your DVR. To startup your DVR: Ensure the power supply is plugged into an electrical outlet. It is HIGHLY recommended that an Uninterruptible Power Supply (UPS) be used in conjunction with the unit. -
Page 17: Rebooting And Locking Your Dvr
There are two proper ways to shutdown the DVR. To shutdown the DVR: Enter the Shutdown menu, shown in Figure 8 by going to Main Menu > Maintenance > Shutdown. • OPTION 1: Standard Shutdown Select the Shutdown button. Figure 8. Shutdown Menu Click the Yes button. -
Page 18: Setting Date & Time
Setting Date & Time It is extremely important to setup the system date and time to accurately timestamp recordings and events. To setup date and time: Enter the System Configuration menu by going to Main Menu > System Configuration, as shown in Figure 9. Click the Time/Date button to enter the Time/Date menu (Figure 10). -
Page 19: Checking The Status Of Your Dvr
Click the Save button to save settings and click the Exit button to exit out of the menu. Clicking the Exit button Figure 11. Time/Date Menu without clicking the Save button will exit the menu without saving. Checking the Status of Your DVR The current status of your DVR can be checked at anytime by going to the Status menu. - Page 20 Subnet Mask: Subnet mask that is used for the DVR. Default Gateway: The default gateway that is set on the DVR. • DNS Server: The DNS server that’s currently being used on the DVR. • DVR Domain Name: The DVR domain name that is set for the DVR. •...
-
Page 21: Chapter 3 Live Feed
C H A P T E R 3 Live Feed... -
Page 22: Watching A Live Feed
Watching a Live Feed The Live Feed mode is automatically started after the DVR boots up. It is also at the very top of the menu hierarchy, thus hitting the ESC button multiple times (depending on which menu you’re on) will bring you to the Live Feed mode. Understanding Live Feed Icons There are multiple icons on each display in Live Feed mode to indicate different camera status and settings. -
Page 23: Operating The Live Feed
Operating the Live Feed In Live Feed mode, you may adjust the settings for individual cameras by left-clicking on the desired display with the mouse. The selected display will be surrounded with a green border, as shown in Figure 14. The settings you may adjust with each display includes: Figure 14. - Page 24 PTZ Control: If the selected camera is a PTZ camera, you may control it directly from the display. To control a PTZ camera: • Select display that corresponds to a PTZ camera. Click the PTZ Control icon. This will bring up additional PTZ control buttons, as shown in Figure 16. Control the PTZ using PTZ control buttons.
-
Page 25: Using The Display Menu
Using the Display Menu The Display Menu can be accessed by right-clicking the mouse on any of the display in Live Feed mode. The Display menu, shown in Figure 18 allows you to quickly change into different display modes and to start/stop auto-switching of the display modes. Figure 18. - Page 26 Start/Stop Auto-Switch: Click to start/ stop auto-switch. Auto-switch will cycle through selected cameras. Switching of camera can be on an individual or multiple camera basis. Next Set of Display: Click to view the next set of display. In 2x2 mode, this will show the next four display. In 3x3 mode, this will show the next nine display.
-
Page 27: Configuring Live Feed Displays
Configuring Live Feed Displays Live Feed displays can be customized to your own needs. These settings can be accessed by entering the Display Configuration menu, shown in Figure 19. To customize display settings: Figure 19. Display Configuration Menu Enter the Display Configuration menu by going to Main Menu > System Configuration > Display Configuration. -
Page 28: Setting Camera Order
Setting Camera Order Setting the camera order allows you to logically position cameras for more efficient monitoring of your own individual location. To set the camera order: Enter the Display Configuration menu, shown in Figure 19 by going to Main Menu > System Configuration > Figure 20. -
Page 29: Chapter 4 Record Settings
C H A P T E R 4 Record Settings... -
Page 30: Configuring Settings For Recording
Configuring Settings for Recording There are multiple ways to setup your DVR for recording. They include setting up a recording schedule, triggering a recording by motion detection and/or a sensor alarm, and manually starting the recording. Configuring Recording Settings Before setting your DVR up for recording, certain settings should be configured first. These settings can be found in the Recording Configuration menu, shown in Figure 21. -
Page 31: Configuring A Quick Recording Schedule
Select the camera to configure in the camera drop down menu on the upper left of the menu. If all cameras are to be configured with the same settings, select All Cameras from the list. Select the Encoding Parameters mode to configure. Either Continuous or On Event can be selected. Select the camera resolution in the Resolution drop down menu The options for the camera resolution includes 4CIF, DCIF, 2CIF, CIF and QCIF. -
Page 32: Configuring An Advanced Recording Schedule
Select the start and stop time for each day of the week. The start and stop time are listed using a 24 hr cycle (i.e. 18:00 is equivalent to 6:00pm). Select Recording Type for each day of the week. Recording type includes Continuous for continuous recording or On Event for recording when an event is triggered (i.e. - Page 33 If there are scheduling errors detected, such as overlapping time periods, error messages such as those shown in Figure 25 will appear. Check the Enable Audio checkbox if you would like to enable audio recording along with the video. Audio can Figure 25.
-
Page 34: Chapter 5 Playback
C H A P T E R 5 Playback... -
Page 35: Playing Back A Recording
Playing Back a Recording Previously recorded files can be played back using the Playback Interface. You must first search for recordings to play them back. Understanding the Playback Interface It’s important to understand how to use the Playback Interface to efficiently navigate through recorded files. To access the Playback Interface, shown in Figure 27, go to Main Menu >... -
Page 36: Searching For Recorded Files
Searching for Recorded Files The Playback Interface allows for easy searching of recorded files. To search for recorded files using the Playback Interface: Enter the Playback menu, shown in Figure 27 by going to Main Menu > Playback. Select the channel to search for recordings on. Select the date to search for recordings on using the calendar. -
Page 37: Playing Back Recorded Files
Playing Back Recorded Files After finding the recordings you would like to playback (See Searching for Recorded Files on page 41), you may use the Playback Controls to navigate through the recording. The controls found under Playback Controls include: To playback recorded files: Search and select recording to playback in the Playback Interface. -
Page 38: Playing Back Multiple Channels
Figure 30. Full-Screen Playback Mode In full-screen mode, you may hide the toolbars by clicking the Hide Toolbar button. Clicking the Exit Full-Screen button will return you to the original playback mode. Click the Enable/Disable Audio button to turn on and off audio during playback. Click the Digital Zoom button to enable digital zoom. -
Page 39: Chapter 6 Backup
C H A P T E R 6 Backup... -
Page 40: Backing Up Video Clips
Backing Up Video Clips Video clips can be backed up to various devices, such as USB flash drives, USB HDDs or a DVD writer. Selecting Video Clips Video clips can be selected for backup in the Playback Interface using the controls found in the Mark Clip For Backup panel, shown in Figure 31. -
Page 41: Backing Up Video Clips
You may play the video clip using the Play Clip button or use the arrow keys shown next to the clip time range to Figure 33. Video Clip Time Range progress through the video one second, minute or hour at a time. Click the Save Clip button to save clip to the DVR. -
Page 42: Backing Up Recorded Files
Connect at least one USB storage device to the DVR. If the device is compatible with the DVR, it will automatically be detected. Select the backup device from the Backup Device drop down menu. The Clips Selected, Required Space and Available Space will be displayed on the Clips Backup menu. If the USB storage device has not been properly initialized and formatted, you may click on the Format button to do so. -
Page 43: Chapter 7 System Configuration
C H A P T E R 7 System Configuration... -
Page 44: Configuring Network Settings
Configuring Network Settings Network settings must be configured before you’re able to use your DVR over the network. To configure network settings: Enter the Network Configuration menu, shown in Figure 36 by going to Main Menu > System Configuration > Network Configuration. -
Page 45: Managing User Accounts
Figure 37. Test Connection Confirmation Select the Save button to save the network settings and select Exit to return to the previous menu. Selecting the Exit button without clicking Save will quit out of the menu without saving settings. Managing User Accounts By default, your DVR comes with one user account, the Administrator account. -
Page 46: Deleting A User
Advanced Control: Manage hard disk drives (initializing and setting properties for HDDs). Ability to remote update system firmware and stopping of the relay output. • Live View: Access the Live Feed. PTZ Control: Control PTZ cameras. • Configuration: Configure parameters, restore parameters to factory defaults and import settings to as well •... -
Page 47: Configuring Ptz Cameras
Configuring PTZ Cameras Configuring Basic PTZ Settings Settings for a PTZ camera must be configured before it can be used. Before proceeding, verify that the PTZ and RS-485 of the DVR are connected properly. To configure PTZ settings: Enter the PTZ Configuration menu, shown in Figure 42 by going to Main Menu > System Configuration > PTZ Configuration. - Page 48 To test and verify PTZ settings: Enter the PTZ Configuration menu, shown in Figure 42 by going to Main Menu > System Configuration > PTZ Configuration. Select the On Camera Settings tab. This will open up the On Camera Settings menu, shown in Figure 40. Select the camera to test in the camera drop down menu.
-
Page 49: Customizing Ptz Presets, Patterns And Patrols
Customizing PTZ Presets, Patterns and Patrols Your DVR allows you to customize presets, patterns and patrols for a connected PTZ ,camera. A PTZ camera must first be configured before PTZ presets, patterns and patrols can be customized (See Configuring Basic PTZ Settings on page 57). To customize PTZ presets: Enter the PTZ Configuration menu, shown in Figure 42 by going to Main Menu >... -
Page 50: Configuring Alarms And Exceptions
Configuring Alarms and Exceptions Setting Up Motion Detection Set up properly, using motion detected recording will increase the number of days your DVR is able to record. It will only record relevant events rather than everything, which will also make searching for events easier. To set up motion detection: 1. -
Page 51: Configuring Alarm Inputs
Configuring Alarm Inputs Recordings can also be triggered from an external sensor alarm device. To setup recording triggers from alarm inputs: Enter the Trigger Settings menu, shown in Figure 43 by going to Main Menu > Recording Configuration > Trigger Settings. -
Page 52: Configuring Exceptions
Select the alarm input to configure in the Alarm Input No. drop down menu on the upper left of the menu. If all Figure 44. Trigger Actions Sub-Menu. alarm inputs are to be configured with the same settings, select All from the list. Select the Trigger Action for the external alarm input device. -
Page 53: Configuring E-Mail Settings
Select the Exception Type to configure. The exception type includes: Figure 45. Exception Configuration Menu HDD Full: If selected, trigger action when HDD is full. HDD Error: If selected, trigger action when errors on the HDD are detected. • Network Failure: If selected, trigger action when a network failure is detected. •... - Page 54 Under Server Information, enter all pertinent email information, including: Figure 46. Email Configuration Menu Server Authentication: Enable if email server requires authentication. Enabling Server Authenticating will enable the User Name and Password fields. • User Name: User name to use for server authentication. Password: Password to use for server authentication.
-
Page 55: Chapter 8 Camera Management
C H A P T E R 8 Camera Management... -
Page 56: Configuring Cameras
Configuring Cameras Adding and Removing Analog Cameras Analog cameras can be enabled and disabled in the Add/Remove Cameras menu. To manage analog cameras: Enter the Add/Remove Cameras menu, shown in Figure 47 by going to Main Menu > Cameras Setup > Add/Remove Cameras. -
Page 57: To Setup Privacy Zones
To setup privacy zones: Enter the Privacy Zones menu, shown in Figure 48 by going to Main Menu > Camera Setup > Privacy Zones. Privacy Zones Menu Figure 48. Select the camera to setup privacy zones in using the camera drop down menu on the upper left of the menu. If all cameras are to be configured with the same settings, select All Cameras from the list. -
Page 58: Configuring Video Tampering Detection
Configuring Video Tampering Detection Video tampering detection can be used to recognize if an area of a camera is purposely covered and to respond accordingly. To configure video tampering detection: Enter the Video Tampering Detection menu, shown in Figure 49 by going to Main Menu > Camera Setup > Video Tampering Detection Select the camera to setup video tampering detection in using the camera drop down menu on the upper left of Figure 49. -
Page 59: Configuring Video Loss Detection
Configuring Video Loss Detection Video loss detection can be enabled on any of the channels on your DVR to detect the loss of video. To configure video loss detection: Enter the Video Loss Detection menu, shown in Figure 49 by going to Main Menu > Camera Setup > Video Loss Detection. -
Page 60: Configuring Osd Settings
Configuring OSD Settings On Screen Display (OSD) settings can be configured in the OSD Configuration menu. The OSD is shown in each display in Live Feed and Playback mode. To configure OSD settings: Enter the OSD Configuration menu, shown in Figure 51 by going to Main Menu > Cameras Setup > OSD Configuration. -
Page 61: Chapter 9 Disk Management
C H A P T E R 9 Disk Management... -
Page 62: Managing Disks
Managing Disks Checking Disk Status The status of all installed hard disk drives (HDD) can be checked under the Disk Management menu. To check the status of installed disks: Enter the Disk Management menu, shown in Figure 54 by going to Main Menu > System Configuration > Disk Management. -
Page 63: Enabling Disk Overwrite
A format progress bar (Figure 56) will be shown on the menu. After the disk has been formatted, the status of Figure 55. Disk Format Confirmation the disk will change to Active. Click the Done button to exit out of Disk Management. Figure 56. - Page 64 Select the cameras that you would like to include in the search. Analog cameras are listed on the first row, Figure 57. File Management Menu preceded with the letter A. Digital cameras are listed on the second row, preceded with the letter D. If you would like include all cameras in the search, check the All box.
-
Page 65: Locking And Unlocking Recorded Files
Locking and Unlocking Recorded Files To lock and unlock recorded files: Search for recorded files using the File Management menu (See Searching for Recorded Files on page 83). Select the file you would like to lock/unlock. Click the Lock icon for the selected file. Click the Done button to exit out of the File Management menu. -
Page 66: Chapter 1 0 Dvr Management
C H A P T E R 1 0 DVR Management... -
Page 67: Managing System
Managing System Upgrading the System Firmware The system firmware for your DVR can be updated from a USB storage device. To update the system firmware: Enter the Firmware Upgrade menu, shown in Figure 59 by going to Main Menu > Maintenance > Firmware Upgrade. -
Page 68: Exporting & Importing Configuration
Select the OK button to restore factory defaults or select the Cancel button to return to the previous menu. Network information such as IP address, subnet mask and gateway will not be restored. Note: Exporting & Importing Configuration Configuration information from your DVR can be exported to a USB storage device and imported into another DVR. This will allow you to efficiently setup the same configuration on numerous DVRs. -
Page 69: Viewing System Logs
Viewing System Logs Many events of your DVR are logged into the system logs. To access the system logs and search for these events: Enter the System Logs menu, shown in Figure 62 by going to Main Menu > Maintenance > System Logs. Select the date from the Calendar to search for system logs in. -
Page 70: Locking And Unlocking System Menus
Log files can also be exported onto a USB storage device. To export a log file, connect a USB storage device to the DVR, select the log files to export and click the Export button. Click the Done button to exit out of menu. Locking and Unlocking System Menus System menus on your DVR can be locked to prevent unauthorized local access.
Need help?
Do you have a question about the DS-8100HDI-S Series and is the answer not in the manual?
Questions and answers