Table of Contents
Advertisement
Advertisement
Table of Contents

Related Manuals for Neato Robotics All-floor


Summary of Contents for Neato Robotics All-floor
- Page 1 Neato All-Floor Robotic Vacuum User’s Guide...
- Page 2 Neato Robotics, Inc. 8100 Jarvis Avenue Suite 100 Newark, CA 94560 p/n 500-0009 rev 4 - North America Copyright © 2011 Neato Robotics, Inc. All rights reserved. Neato Robotics and Your Future is Neat are registered trademarks of Neato Robotics, Inc.
-
Page 3: Table Of Contents
Table of Contents Welcome! ............................... 5 Anatomy of Your Neato Vacuum ............... 6 Important Safety Instructions ................. 10 Likes and Dislikes ..................11 Using the Neato Vacuum...........................15 Using the Charging Base ................16 Charging Status ..................20 Optimal Charging ................... 20 Cleaning Mode ................... - Page 4 Emptying the Dirt Bin................... 39 Boundary Markers ..................41 Using boundary markers................41 Communicating with Your Neato Vacuum ............42 Getting the Best Performance from Your Neato Vacuum ......... 43 LCD Feedback Messages ................44 Filters ..................... 47 Customer Support ............................ 48 One Year Limited Warranty - North America ............
-
Page 5: Welcome
We want to keep in touch. To ensure that we keep you up to date on your new Neato Vacuum, please register at http://www.neatorobotics.com/register. Neato is developing robotic home maintenance products that promise to free everyone from the drudgery of household cleaning. -
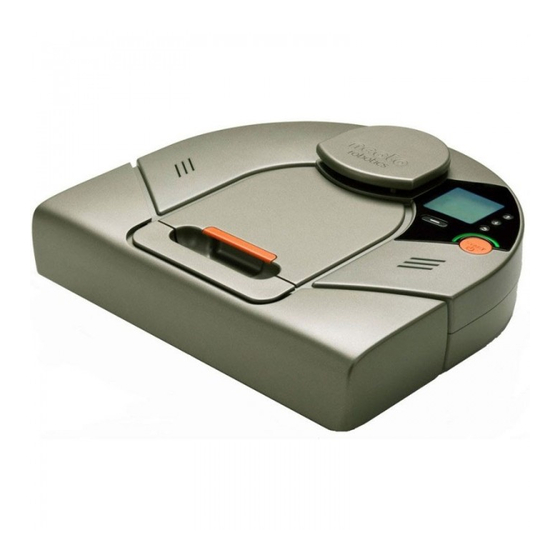
Page 6: Anatomy Of Your Neato Vacuum
Anatomy of Your Neato Vacuum Laser-Guided Vision System —the robot’s “eye” Control panel (see next page) Start dirt bin button handle (grasp in direction dirt bin eject of arrow) bumper Top view Neato Vacuum User’s Guide... - Page 7 LCD screen Buttons: Down Back softkey Start button status light Control panel Neato Vacuum User’s Guide...
- Page 8 Bottom view charging contact points Back View Neato Vacuum User’s Guide...
- Page 9 Charging base (external view) cable wrap pegs power cable Charging base (internal view) Neato Vacuum User’s Guide...
-
Page 10: Important Safety Instructions
Important Safety Instructions Please read all instructions before using this appliance. Save these instructions for future reference. Refer all non-routine servicing to Neato Robotics. The robotic vacuum cleaner shall only be charged using the included power adapter or charging base. -
Page 11: Likes And Dislikes
Likes and Dislikes There are just a few things to remember that will keep your Neato Vacuum happy and successful in your home: Likes Dislikes POWER. Charge it when you aren't using WATER, CHEMICALS, or OTHER MOLD it to ensure that every time you need it, PRODUCING FLUIDS. - Page 12 GROOMING. Because it's down in the dirt COLD. Exposing your Neato Robotics all day long, your Neato Vacuum can get vacuum to freezing temperatures may a little grungy. After a while, give it a cause permanent damage, and possibly once over to ensure wheels and brushes hurt its feelings.
- Page 13 Neato Vacuum cleaning smarts 1- Rectangular front design allows vacuuming close to walls and into corners. 2- Low profile allows cleaning under furniture. 3- Always vacuums in straight lines. 4 & 5- Cleans closely around obstacles. 6- Automatic doorway recognition ensures complete cleaning of room before moving on to the next.
- Page 14 (This page intentionally left blank.) Neato Vacuum User’s Guide...
-
Page 15: Using The Neato Vacuum
Using the Neato Vacuum The Neato Vacuum is ready to start cleaning as soon as you charge up its battery. •To charge the battery, see Using the Charging Base on page 16. •To begin a quick-start cleaning, see Quick-Start Your Robotic Vacuum on page 22. -
Page 16: Using The Charging Base
Using the Charging Base Using the Charging Base The Neato Vacuum has a preinstalled rechargeable battery that has to be fully charged before you can use it for the first time. To use the charging base, follow these steps: 1 Plug the charging base into the wall and place it on the floor in a room that you want to vacuum frequently and which provides the vacuum a clear path to return to recharge itself. - Page 17 NOTE:There are exit holes on either side of the charging base so that you can have the cable exit the charging base on the side closest to the wall plug. Refer to the illustration on page 9. Connecting the Neato Vacuum to the charging base Neato Vacuum User’s Guide...
- Page 18 Using the Charging Base MINIMUM 3 FEET Giving the vacuum a clear path to its charger Neato Vacuum User’s Guide...
- Page 19 Using the Charging Base 3 Place the Neato Vacuum’s curved edge up against the charging base so that the charging base's contact points make contact with the vacuum’s charging contact points. The status light turns on to show you it is charging.
-
Page 20: Charging Status
Communicating with Your Neato Vacuum on page 42) Optimal Charging For optimal performance, we recommend that you charge your Neato Vacuum on the charging base whenever it is not cleaning. Not only will this make sure the vacuum will be ready for upcoming cleaning tasks, but it also ensures longer battery life. -
Page 21: Cleaning Mode
Depending on how it was started, it will: Started off of the Charging Base: If the Neato Vacuum was started off of its base and did not finish the cleaning job in one battery charge, it will return to base to recharge, and then start cleaning again where it left off. -
Page 22: Quick-Start Your Robotic Vacuum
It is in suspended cleaning mode while charging. When finished charging, place the Neato Vacuum within two feet of where it returned for charging, press START again, and it will return to where it left off to finish the cleaning job. - Page 23 4 Press the START button. If the vacuum is asleep, that will wake it up! Then press the button once more to clean your entire house. 5 The Neato Vacuum maps the room and cleans it automatically. 6 When finished, the vacuum returns to where it started—either to the charging base or to where you manually started it in the room and turns itself off.
-
Page 24: Using The Control Center Lcd Screen
Using the Control Center LCD screen Using the Control Center LCD screen The Neato Vacuum’s LCD Control Center screen is your interface to communicate with the vacuum. This is where you give the vacuum its cleaning schedule or pause its cleaning cycle, and it’s also where the vacuum will give you information. - Page 25 •Clean a smaller area using Spot mode (see page 26) •Set the clock of the Neato Vacuum (see page 28) •Program the Neato Vacuum to clean on a scheduled basis (see page 30) •Get feedback from the vacuum on how it is doing and where it might need some help (see page 42) •Change the language on the LCD display (see page 36)
-
Page 26: Using Spot Mode For Cleaning Smaller Areas
SELECT. be cleaned, and press MENU. The Neato Vacuum cleans the 4' by 6' area in front of it: first the outline of the area, and then the interior. Neato Vacuum User’s Guide... - Page 27 Using Spot Mode for Cleaning Smaller Areas (This page left intentionally blank.) Neato Vacuum User’s Guide...
-
Page 28: Setting The Clock
Set Clock and then press SELECT. Use the arrow Use up and down buttons to select arrows to select either 12-Hour the current day Clock or 24-Hour of the week and Clock and then press ENTER. press SELECT. Neato Vacuum User’s Guide... - Page 29 ENTER. minute and press Cycle through the ENTER. hours to select AM or PM. The current day and time are shown. Press the Back button make corrections; otherwise press SAVE. Neato Vacuum User’s Guide...
-
Page 30: Scheduling A Cleaning
Schedule and then press SELECT. Use the arrow Use the arrow buttons to select buttons to select Set or Change the day you want and then press your vacuum to SELECT. clean and press SELECT. Neato Vacuum User’s Guide... - Page 31 Future cleanings will occur at the times and dates you selected. At each scheduled time, the Neato Vacuum will come off of the charging base and start its scheduled cleaning. When finished cleaning, the vacuum returns to the charging base to recharge. If the battery runs low during the scheduled cleaning, the vacuum returns to its base, recharges, then returns one more time to clean where it left off.
-
Page 32: To Get The Most Of Scheduled Cleanings
To Get the Most of Scheduled Cleanings If you are not using the charging base, you will need to put the Neato Vacuum out and it will start its scheduled cleaning when that is the actual time and day of the week. -
Page 33: Ideas For Scheduled Cleanings
10 a.m. Locating your charging base in the kitchen, the Neato Vacuum comes off its charging base, cleans the rooms, and returns to the charging base. Cleaning on an everyday basis helps to minimize dust build up and can result in a reduction in allergy symptoms. -
Page 34: Removing A Scheduled Cleaning
Removing a Scheduled Cleaning Removing a Scheduled Cleaning If you need to remove a previously-scheduled cleaning, follow these steps. Press MENU. Press the arrow buttons to select Schedule and then press SELECT. Neato Vacuum User’s Guide... - Page 35 SELECT. remove and then press SELECT. Press DELETE to A confirmation confirm deletion. message verifies Use the Back the scheduled cleaning that you button if you removed. made a mistake. Neato Vacuum User’s Guide...
-
Page 36: Changing The Language On The Lcd Display
Press MENU. Press the arrow buttons to select Language and then press SELECT. Use the arrow The LCD will now buttons to select use the language the language you you selected. want to use then press SELECT. Neato Vacuum User’s Guide... -
Page 37: Pausing A Cleaning
Pausing a Cleaning Pausing a Cleaning If at any time you want to pause a cleaning, press any button on the Neato Vacuum and the vacuum will offer you a PAUSE menu. From the PAUSE menu, press the down arrows to make the vacuum: •Pause its current cleaning... -
Page 38: Turning Off Your Vacuum
Turning off Your Vacuum If you would like to turn off your vacuum for long term storage or if you are going away for vacation, you can turn off all power to your Neato Vacuum. Note that this will delete your clock settings. -
Page 39: Emptying The Dirt Bin
Emptying the Dirt Bin Emptying the Dirt Bin For optimal performance, empty the Neato Vacuum’s dirt bin after every use. Remove the dirt bin. Remove the filter. Neato Vacuum User’s Guide... - Page 40 Tap the filter against the garbage can to get rid of any excess dirt. Replace the filter cover, then replace the dirt bin into the top of the Neato Vacuum. Neato Vacuum User’s Guide...
-
Page 41: Boundary Markers
To use the markers, simply lay the boundary marker flat on the floor from one wall to the opposite wall to block off an area. The Neato Vacuum will clean the floor on the side of the boundary marker that it is started on. Place the vacuum within the bounded area and press START. -
Page 42: Communicating With Your Neato Vacuum
Communicating with Your Neato Vacuum Communicating with Your Neato Vacuum Communication is a two-way street, so be sure to listen when your Neato Vacuum is talking to you! When it’s charging, the status light around the START button will be GREEN to indicate your Neato Vacuum is ready for work. -
Page 43: Getting The Best Performance From Your Neato Vacuum
1 Empty your Dirt Bin after every cleaning 2 Clean your brush of debris frequently 3 Periodically dust off your drop sensors. Using a cotton swab, clean the two drop sensor windows on the bottom of your Neato Vacuum, located as shown below. drop sensor drop sensor... -
Page 44: Lcd Feedback Messages
Bumper Stuck Jiggle the bumper to loosen. Time Not Set If your battery runs very low, the Neato Vacuum loses its clock setting. Use the menus to reset the time and day as described in Setting the Clock on page 28. - Page 45 Cannot Charge Make sure the charging cable is plugged into the base and wall. When vacuum is initially connected to the base, the status light will light up to let you know the power is on. Neato Vacuum User’s Guide...
- Page 46 • the charging base is solid against a wall and is not leaning backward or forward • if charging base is on carpet, try relocating to a hard floor surface If you still have difficulties, please contact Neato Customer Care. Neato Vacuum User’s Guide...
-
Page 47: Filters
We also recommend changing your filter in your vacuum every three to six months (based on typical usage; if you use your vacuum more frequently, you may need to change your filter more often.) You can purchase additional filters online at http://www.neatorobotics.com. Neato Vacuum User’s Guide... -
Page 48: Customer Support
Customer Support If you have any questions or comments, contact Neato Robotics, Inc. •Email customercare@neatorobotics.com •Visit www.NeatoRobotics.com for additional support, accessories, and frequently asked questions. •Call a customer care specialist: •United States: 1-877-29-NEATO Neato Vacuum User’s Guide... -
Page 49: One Year Limited Warranty - North America
365 days from the date of purchase from Neato Robotics or its authorized reseller. You may also find this information by selecting your product in the Support section of our website at www.neatorobotics.com. Except where prohibited by applicable law, this warranty is nontransferable, is limited to the original purchaser, and applies only to products purchased and used in North America. -
Page 50: Compliance Information
8100 Jarvis Avenue Suite 100 Newark, CA 94560 No service is allowed by the user. If there are any problems with the RPS laser distance sensor, the robot should be returned to the factory for any service or repair. Neato Vacuum User’s Guide... -
Page 51: Declaration Of Conformity
Voltage Equipment Directive has been compiled and is available for inspection by the relevant enforcement authorities. Details of these special measures and limitations to use are available upon request. The CE mark was first applied in 2010 and re-issued in 2012 due to new product variants. Neato Vacuum User’s Guide... - Page 52 April 2012 Date of Issue Neato Robotics Newark, CA Neato Vacuum User’s Guide...
-
Page 53: Fcc Compliance Statement
• Increase the separation between the equipment and receiver. • Connect the equipment into an outlet on a circuit different from that to which the receiver is connected. • Consult the dealer or an experienced radio/TV technician for help. Neato Vacuum User’s Guide... - Page 54 Trade Name: NEATO Model Number: XV Series Responsible Party: NEATO Robotics Changes or modifications not expressly approved by Neato can void the user's authority to operate the equipment. Neato Vacuum User’s Guide...
-
Page 55: Disposal Notices
Neato Vacuum If you ever dispose of your Neato Vacuum, follow these steps: 1 Unplug the Neato Vacuum from any power source, including removing it from its charging base and removing the power adapter plug from the Neato Vacuum power connector. -
Page 56: Linux Operating System
GPLv2. To the extent that any of the terms and conditions of the Neato EULA conflict with the GPLv2, such conflicting terms of the Neato EULA do not apply to the Linux installations. The licensors of the Linux operating system disclaim all warranties and liability, whether express or implied, relating to or resulting from use or distribution of the Linux operating system. - Page 57 GPLv2. Use of the Neato application is governed by the applicable Neato EULA (http://www.neatorobotics.com/EULA). For clarity, Neato has not placed the Neato application in the public domain, nor has Neato licensed the application under the terms GPLv2. NOTE: If you are unable or unwilling to download our modifications from http:// www.neatorobotics.com/lab/linux, you may instead request to receive a CD-R...
Need help?
Do you have a question about the All-floor and is the answer not in the manual?
Questions and answers