Table of Contents
Advertisement
Advertisement
Chapters
Table of Contents

Related Manuals for Neato Robotics Neato XV Series


Summary of Contents for Neato Robotics Neato XV Series
- Page 1 Neato XV™ Series Robot Vacuum User Guide...
- Page 2 SAVE THESE INSTRUCTIONS. PLEASE REFER TO PAGE 10 FOR ADDITIONAL SAFETY INSTRUCTIONS. Neato Robotics, Inc. 8100 Jarvis Avenue Suite 100 Newark, CA 94560 Copyright © 2013 Neato Robotics, Inc. All rights reserved. Neato Robotics is a registered trademark of Neato Robotics, Inc.
-
Page 3: Table Of Contents
Table of Contents Welcome!................................. 5 Anatomy of Your Neato Vacuum ..........................................6 Important Safety Instructions........................................... 10 Likes and Dislikes..............................................11 Turn to Run Mode..............................................14 Using the Neato Vacuum...........................15 Using the Charging Base ............................................16 Charging Status............................................... 20 Optimal Charging............................................20 Cleaning Mode................................................21 Quick-Start Your Robotic Vacuum........................................ - Page 4 Ideas for Scheduled Cleanings..........................................33 Removing a Scheduled Cleaning.......................................... 34 Changing the Language on the LCD Display......................................36 Pausing a Cleaning ..............................................37 Putting your Vacuum to Sleep..........................................37 Turning off Your Vacuum............................................38 Emptying the Dirt Bin..............................................39 Boundary Markers ..............................................41 Using boundary markers ..........................................41 Communicating with Your Neato Vacuum......................................
-
Page 5: Welcome
Welcome! Thank you for purchasing your new Neato Vacuum. And welcome to the home robotics revolution. This detailed user’s guide will provide all you need to know. It’s easy. If you are in a hurry, and want to learn the basics to get started right away, you can read the Quick Start Guide. -
Page 6: Anatomy Of Your Neato Vacuum
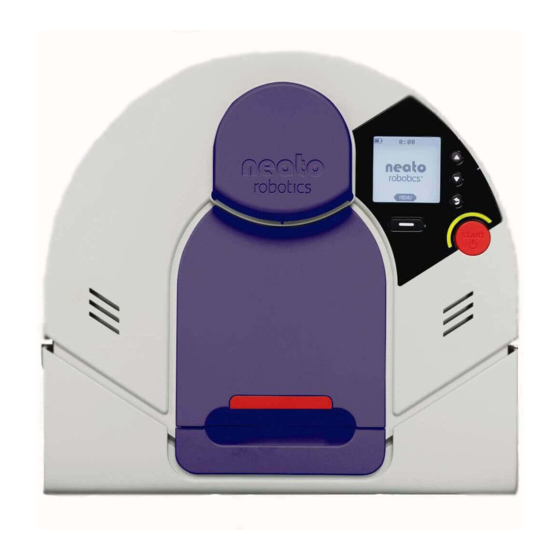
Anatomy of Your Neato Vacuum Laser-Guided Vision System —the robot’s “eye” Control panel (see next page) Start dirt bin button handle (grasp in direction dirt bin eject of arrow) bumper Top view Neato XV™ Series User Guide... - Page 7 LCD screen Buttons: Down Back softkey Start button status light Control panel Neato XV™ Series User Guide...
- Page 8 drop sensor drop sensor window window sweeping brush brush guard brush guard release brush guard wheel release wheel battery doors information label Bottom view charging contact points Back View Neato XV™ Series User Guide...
- Page 9 release button charging contact points Charging base (external view) cable wrap pegs power cable Charging base (internal view) Neato XV™ Series User Guide...
-
Page 10: Important Safety Instructions
Please read all instructions before using this appliance. Save these instructions for future reference. Refer all non-routine servicing to Neato Robotics. The robotic vacuum cleaner shall only be charged using the included charging base. The robotic vacuum cleaner shall only be operated using the included batteries. Do not replace with non-rechargeable batteries. -
Page 11: Likes And Dislikes
Likes and Dislikes There are just a few things to remember that will keep your Neato Vacuum happy and successful in your home: Likes Dislikes POWER. Charge it when you aren't using WATER, CHEMICALS, or OTHER MOLD it to ensure that every time you need it, PRODUCING FLUIDS. - Page 12 GROOMING. Because it's down in the dirt COLD. Exposing your Neato Robotics all day long, your Neato Vacuum can get vacuum to freezing temperatures may a little grungy. After a while, give it a...
- Page 13 Neato Vacuum cleaning smarts 1- Rectangular front design allows vacuuming close to walls and into corners. 2- Low profile allows cleaning under furniture. 3- Always vacuums in straight lines. 4 & 5- Cleans closely around obstacles. 6- Automatic doorway recognition ensures complete cleaning of room before moving on to the next.
-
Page 14: Turn To Run Mode
Turn to Run Mode... Remove dirt bin, and locate the ON/OFF switch. Push the switch DOWN to turn your Neato to ON. Replace the dirt bin. Neato XV™ Series User Guide... -
Page 15: Using The Neato Vacuum
Using the Neato Vacuum The Neato Vacuum is ready to start cleaning as soon as you charge up its battery. •To charge the battery, see Using the Charging Base on page 16. •To begin a quick-start cleaning, see Quick-Start Your Robotic Vacuum on page 22. •To schedule regular cleanings, see Scheduling a Cleaning on page 30. -
Page 16: Using The Charging Base
Using the Charging Base Using the Charging Base The Neato Vacuum has a preinstalled rechargeable battery that has to be fully charged before you can use it for the first time. To use the charging base, follow these steps: 1 Plug the charging base into the wall and place it on the floor in a room that you want to vacuum frequently and which provides the vacuum a clear path to return to recharge itself. - Page 17 Using the Charging Base NOTE:There are exit holes on either side of the charging base so that you can have the cable exit the charging base on the side closest to the wall plug. Refer to the illustration on page 9. Connecting the Neato Vacuum to the charging base Neato XV™...
- Page 18 Using the Charging Base Giving the vacuum a clear path to its charger Neato XV™ Series User Guide...
- Page 19 Using the Charging Base 3 Place the Neato Vacuum’s curved edge up against the charging base so that the charging base's contact points make contact with the vacuum’s charging contact points. The status light turns on to show you it is charging. Neato Vacuum in its charging base Neato XV™...
-
Page 20: Charging Status
Charging Status Charging Status Recharging the battery takes about 2 to 3 hours. The status light lets you know the current charging state of your Neato Vacuum: Status light color Meaning Solid green Fully charged and ready to clean Pulsing green Charging, but ready to clean Pulsing amber Charging, can’t clean yet... -
Page 21: Cleaning Mode
Cleaning Mode Cleaning Mode Your Neato cleans using its powerful vacuum. Just press the START button and it will vacuum your home, cleaning one room at a time. Neato creates a map of your home as it goes from room to room. When it needs to recharge its batteries, it uses the map to find it way back to where it started. -
Page 22: Quick-Start Your Robotic Vacuum
Quick-Start Your Robotic Vacuum Quick-Start Your Robotic Vacuum The Neato Vacuum works best when it performs regularly scheduled cleanings (see Scheduling a Cleaning on page 30), but you can quick-start the vacuum for immediate cleaning any time. To start the Neato Vacuum: 1 Charge the vacuum (see Using the Charging Base on page 16). - Page 23 Quick-Start Your Robotic Vacuum 5 The Neato Vacuum maps the room and cleans it automatically. 6 When finished, the vacuum returns to where it started—either to the charging base or to where you manually started it in the room and turns itself off. Neato XV™...
-
Page 24: Using The Control Center Lcd Screen
Using the Control Center LCD screen Using the Control Center LCD screen The Neato Vacuum’s LCD Control Center screen is your interface to communicate with the vacuum. This is where you give the vacuum its cleaning schedule or pause its cleaning cycle, and it’s also where the vacuum will give you information. - Page 25 Using the Control Center LCD screen Using this screen, you can: •Clean a smaller area using Spot mode (see page 26) •Set the clock of the Neato Vacuum (see page 28) •Program the Neato Vacuum to clean on a scheduled basis (see page 30) •Get feedback from the vacuum on how it is doing and where it might need some help (see page 42) •Change the language on the LCD display (see page 36)
-
Page 26: Using Spot Mode For Cleaning Smaller Areas
Using Spot Mode for Cleaning Smaller Areas Using Spot Mode for Cleaning Smaller Areas Spot Mode will clean a small area approximately 4 feet by 6 feet. To use Spot Mode: Place the Neato Press the arrow Vacuum on the buttons to select ground, Spot Clean and... - Page 27 Using Spot Mode for Cleaning Smaller Areas (This page left intentionally blank.) Neato XV™ Series User Guide...
-
Page 28: Setting The Clock
Setting the Clock Setting the Clock Before you can schedule future cleanings, you must set the current day and time on the vacuum so it knows when to start the next cleaning. To set the date and time: Press MENU. Press the arrow buttons to select Set Clock and... - Page 29 Setting the Clock Use the arrow Use the arrow buttons to select buttons to select the current hour the current and press ENTER. minute and press Cycle through the ENTER. hours to select AM or PM. The current day and time are shown.
-
Page 30: Scheduling A Cleaning
Scheduling a Cleaning Scheduling a Cleaning Before setting a schedule, set the clock as described in Setting the Clock on page 28. To schedule a cleaning: Press MENU. Press the arrow buttons to select Schedule and then press SELECT. Use the arrow Use the arrow buttons to select buttons to select... - Page 31 Scheduling a Cleaning Use the arrow Use the arrow buttons to select buttons to select the hour you want the minute you your vacuum to want your clean and then vacuum to clean press SELECT. and then press SELECT. Confirm the day, time, and cleaning mode by pressing ADD.
-
Page 32: To Get The Most Of Scheduled Cleanings
To Get the Most of Scheduled Cleanings If you are not using the charging base, you will need to put the Neato Vacuum out and it will start its scheduled cleaning when that is the actual time and day of the week. When you return, you will need to manually place the vacuum on its charging base. -
Page 33: Ideas For Scheduled Cleanings
Ideas for Scheduled Cleanings Ideas for Scheduled Cleanings Some ways you can take advantage of scheduled cleanings include: •Clean a specific high-traffic area on a regular basis. For example, you could set up a schedule to clean your kitchen and family room everyday at 10 a.m. Locating your charging base in the kitchen, the Neato Vacuum comes off its charging base, cleans the rooms, and returns to the charging base. -
Page 34: Removing A Scheduled Cleaning
Removing a Scheduled Cleaning Removing a Scheduled Cleaning If you need to remove a previously-scheduled cleaning, follow these steps. Press MENU. Press the arrow buttons to select Schedule and then press SELECT. Neato XV™ Series User Guide... - Page 35 Removing a Scheduled Cleaning Use the arrow Use the arrow buttons to select buttons to choose Remove Day and the cleaning then press event you want to SELECT. remove and then press SELECT. Press DELETE to A confirmation confirm deletion. message verifies Use the Back the scheduled...
-
Page 36: Changing The Language On The Lcd Display
Changing the Language on the LCD Display Changing the Language on the LCD Display If you want to use a different language on the LCD display, follow these steps: Press MENU. Press the arrow buttons to select Language and then press SELECT. -
Page 37: Pausing A Cleaning
Pausing a Cleaning Pausing a Cleaning If at any time you want to pause a cleaning, press any button on the Neato Vacuum and the vacuum will offer you a PAUSE menu. From the PAUSE menu, press the down arrows to make the vacuum: •Pause its current cleaning •Cancel its current cleaning... -
Page 38: Turning Off Your Vacuum
Turning off Your Vacuum Turning off Your Vacuum If you would like to turn off your vacuum for long term storage or if you are going away for vacation, you can turn off all power to your Neato Vacuum. Note that this will delete your clock settings. -
Page 39: Emptying The Dirt Bin
Emptying the Dirt Bin Emptying the Dirt Bin For optimal performance, empty the Neato Vacuum’s dirt bin after every use. Remove the dirt bin. Remove the filter. Neato XV™ Series User Guide... - Page 40 Emptying the Dirt Bin Empty the contents of the dirt bin into a garbage can. Tap the filter against the garbage can to get rid of any excess dirt. Replace the filter cover, then replace the dirt bin into the top of the Neato Vacuum. Neato XV™...
-
Page 41: Boundary Markers
Boundary Markers Boundary Markers Boundary Markers are useful tools that tell your Neato Vacuum where not to clean. Boundary markers are most helpful when you want to: 28'-0" ~350 Sq Ft Scheduled Area • Create a boundary where one does not exist. You might have a large open plan house where you Kitchen want to clean a subset of a large room like the... -
Page 42: Communicating With Your Neato Vacuum
Communicating with Your Neato Vacuum Communicating with Your Neato Vacuum Communication is a two-way street, so be sure to listen when your Neato Vacuum is talking to you! When it’s charging, the status light around the START button will be GREEN to indicate your Neato Vacuum is ready for work. -
Page 43: Getting The Best Performance From Your Neato Vacuum
Getting the Best Performance from Your Neato Vacuum Getting the Best Performance from Your Neato Vacuum 1 Empty your Dirt Bin after every cleaning 2 Clean your brush of debris frequently 3 Periodically dust off your drop sensors. Using a cotton swab, clean the two drop sensor windows on the bottom of your Neato Vacuum, located as shown below. -
Page 44: Lcd Feedback Messages
LCD Feedback Messages LCD Feedback Messages Your vacuum is smart and will let you know when it needs help with anything. Just read the messages on the LCD to understand what it needs. Here are some specific tips. LCD Message Remedy Dirt Bin Full Empty dirt bin and replace into its slot. - Page 45 LCD Feedback Messages LCD Message Remedy Cannot Charge Make sure the charging cable is plugged into the base and wall. When vacuum is initially connected to the base, the status light will light up to let you know the power is on. Neato XV™...
- Page 46 LCD Feedback Messages LCD Message Remedy Vacuum Won’t Dock If your vacuum is having difficulty docking on its charging base, ensure that: • the charging base is located at least 3 feet from a corner of a room • the charging base has clearance 3 feet in front of it •...
-
Page 47: Filters
Filters Filters To get the best results, we recommend emptying your dirt bin and cleaning the filter after every vacuum session as described in Emptying the Dirt Bin on page 39. To clean your filter, just tap the filter against a garbage can to loosen the debris off of it. We also recommend changing your filter in your vacuum every one to two months (based on typical usage;... - Page 48 Filters (This page intentionally left blank.) Neato XV™ Series User Guide...
-
Page 49: Customer Support
Customer Support If you have any questions or comments, •Contact your authorized reseller or •Visit www.NeatoRobotics.com for additional information. Neato XV™ Series User Guide... -
Page 50: Limited Warranty
Limited Warranty See Limited Warranty at www.neatorobotics.com. Neato XV™ Series User Guide... -
Page 51: Compliance Information
-1.5 mrad Caution: Use of controls or adjustments or performance of procedures other than those specified herein may result in hazardous radiation exposure. Neato Robotics, Inc. 8100 Jarvis Avenue Suite 100 Newark, CA 94560 No service is allowed by the user. If there are any problems with the RPS laser distance sensor, the robot should be returned to an authorized service provider for service or repair. -
Page 52: Declaration Of Conformity
Declaration of Conformity We declare under our sole responsibility that the, Robotic Vacuum Cleaner Model: XV Series and derivatives to which this declaration relates, is in conformity with the following standards, Council Directive 2006/95/EC — Low Voltage Directive EN60335-1: 2002 + A1+ A2 +A11 +A12 +A13 IEC/ EN 60335-2-2:2003 + A1 + A2 EN 50366:2003 + A1 The last two digits of the year in which the CE marking was affixed are 10. - Page 53 April 2012 Date of Issue Neato Robotics Newark, CA Neato XV™ Series User Guide...
-
Page 54: Fcc Compliance Statement
FCC COMPLIANCE STATEMENT This device complies with part 15 of the FCC rules. Operation is subject to the following two conditions: 1 this device may not cause harmful interference, and 2 this device must accept any interference received, including interference that may cause undesired operation NOTE: This equipment has been tested and found to comply with the limits for a Class B digital device, pursuant to part 15 of the FCC Rules. - Page 55 Trade Name: NEATO Model Number: XV Series Responsible Party: NEATO Robotics Changes or modifications not expressly approved by Neato can void the user's authority to operate the equipment. Neato XV™ Series User Guide...
-
Page 56: Disposal Notices
Disposal Notices Neato Vacuum If you ever dispose of your Neato Vacuum, follow these steps: 1 Unplug the Neato Vacuum from any power source, including removing it from its charging base and removing the power adapter plug from the Neato Vacuum power connector. -
Page 57: Linux Operating System
NOTE: The Neato application, which provides functionality specific to the Neato products, such as the LCD menu and the robot’s navigation intelligence, is proprietary software developed by Neato Robotics, Inc. The Neato application has not been combined or distributed with the Linux operating system in a manner that would obligate Neato to license the application under the terms of Neato XV™... - Page 58 CD-R with our modifications. To do so, please send a written request to: Neato Robotics, Inc. Attention: Customer Care - GNU/Linux Source Code Request. 8100 Jarvis Ave. Suite 100 Newark, CA 94560 Please include a check in the amount of $15.00 to cover reproduction, shipping, and...
- Page 59 Neato XV™ 系列机器人吸尘器 用户指南...
- Page 60 使用此装置前请阅读所有说明。 保存好这些说明。 有关附加的安全说明,请参阅第 10 页。 Neato Robotics, Inc. 8100 Jarvis Avenue Suite 100 Newark, CA 94560 版权所有 © 2013 Neato Robotics, Inc.。保留所有权利。 Neato Robotics 是 Neato Robotics, Inc. 的注册商标。...
- Page 61 目录 欢迎! ................................ 5 Neato 机器人吸尘器剖析图................6 重要安全说明 ..................... 10 要做的和不要做的 ..................11 切换至运行模式..................14 使用 Neato 机器人吸尘器......................15 使用充电基座 ..................... 16 充电状态 ....................20 最佳充电 ..................... 20 清扫模式 ....................21 快速启动您的机器人吸尘器 ................22 使用控制中心 LCD 屏幕 ................. 24 使用定点模式清扫更小的区域................26 设置时钟...
- Page 62 定时预约清扫的想法 ..................33 移除定时预约清扫 ..................34 更改 LCD 显示屏上的语言 ................36 暂停清扫 ....................37 将机器人吸尘器切换到睡眠模式............... 37 关闭机器人吸尘器 ..................38 清空尘盒 ....................39 边界标记 ....................41 使用边界标记..................41 与您的 Neato 机器人吸尘器沟通 ..............42 获得 Neato 机器人吸尘器的最佳性能 ..............43 LCD 反馈消息 .................... 44 过滤器.....................
- Page 63 欢迎! 感谢您购买新的 Neato 机器人吸尘器。欢迎步入家用机器人革命。 此内容详细的用户指南将提供您需要知道的所有信息。简单易行。 如果您时间不宽裕,想立即了解基础使用方法,您可以阅读 《快速入门指南》 。更加简便。 我们希望与您保持联系。 为保证您及时获取有关您的新 Neato 机器人吸尘器的最新信息,请在以下网址进行产品注册: http://www.neatorobotics.com。 Neato 专注于研发家用机器人产品,旨在将每一位用户从枯燥的家庭清扫中解放出来。 Neato XV™ 系列用户指南...
-
Page 64: Neato 机器人吸尘器剖析图
Neato 机器人吸尘器剖析图 激光导引视觉系统 — 机器人的眼睛 控制面板 (参见下一页) 开始 尘盒 按钮 把手 (按照 箭头方向 尘盒弹出 抓取) 缓冲器 顶部视图 Neato XV™ 系列用户指南... - Page 65 屏幕 按钮: 向上 向下 返回 软键 开始按钮 状态 指示灯 控制面板 Neato XV™ 系列用户指南...
- Page 66 跌落传感器 跌落传感器 窗口 窗口 清扫滚刷 滚刷防护装置 滚刷防护装置 释放 滚刷防护装置 轮子 释放 轮子 电池门 信息 标签 底部视图 充电 接触点 背面视图 Neato XV™ 系列用户指南...
- Page 67 释放按钮 充电 接触点 充电基座 (外部视图) 电缆缠绕 支柱 电源电缆 充电基座 (内部视图) Neato XV™ 系列用户指南...
-
Page 68: 重要安全说明
重要安全说明 使用此装置前请阅读所有说明。 保存好这些说明,以备今后参考。 对于所有非例行维修,请委托 Neato Robotics 执行。 本机器人吸尘器仅可使用随附的充电基座进行充电。 本机器人吸尘器仅可使用随附的电池进行操作。请勿使用非充电电池来代替。 身体、感官或心理残疾或缺乏经验和知识的人士 (包括儿童)不得使用此装置,除非在其 监护人的监管或指导下使用。确保儿童不将此装置当做玩具。 为确保最佳性能,请在每次使用后清空尘盒并清扫吸尘滚刷。 Neato XV™ 系列用户指南... -
Page 69: 要做的和不要做的
要做的和不要做的 为确保 Neato 机器人吸尘器更好地在您家中提供服务,有一些事项您需要记住: 要做的 不要做的 水、化学品或其它液体。请勿用 Neato 机 电源。不使用机器人时,请对其进行充 电,以确保在您每次使用时,它都电量 器人吸尘器清理湿垃圾。虽然 Neato 机器 十足。 人吸尘器看起来像宠物,但是请勿对其进 行冲洗,或将其浸入水中。此外,请勿让 其接触刺激性化学品或任何染色剂。但, 您可使用湿抹布对其进行擦洗。 Neato XV™ 系列用户指南... - Page 70 要做的 不要做的 边界。 Neato 机器人吸尘器能够清扫任何 悬挂的电缆和贴近地面的桌布。为确保机 器人和您家庭的安全,确保悬挂的电线、 它可以到达的地方。如果您不想让机器人 桌布和其它类似电线的物件不会绊住您的 打扫某一区域,您只需放置边界标记即可 机器人吸尘器。 (参见第 41 页) 。机器人将会清扫到边界 标记,但不会越过边界标记。 清理。由于 Neato 机器人吸尘器整天与脏 低温。将 Neato 机器人吸尘器放置在零度 东西打交道,它会变得有点脏。用过一段 以下环境中可能会对其造成永久损害,很 时间后,请粗略查看一下它,确保轮子和 可能损伤它的感知能力。 滚刷上没有毛发和碎屑,使其能够顺畅地 室外。 Neato 机器人吸尘器是家用电器, 运行。 不可在室外使用。请将其放于室内使用。 Neato XV™ 系列用户指南...
- Page 71 Neato 机器人吸尘器智能清扫 矩形前端设计使其可以贴近墙面和墙角吸尘打扫。 低矮的外形使其可以在家具下面开展清扫工作。 始终以直线路径吸尘打扫。 4 & 5- 紧贴障碍物环绕清扫。 自动门口识别确保在移动到下一单房间前, 完成对单房间的全面清扫。 Neato XV™ 系列用户指南...
-
Page 72: 切换至运行模式
切换至运行 模式 ... 取出尘盒,找到 “打开” “关闭”开关。 Neato 向下推开关将 打开。 装回尘盒。 Neato XV™ 系列用户指南... -
Page 73: 使用 Neato 机器人吸尘器
使用 Neato 机器人吸尘器 电池充满电后, Neato 机器人吸尘器便可以开始清扫。 • 要给电池充电,请参阅第 16 页的 使用充电基座 。 • 要快速启动清扫,请参阅第 22 页的 快速启动您的机器人吸尘器 。 • 要定时预约清扫,请参阅第 30 页的 定时预约清扫 。 Neato XV™ 系列用户指南... -
Page 74: 使用充电基座
使用充电基座 使用充电基座 Neato 机器人吸尘器预安装了一块充电电池,首次使用前,您必须将其充满电。 要使用充电基座,请遵循以下步骤: 1 将充电基座插入墙上的壁装插座,并将其放在您想要经常吸尘打扫的单房间的地板上, 以提供一条明确的路径给机器人吸尘器返回充电基座进行充电。 2 放置充电基座时,请确保: • 充电基座背面贴紧墙面 • 充电基座与单房间的墙角距离至少保持 3 英尺 • 充电基座不倾斜 Neato XV™ 系列用户指南... - Page 75 使用充电基座 注意:充电基座两侧各有一个出口孔,您可以在距墙上插头最近的一侧,将电缆从 充电基座拉出。参考第 9 页的图例。 Neato 将 机器人吸尘器连接至充电基座 Neato XV™ 系列用户指南...
- Page 76 使用充电基座 给机器人吸尘器一条到其充电器的明确路径 Neato XV™ 系列用户指南...
- Page 77 使用充电基座 3 将 Neato 机器人吸尘器的弯曲边缘顶在充电基座上,使充电基座的接触点与机器人吸尘 器的充电接触点接触。状态指示灯亮起,表明正在充电。 Neato 机器人吸尘器在充电基座上 Neato XV™ 系列用户指南...
-
Page 78: 充电状态
充电状态 充电状态 电池充电需要大约 2 到 3 小时。状态指示灯向您指示 Neato 机器人吸尘器当前的充电 状态: 状态指示灯颜色 含义 常亮绿色 充满电,准备清扫 闪烁绿色 正在充电,但可以开始清扫 闪烁琥珀色 正在充电,但尚不能清扫 机器人出现错误 (参阅 LCD 屏幕了解详情,参考第 42 页的 与 常亮琥珀色 Neato 您的 机器人吸尘器沟通 ) 最佳充电 为确保获得最佳性能,建议在不使用 Neato 机器人吸尘器时,将其放在充电基座上充电。 这不仅可以确保机器人吸尘器为即将到来的清扫任务做好准备,还可以确保更长的电池使 用寿命。 Neato XV™ 系列用户指南... -
Page 79: 清扫模式
清扫模式 清扫模式 Neato 机器人使用其强大的真空吸尘器进行清扫。只需按开始按钮,它便开始逐个打扫您 的房间。 Neato 在逐房间打扫时会创建一个房间地图。当它需要充电时,它将使用该地图 返回开始处。根据其开始位置,它将: 从充电基座开始:如果 Neato 从充电基座开始打扫,电池电量快耗尽时,它将返回 充电基座充电,充满电后,回到暂停处继续打扫。如果仍未完成清扫工作,它将再 次返回充电基座充电,然后返回暂停处完成清扫。 不从充电基座开始:如果 Neato 不从充电基座开始打扫,电池电量快耗尽时,它将 返回开始打扫处,停下并发出充电请求。完成充电后,请将 Neato 放在其停止处周 围两英尺以内,然后按开始按钮。它将返回暂停打扫处完成清扫工作。如果未完成 清扫工作,它将重复此操作。 在一个清扫周期中, Neato 最多可如此循环三次。完成清扫周期后, Neato 将删除地图。 Neato XV™ 系列用户指南... -
Page 80: 快速启动您的机器人吸尘器
快速启动您的机器人吸尘器 快速启动您的机器人吸尘器 当执行定时预约清扫时, Neato 机器人吸尘器工作效果最佳 (参阅第 30 页的 定时预约清 扫 ) ,但是您可以随时快速启动机器人吸尘器,立即开始清扫。 要启动 Neato 机器人吸尘器: 1 给机器人吸尘器充电 (参阅第 16 页的 使用充电基座 ) 。当 “开始”按钮指示灯常亮绿 色时,表明机器人吸尘器已充满电。 2 拿开所有可能卡在机器人吸尘器滚刷上的松散物件 (如小玩具配件) 。 3 将 Neato 机器人吸尘器放在地板上。 4 按“开始”按钮。如果机器人吸尘器处于睡眠模式,此操作可将其唤醒!然后再按一次 该按钮,开始清扫整个多房间。 Neato XV™ 系列用户指南... - Page 81 快速启动您的机器人吸尘器 5 Neato 机器人吸尘器会将单房间地图保存起来,自动进行清扫。 6 完成后,机器人吸尘器返回到起始位置 (充电基座或您在单房间内手动启动它的地 方) ,然后自动关闭。 Neato XV™ 系列用户指南...
-
Page 82: 使用控制中心 Lcd 屏幕
使用控制中心 LCD 屏幕 使用控制中心 LCD 屏幕 Neato 机器人吸尘器 LCD 控制中心屏幕是您与机器人吸尘器沟通的界面。 这是您为机器人 吸尘器提供清扫定时预约或暂停其清扫周期的界面,也是机器人吸尘器为您提供信息的界 面。例如,它可以告诉您,它即将返回充电基座充电。此外,如果机器人吸尘器出现问题, 它会告诉您所发生状况,以便您解决问题。 “欢迎”屏幕看起来如下: 屏幕下方的按钮 (亦称软键)用于执行屏幕上它上方所显示的操作 (在本例中, “菜单” 用于打开主菜单) 。 Neato XV™ 系列用户指南... - Page 83 使用控制中心 LCD 屏幕 使用此屏幕,您可以: • 使用 “定点”模式清扫更小的区域 (参阅第 26 页) • 设置 Neato 机器人吸尘器的时钟 (参阅第 28 页) • 为 Neato 机器人吸尘器编程以进行定时预约清扫 (参阅第 30 页) • 从机器人吸尘器获取与其运行状况和所需帮助相关的反馈信息 (参阅第 42 页) • 更改 LCD 显示屏上的语言 (参阅第 36 页) • 暂停机器人吸尘器 (参阅第 37 页) •...
-
Page 84: 使用定点模式清扫更小的区域
使用定点模式清扫更小的区域 使用定点模式清扫更小的区域 在定点模式中,将清扫约 4 英尺 × 6 英尺的小区域。 要使用定点模式: 将 Neato 机器人 按箭头按钮选择 “定点清扫” ,然 吸尘器居中放在地 后按 “选择” 。 面上,面向即将清 扫的区域,按 “菜单” 。 Neato 机器人吸尘 器将清扫其前方 4 英尺 × 6 英尺的 区域:首先清扫区 域外围,然后清扫 内部。 Neato XV™ 系列用户指南... - Page 85 使用定点模式清扫更小的区域 (本页故意留为空白。 ) Neato XV™ 系列用户指南...
-
Page 86: 设置时钟
设置时钟 设置时钟 在您可以定时预约将来的清扫前,您必须在机器人吸尘器上设置当前日期和时间,以便其 知晓何时进行下一清扫。 要设置日期和时间: 按 “菜单” 。 按箭头按钮选择 “设置时钟” ,然 后按 “选择” 。 使用箭头按钮选择 使用向上和向下 “12 小时制”或 箭头选择星期几, 然后按 “确定” 。 “24 小时制” ,然 后按 “选择” 。 Neato XV™ 系列用户指南... - Page 87 设置时钟 使用箭头按钮选择 使用箭头按钮选 当前小时,然后按 择当前分钟,然 “确定” 。循环小 后按 “确定” 。 时选择 “上午” 或 “下午” 。 当前日期和时间已 经显示。按 “返 回”按钮 进行 更正;否则按 “保存” 。 Neato XV™ 系列用户指南...
-
Page 88: 定时预约清扫
定时预约清扫 定时预约清扫 设置定时预约前,请按第 28 页的 设置时钟 中所述设置时钟。 要定时预约清扫: 按 “菜单” 。 按箭头按钮选择 “定时预约” , 然后按 “选择” 。 按箭头按钮选择 使用箭头按钮选 “修改定时预 择您想要机器人 约” ,然后按 吸尘器开展清扫 “选择” 。 工作的日期,然 后按 “选择” 。 Neato XV™ 系列用户指南... - Page 89 定时预约清扫 使用箭头按钮选择 使用箭头按钮选 您想要机器人吸尘 择您想要机器人 器开展清扫工作的 吸尘器开展清扫 小时,然后按 工作的分钟,然 “选择” 。 后按 “选择” 。 通过按 “添加” 确认日期、时间 和清扫模式。 要进行更改, 请按 “返回” 按钮 。 将会在您选定的时间和日期进行将来的打扫。在每一个定时预约时间, Neato 机器人吸尘 器将离开充电基座,开始定时预约清扫。完成清扫后,机器人吸尘器自动返回充电基座充 电。如果在预约清扫期间,电池电量快耗尽,机器人吸尘器将自动返回充电基座充电,然 后再回到暂停处继续未完成的清扫。 Neato XV™ 系列用户指南...
-
Page 90: 要充分利用定时预约清扫
要充分利用定时预约清扫 如果您未使用充电基座,您需要手动启动 Neato 机器人吸尘器。它将根据实际的时间和星 期几开始定时预约清扫。您回来后,需要手动将机器人吸尘器放回充电基座。 要充分利用定时预约清扫 • 需要将充电基座放在您想要进行定时预约清扫的区域内。 • 确保在定时预约之间清空尘盒 (参阅第 39 页的 清空尘盒 )以获得最佳结果。 • 如果电池电量不足以完成清扫周期, Neato 机器人吸尘器将自动返回充电基座充电, 然后回到暂停处继续完成清扫。 Neato XV™ 系列用户指南... -
Page 91: 定时预约清扫的想法
定时预约清扫的想法 定时预约清扫的想法 一些帮助您利用定时预约清扫的方式: • 定期清扫经常走动的特定区域。例如,您可以设置一个定时预约在每天上午 10 点清 扫您的厨房或客厅。将充电基座放在厨房内,Neato 机器人吸尘器会自动离开充电基 座,清扫单房间,然后返回充电基座。每天定时清扫有助于降低灰尘堆积,减少过敏 症状。 • 您还可以将充电基座放在卧室走廊上,定时预约每隔一天清扫一次卧室地板。要使机 器人保持在多房间的该区域内,只需放置边界标记即可,然后机器人便可以出去进行 尽可能多的清扫,如果清扫区域较大,在电池电量快耗尽时,它将返回充电基座充 电,然后回到暂停处继续清扫。 Neato XV™ 系列用户指南... -
Page 92: 移除定时预约清扫
移除定时预约清扫 移除定时预约清扫 如果您需要移除之前设置的定时预约清扫,请遵循以下步骤: 按 “菜单” 。 按箭头按钮选择 “定时预约” ,然 后按 “选择” 。 Neato XV™ 系列用户指南... - Page 93 移除定时预约清扫 使用箭头按钮选择 使用箭头按钮选择 “移除日期” , 您要移除的清扫 然后按 “选择” 。 事务,然后按 “选择” 。 按 “删除”确认 将显示一条确认消 删除。如果操作 息核实您移除的定 失误,请使用 时预约清扫。 “返回”按钮 。 Neato XV™ 系列用户指南...
-
Page 94: 更改 Lcd 显示屏上的语言
更改 LCD 显示屏上的语言 更改 LCD 显示屏上的语言 如果您要在 LCD 显示屏上使用不同的语言,请遵循以下步骤: 按 “菜单” 。 按箭头按钮选择 “语言” ,然后按 “选择” 。 LCD 将使用您选择 使用箭头按钮选 择您想要使用的 的语言。 语言,然后按 “选择” 。 Neato XV™ 系列用户指南... -
Page 95: 暂停清扫
暂停清扫 暂停清扫 在任何时间如果您想要暂停清扫,请按 Neato 机器人吸尘器上的任一按钮,机器人吸尘器 将显示 “暂停”菜单。从 “暂停”菜单中,按向下箭头使机器人吸尘器: • 暂停当前清扫 • 取消当前清扫 • 取消清扫,并返回充电基座 • 恢复当前清扫 使用向上和向下箭头以及 “选择”按钮告诉 Neato 机器人吸尘器执行以上任一命令。 将机器人吸尘器切换到睡眠模式 按 “开始”按钮并保持 2 秒钟, Neato 机器人吸尘器 LCD 屏幕指示灯将熄灭。下次打开 机器人吸尘器时,指示灯将再次亮起。 Neato XV™ 系列用户指南... -
Page 96: 关闭机器人吸尘器
关闭机器人吸尘器 关闭机器人吸尘器 如果要关闭机器人吸尘器以长期存放,或者如果您要外出度假,您可以关闭 Neato 机器人 吸尘器的所有电源。注意这将删除您的时钟设置。 要关闭机器人吸尘器: 1 选择 LCD 屏幕上的 “菜单” 。 2 选择 “支持” 。 3 选择 “关机” 。 要在完成此操作后重新启动机器人吸尘器,只需按 “开始”按钮即可。 注意:关闭 Neato 机器人吸尘器的所有电源后,不可将它放在充电基座上。 注意:如果电池电量过低,机器人将自动关闭。如果时钟已被重新设置,定时预约 不再可用,这是因为电池电量已完全耗尽。因此,我们建议您在机器人不进 行清扫时,始终将其保持在充电状态。 Neato XV™ 系列用户指南... -
Page 97: 清空尘盒
清空尘盒 清空尘盒 为确保获得最佳性能,请在每次使用后,清空 Neato 机器人吸尘器的尘盒。 取出尘盒。 取下过滤器。 Neato XV™ 系列用户指南... - Page 98 清空尘盒 将尘盒内垃圾清空倒入垃圾 箱。对着垃圾箱轻敲过滤 器,清除剩余的灰尘。 将过滤器放回过滤器盖中,然后将尘盒装回 Neato 机 器人吸尘器的顶部。 Neato XV™ 系列用户指南...
-
Page 99: 边界标记
边界标记 边界标记 边界标记是告诉 Neato 机器人吸尘器什么地方 不 用清扫的有用工具。 当您想做如下事情时,边界标记是非常有用的: ~350 Sq Ft Scheduled Area 28'-0" • 在不存在边界的地方创造一个边界。您可能拥有 Kitchen 一个大的开放式规划多房间,想要清扫一个大单 房间中的一部分区域,如此处显示的阴影部分。 • 让 Neato 机器人吸尘器远离您不想让其接近的任 何物件。 5'-0" 使用边界标记 要使用边界标记,只需将它紧贴地板从一面墙拉到对面墙,即可封锁一个区域。 Neato 机 器人吸尘器将会在其启动的边界标记的一侧清扫地板。将机器人吸尘器放在边界标记限定 的区域内,然后按 “开始” 。机器人吸尘器将识别边界标记,且不会越过边界标记。您可 按照需要使用剪刀将边界标记剪成更短的长度。 完成清扫后,机器人吸尘器将返回充电基座,如果未找到充电基座,将返回到起始位置。 (在这种情况下,您需要尽快给机器人吸尘器充电。 ) Neato XV™ 系列用户指南... -
Page 100: 与您的 Neato 机器人吸尘器沟通
与您的 Neato 机器人吸尘器沟通 与您的 Neato 机器人吸尘器沟通 沟通是相互的,在 Neato 机器人吸尘器跟您讲话时,请认真听。 充电时, “开始” 按钮周围的状态指示灯将变为绿色, 指示 Neato 机器人吸尘器可以工作。 如果状态指示灯为琥珀色,则表明 Neato 机器人吸尘器在开始工作前需要获得一些帮助。 只需要阅读 LCD 控制中心屏幕显示的内容,了解机器人吸尘器需要什么帮助。机器人吸尘 器将告诉您何时: • 清空尘盒和过滤器 • 修复卡住的滚刷 • 扯开缓冲器 • 清洁跌落传感器窗口 ...以及其它反馈信息。 Neato XV™ 系列用户指南... -
Page 101: 获得 Neato 机器人吸尘器的最佳性能
获得 Neato 机器人吸尘器的最佳性能 获得 Neato 机器人吸尘器的最佳性能 1 每次清扫后,清空尘盒 2 经常清理粘在滚刷上的碎屑 3 定期除净跌落传感器的灰尘。使用棉签清洁 Neato 机器人吸尘器底部的两个跌落传感器 窗口 (位置如下所示) 。 跌落传感器 跌落传感器 窗口 窗口 清洁跌落传感器 Neato XV™ 系列用户指南... -
Page 102: Lcd 反馈消息
LCD 反馈消息 LCD 反馈消息 机器人吸尘器是智能的,在其需要任何帮助时,会让您知道。只需阅读 LCD 上的消息, 便可了解它需求什么。以下是一些特定的提示。 LCD 消息 解决方法 尘盒已满 清空尘盒,然后将其装回插槽中。 滚刷卡住 卸下滚刷防护装置,清除滚刷和滚刷轴上的所 有毛发和碎屑。装回滚刷和防护装置,按 “开始”按钮继续清扫。 缓冲器卡住 轻摇缓冲器使其松开。 如果电池电量非常低, Neato 机器人吸尘器将 未设置时间 失去它的时钟设置。使用菜单重新设置时间和 日期,如第 28 页的 设置时钟 中所描述。 Neato XV™ 系列用户指南... - Page 103 LCD 反馈消息 LCD 消息 解决方法 无法充电 确保充电电缆插入基座和墙上的壁装插座。首 次将机器人吸尘器与基座连接时,状态指示灯 将亮起,指示电源已打开。 机器人吸尘器无法 如果很难将机器人吸尘器与充电基座对接, 对接 请确保: • 充电基座与单房间的墙角距离至少保持 3 英尺 • 充电基座前方有 3 英尺空隙 • 充电基座没有被沙发或其它家具挡住 • 充电基座稳固依靠在墙上,没有前后 倾斜 • 如果充电基座位于地毯上,尝试将其重 新放置在硬地板上 如果您仍有问题,请联系 Neato 客户关怀。 Neato XV™ 系列用户指南...
-
Page 104: 过滤器
过滤器 过滤器 要获得最佳结果,我们建议您在每次吸尘打扫后,清空尘盒和清洁过滤器,如第 39 页的 清空尘盒 中所述。要清洁过滤器,只需对着垃圾箱轻敲过滤器,敲掉上面的碎屑即可。 我们也建议您每一到两个月更换一次机器人吸尘器中的过滤器(基于典型使用情况;如果 您使用机器人吸尘器较频繁,则您可能需要更频繁地更换过滤器。 ) Neato XV™ 系列用户指南... - Page 105 过滤器 Neato XV™ 系列用户指南...
- Page 106 过滤器 (本页故意留为空白。 ) Neato XV™ 系列用户指南...
-
Page 107: 客户支持
客户支持 如果有任何问题或意见, • 请联系您的授权转售商或 • 访问 www.NeatoRobotics.com 了解附加信息。 Neato XV™ 系列用户指南... -
Page 108: 有限保修
有限保修 请访问我们的网站 www.neatorobotics.com,查看有限保修条款。 Neato XV™ 系列用户指南... -
Page 109: 符合性信息
785 nm • 脉冲重复频率 1.8 kHz • 脉冲持续时间 200 s • 峰值功率 2.1 mW • 光束直径 2.3 mm • 光束发散度 -1.5 mrad 小心:未按照此处规定的参数控制、调整或执行产品程序可能引起危险的辐射暴露。 Neato Robotics, Inc. 8100 Jarvis Avenue Suite 100 Newark, CA 94560 不允许用户进行维修。如果 RPS 激光测距传感器出现任何问题,应将机器人返回到授权服务提供商处维修 或修理。 Neato XV™ 系列用户指南... -
Page 110: 符合性声明
符合性声明 我们负责任地声明, 机器人吸尘器 型号:XV 系列及派生产品 符合以下标准: 理事会指令 2006/95/EC 低电压指令 EN60335-1: 2002 + A1+ A2 +A11 +A12 +A13 IEC/ EN 60335-2-2:2003 + A1 + A2 EN 50366:2003 + A1 附加 CE 标记的年份的后两位数是 10。 理事会指令 2004/108/EC 电磁兼容性指令 EN55014-1:1997 w/ A1:2001 和 A2:2001, B 类 EN 55014-2:1997 EN 61000-3-2: 2006 (交流充电器)... - Page 111 2012 年 4 月 颁发日期 Neato Robotics Newark, CA Neato XV™ 系列用户指南...
-
Page 112: Fcc 符合性声明
FCC 符合性声明 本设备符合 FCC 规则第 15 部分的要求。操作须符合以下两种条件: 1 本设备不可造成有害干扰, 2 本设备必须接受任何已接收到的干扰,包括可能导致意外操作的干扰 注意: 本设备经测试证实,符合 FCC 规则第 15 部分对 B 类数字设备的限制。这些限制用于在住宅安装环 境下针对有害干扰提供适当的保护。本设备产生、使用且可能辐射射频能量,如果不按照说明安装 和使用,可能会对无线电通信造成有害干扰。但是,我们不能担保干扰不会在特定安装环境中出现。 如果本设备对无线电或电视接收造成有害干扰 (可通过打开和关闭本设备进行判断),用户可尝试 遵照以下一项或多项措施校正干扰: • 重新定向或重新放置接收天线。 • 增大设备和接收器之间的距离。 • 将设备连接到与接收器所连接电路不同的插座上。 • 咨询经销商或有经验的无线电/电视技术人员,寻求帮助。 Neato XV™ 系列用户指南... - Page 113 商品名称:NEATO 型号:XV 系列 责任方:NEATO Robotics 未经 Neato 明确许可而变更或改装本设备可导致用户操作设备的授权失效。 Neato XV™ 系列用户指南...
-
Page 114: 处置注意事项
处置注意事项 Neato 机器人吸尘器 如果您要处置 Neato 机器人吸尘器,请遵循以下步骤: 1 将 Neato 机器人吸尘器从电源上拔下,同时将其从充电基座上取下,并从 Neato 机器 人吸尘器电源连接器卸下电源适配器插头。 2 打开电池门 (参见第 8 页底部视图) ,取出电池。 3 将机器人吸尘器拿到最近的废品管理电子产品回收中心。 4 将电池拿到您学校、工作地点或最近的废品管理电池回收中心。 电池 如果电池由于过热或损坏而导致泄漏,请将其装入塑料袋中,并按照所有适用的联邦、州 和地方法规进行处置。 取出电池后,Neato 机器人吸尘器中的电池盒需用湿抹布擦干净, 并 等晾干后再安装新电池。 Neato XV™ 系列用户指南... -
Page 115: Linux 操作系统
些冲突条款将不适用于 Linux 安装。 Linux 操作系统的许可方否认任何因使用或分发 Linux 操作系统而导致的或与其相关的担保和责任,无论是明示或暗示的。请查阅 GPLv2 了解与 Linux 相关的附加许可信息。 注意:为 Neato 产品提供专用功能的 Neato 应用程序,如 LCD 菜单和机器人导航智能,是 Neato Robotics, Inc. 开发的专有软件。 Neato 应用程序与 Linux 操作系统整合或分 发的方式不能致使 Neato 按照 GPLv2 中的条款发放应用程序许可证。Neato 应用程 序的使用受适用的 Neato EULA (http://www.neatorobotics.com/EULA) 约束。为 清楚起见, Neato 未开放 Neato 应用程序,或按照 GPLv2 中的条款发放应用程序... - Page 116 注意:如果您无法或不愿意从 下载我们的修 改版,您可申请获得一份包含修改版的 CD-R。如需这样做,请将书面申请寄送至: Neato Robotics, Inc. Attention: Customer Care - GNU/Linux Source Code Request. 8100 Jarvis Ave. Suite 100 Newark, CA 94560 请附上面值 15 美元的支票,用以支付复制、运送和处理费用。我们将在接到申请后 3 周内 交货。 Neato XV™ 系列用户指南...
Need help?
Do you have a question about the Neato XV Series and is the answer not in the manual?
Questions and answers