Table of Contents

Related Manuals for Digiplex EVO641


Summary of Contents for Digiplex EVO641
- Page 1 EVO641 / EVO641R DGP2-648BL DGP2-641BL / DGP2-641RB User Guide For EVO Systems We hope this product performs to your complete satisfaction. Should you have any questions or comments, please visit www.paradox.com and send us your comments.
-
Page 3: Table Of Contents
Table of Contents Introduction ........1 Trouble Display ....... 17 Legend ..............1 Trouble Display ..........17 Event Record Display ........18 Basic Operation ......... 2 Additional Features ......19 Confidential Mode ..........3 Programmable Outputs (PGMs) ..... 19 Keypad Settings ..........19 Partitioned System ...... -
Page 5: Introduction
1.0 Introduction Your EVO System is an advanced technology security system that will provide you with reliable security protection and powerful features that are easy to use. The elegant and user-friendly keypads will allow you easy access to your security system's functions and information at the touch of a button. -
Page 6: Basic Operation
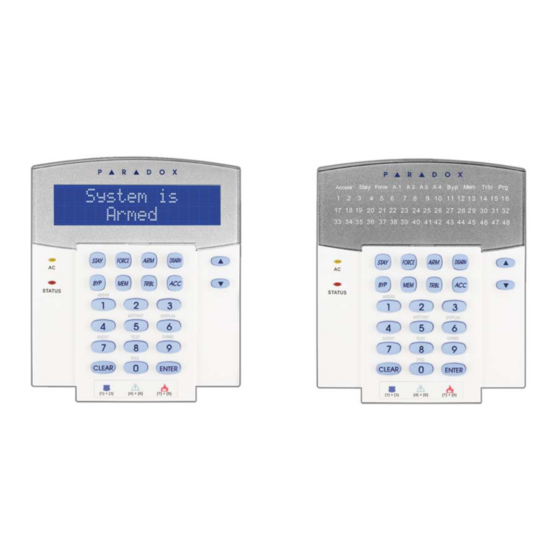
2.0 Basic Operation The following sections will introduce you to the roles of the buttons, lights, and messages on your keypad. Figure 1: LCD Keypad Basic Overview AC Light: = AC power The LCD screen will guide you = Power failure with detailed messages. -
Page 7: Confidential Mode
2.1 Auditory Feedback (Beep Tones) When you enter information on the keypad, the keypad will guide you with beep tones to communicate the acceptance or rejection of your entries. Confirmation Beep: When an operation (i.e. arming/disarming) is successfully entered or when the system switches to a new status/mode, the keypad emits an intermittent beep tone (“... -
Page 8: Partitioned System
3.0 Partitioned System Your installer can set your keypad to recognize separate protected areas. A separated system is called a partitioned system, which can be useful in situations where shared security systems are more practical. For example, a company that has both an office and a warehouse area, can arm and disarm each area separately while controlling access to each area. -
Page 9: Arming
4.0 Arming When your system is armed, it can respond to any breach in the protected zones by causing an alarm and sending a report to your monitoring station. 4.1 Exit Delay Timer When you arm your system, it will trigger the Exit Delay Timer to provide you with enough time to exit the protected area before the system is armed. -
Page 10: Keyswitch Arming
3. Enter the zone number (i.e. 01, 02,...96), or use the [ ] and [ ] buttons and press ] once the zone you want to bypass appears on the screen. If bypassed, the byp light does not appear on the screen and the keypad emits a rejection beep, you may not have access to bypass that zone. -
Page 11: Auto-Arming
4.8 Auto-Arming If enabled by your installer, you can set the time that an area will arm itself automatically. 4.8.1 Timed Auto-Arming Your installer can set Timed Auto-Arming to function in either Force or Stay arming mode. A sixty-second (default value) Exit Delay sequence will begin prior to your system automatically arming itself at the programmed time. -
Page 12: Disarming
The area and zone (i.e. Alarm Area 1 - Front Door) are displayed / zone’s LED flashes even when the system is armed. The notification continues until disarming, even if the zone is restored. (EVO641 / EVO641R only) • The alarm memory will be erased after the next alarm occurs and a valid code has been entered. -
Page 13: Access Codes
6.0 Access Codes Access Codes allow access to the system. Your system supports up to 999 user access codes. Codes are given a User Number between 002 and 999 (User Number 001 is the System Master Code). Your installer will program user access codes to be four, six, or variables of one to six digits in length. - Page 14 4. Press the [ ] button to move the cursor to a new space. 5. Repeat steps 2 and 3 until the desired label is complete. 6. Press the [ ] button to save and exit. ENTER 6.3.1 Keypad Buttons Every numeric button on the LCD keypads is assigned a set of letters.
-
Page 15: Deleting User Access Codes
Table 3: Special Characters Catalogue 6.4 Deleting User Access Codes To delete user access codes, follow steps 1 to 5 in section 6.5.1 on page 12. Once the information is erased, press the [ ] button to save and exit. ENTER 6.5 Programming User Access Codes The System Master and Users with the Master feature can program user access codes... -
Page 16: User Options
6.5.1 Programming User Settings Notes: - For a detailed description of the User Options, see section 6.6 on page 13. - By default, all users can regular arm the system. Note: - For a detailed description of the Access Control User Options, see section 6.7 on page User Labels on page 9. -
Page 17: Access Control User Options
6.6 User Options Options [1] and [2]: Master Feature When option is OFF, the User cannot program other users into the system. When option is ON and option is OFF, the user can program and modify user access codes (P.I.N. only) and User Labels. When both options are ON, the user has Full Master rights. - Page 18 Option [3]: Card with Extended Unlocked Period When option is ON, “Extended Unlocked Period” is enabled. “Extended Unlocked Period” refers to the time period programmed into each Access Control door by your installer that extends the unlocked time of the door. For example, if your installer sets the Unlocked period of the door to 30 seconds and the Extended Unlocked Period to 15 seconds, a user access code with “Extended Unlocked Period”...
-
Page 19: Using Access Control
7.0 Using Access Control 7.1 Entering & Exiting Depending on how your system is installed and on the type of keypad, there are various ways to enter and exit Access Control doors: • Present your Access Control card to the reader or the EVO641R or DGP2-641RB keypad. -
Page 20: How Access Control Works
7.3 How Access Control Works To illustrate how Access Control functions, we will use three simple Access Control System examples: Figure 3: Example A Bonnie’s Access Control card is programmed with Access Level 01 and Schedule 01. If she presents her card to the reader or the EVO641R / DGP2-641RB keypad on Door 02 on Tuesday, August 3 at 3:00 p.m., she will gain access to the room. -
Page 21: Trouble Display
8.0 Trouble Display 8.1 Trouble Display If your system experiences any problems, Trouble(s) [TRBL] to View will appear on the screen, or the action light will illuminate. The Trouble Display will only display the troubles that occur in the area(s) to which the keypad has been assigned. Potential troubles have been sorted into eight groups. -
Page 22: Event Record Display
8.1.6 Group 8: Clock Loss The time and date have been reset to the default. This is the only trouble that we recommend that you correct. Clock Loss [8] to Set will appear on the LCD screen after you press the [ ] button or the [ ] key. -
Page 23: Additional Features
*This feature cannot be accessed via One-Touch Buttons (see section 4.6.2 on page 6). † When keypad mute is enabled, only confirmation, rejection, and key-press beeps are audible. ‡ EVO641 / EVO641R only 9.3 Modifying illumination settings on the DGP2-648BL LED To modify illumination settings: 1. Enter your . -
Page 24: Programming Chime Zones
On the DGP2-648BL LED keypad, follow this procedure: 1. Enter your [ ] and press the [ ] button. ACCESS CODE TRBL 2. Press the [8] button. 3. Enter the hour and minutes according to the 24-hour clock (i.e. 9AM is 09:00 and 9PM is 21:00). -
Page 25: Vdmp3 Plug-In Voice Dialer
10.0 VDMP3 Plug-In Voice Dialer The VDMP3 is a voice-assisted module that can be programmed to call up to 8 telephone numbers in the event of an alarm. You can also call the VDMP3 from an outside line, enabling you to arm or disarm the system as well as activate up to 8 PGMs. 10.1 Calling the VDMP3 (outside line) Connected to an answering machine: 1. - Page 26 22 User Guide...
-
Page 27: Testing And Maintenance
11.0 Testing and Maintenance 11.1 Burglar Alarm Testing Two people are needed to complete this test. One person will watch the screen on the keypad while the other person walks around the protected areas and opens the zones (i.e. opens the doors and windows that are protected, walk in the path of the motion detectors, etc.). -
Page 28: Fire And Burglar Alarms
12.0 Fire and Burglar Alarms 12.1 Standard Fire Zone During a fire alarm, the bell/siren emits an intermittent sound ( ) until BEEP BEEP BEEP silenced or reset. If the zone is a Standard Fire Zone, your system can immediately send an alert to your monitoring station. -
Page 29: Minimizing Home Fire Hazards
Figure 7: Delayed Fire Zone 12.4 Minimizing Home Fire Hazards How can you avoid the three most common causes of fires at home? • Never leave cooking food unattended. It’s the leading cause of fire injuries. Cooking fires often result from unattended cooking and human error, rather than mechanical failure. -
Page 30: Appendix 1: Hebrew Special Characters
Appendix 1: Hebrew Special Characters Refer to the following tables when programming the user labels of a Hebrew LCD keypad. Instead of using Table 2 on page 10 and Table 3 on page 11, use Tables 9 and 10 below. Refer to section 6.3 on page 9 for information on programming user labels. -
Page 31: Appendix 2: Russian Special Characters
Appendix 2: Russian Special Characters Refer to the following tables when programming the user labels of a Russian LCD keypad. Instead of using Table 2 on page 10 and Table 3 on page 11, use Tables 11 and 12 below. Refer to section 6.3 on page 9 for information on programming user labels. -
Page 32: Appendix 3: Greek Special Characters
Appendix 3: Greek Special Characters Refer to the following tables when programming the user labels of a Greek LCD keypad. Instead of using Table 2 on page 10 and Table 3 on page 11, use Tables 13 and 14 below. Refer to section 6.3 on page 9 for information on programming user labels. - Page 33 Index Copy User Options ................9 Access Codes Deleting .................. 11 Labelling ................... 9 Date, Set ..................19 Programming ................11 Deactivating a Security System ............8 System Master ................. 9 Delay Timer User ..................9 Entry ..................8 Access Control ................13 Exit ....................5 Entering &...
- Page 34 Timer Entry Delay ................8 Master Code ..................9 Exit Delay .................5 Master Feature, in User Options ............ 13 Trouble AC Failure ................17 Battery ..................17 Bell/Siren Disconnected ............17 No Movement Auto-Arming ............. 7 Clock ..................18 Communicator ................17 Fail to Communicate ...............17 One Touch Button for the DGP-641BL/RB and the DGP-648 ..
- Page 35 6215399, 6111256, 5751803, 5721542, 5287111, 5119069, 5077549, 5920259, 5886632. Canadian and international patents may also apply. Digiplex, InTouch, WinLoad and NEware are trademarks or registered trademarks of Paradox Security Systems Ltd. or its affiliates in Canada, the United States and/or other countries.
- Page 36 For technical support in Canada or the U.S., call 1-800-791-1919, Monday to Friday from 8:00 a.m. to 8:00 p.m. EST. For technical support outside Canada and the U.S., call 00-1-450-491-7444, Monday to Friday from 8:00 a.m. to 8:00 p.m. EST. Please feel free to visit our website at www.paradox.com.
Need help?
Do you have a question about the EVO641 and is the answer not in the manual?
Questions and answers