Rimage 2000i User Manual
Cd/dvd duplicator printer
Hide thumbs
Also See for 2000i:
- User manual (192 pages) ,
- Knowledge base (43 pages) ,
- Alignment manual (6 pages)
Table of Contents
Advertisement
Advertisement
Table of Contents

Related Manuals for Rimage 2000i


Summary of Contents for Rimage 2000i
- Page 1 Rimage 2000i™ User Guide This manual provides the information needed to operate the Rimage 2000i , identify the parts, and configure the printing preferences. To set up and install your Rimage 2000i , refer to the Rimage 2000i Setup and Installation Guide included with your product.
- Page 2 Rimage Corporation reserves the right to make improvements to the equipment and software described in Rimage Corporation this document at any time without any prior notice. Rimage 7725 Washington Avenue South Corporation reserves the right to revise this publication and...
-
Page 3: Table Of Contents
Replace the Ink Cartridges ................................... 25 Diagnostic Tests ..................................26 Access Diagnostic Test Mode..................................26 Select a Diagnostic Test ................................... 26 Diagnostic Test 3 – Calibrate Diagnostic Test .............................. 26 Align the Printer on the Rimage 2000i ............................. 27 100763_M... - Page 4 100763_M...
-
Page 5: Introduction
The Rimage 2000i operates with either Rimage 2000i Software or OfficeNET Software Suite. When installed with OfficeNET Software Suite, the Rimage 2000i can be shared on a network, allowing all users to create discs from their desktops. For more information about setting up and submitting orders over a network, refer to the Rimage Advance Setup (Networking) Guide available at www.rimage.com/support. - Page 6 Rimage 2000i™ User Guide 100763_M...
-
Page 7: Important Information
The latest documents • Current firmware and driver downloads Technical Support Support for the Rimage 2000i is available through your authorized reseller. Important! Make sure to register your Rimage 2000i so Rimage can notify you of upgrades as they become available. 100763_M... -
Page 8: Optical Disc Recording Software Disclaimer
• Use only the supplied AC power cord. For more information or to order a new power cord, contact Rimage • The laser beam used by the DVD-R recorder is a Class Customer Service. -
Page 9: Compliance Information
Pursuant to Part 15.21 of the FCC Rules, any changes or modification to this equipment not expressly approved by Rimage Corporation may cause harmful interference, and void your authority to operate this equipment. -
Page 10: Rimage 2000I Specifications
Rimage 2000i™ User Guide Rimage 2000i Specifications Note: The most up-to-date technical specification information for the Rimage 2000i is available at www.rimage.com/support. From the Support menu select: Desktop Series > Rimage 2000i > User Manuals tab Rimage 2000i Standard Rimage 2000i autoloader (includes the embedded Rimage 480i printer), Rimage 2000i system Software Suite. -
Page 11: Networking Ability
Important Information Rimage 2000i Networking ability Refer to the Rimage Advanced Setup (Netoworking) Guide for instructions on submitting orders from a networked computer. Print quality Technology Thermal inkjet printing Resolution Up to 4800 dpi Droplet size 3 pico-liters Pixel density 5.76 million pixels per square inch Power 100 –... - Page 12 Rimage 2000i™ User Guide 100763_M...
-
Page 13: Printer Requirements
Printer Requirements Printer Requirements This section describes the ink, label design, and print requirements for the Rimage 2000i. Ink Requirements Important! • Use only authentic Rimage ink cartridges in the Rimage 2000i. • Keep print cartridges sealed in their original packaging until they are needed. -
Page 14: Label Design Requirements
The hole is 15 mm (0.59"). The printable area and hub sizes may vary between disc manufacturers. Note: The media in Rimage Media Kits have a printable area of 118 to 24 mm. On most labels, print settings of 118 mm and 24 mm are recommended. -
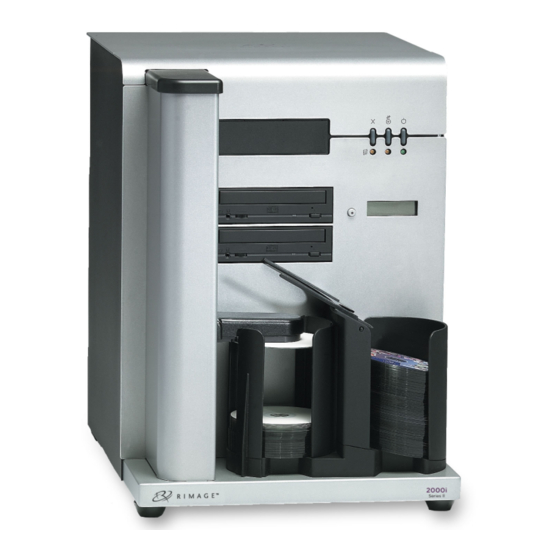
Page 15: Identify The Parts Of The Rimage 2000I
Identify the Parts of the Rimage 2000i Identify the Parts of the Rimage 2000i This section describes the Rimage 2000i hardware and its features. Front View Printer Service Door Ink Cartridge Access Door Printer Control Printer Tray Panel Door Operator Panel... -
Page 16: Parts Information
Operator Two-line Button Display Printer Control Panel The Rimage 2000i printer control panel has three buttons and three indicator lights that indicate certain conditions. The table below explains the functionality of each button and indicator light. Image Name Functionality Cancel button Press the cancel button to provide limited functionality and cancel printing. -
Page 17: Operate The Rimage 2000I
Operate the Rimage 2000i Operate the Rimage 2000i This section includes information about how to power on and off the Rimage 2000i, pause the system, and load discs. It also provides instructions for setting your printing preferences. Power On the Rimage 2000i Important! You must power on the Rimage 2000i before you power on the PC. -
Page 18: Set Your Printing Preferences On A Windows-Based Pc
Press and release the operator button to return to normal operation. Set Your Printing Preferences on a Windows-based PC Printing preferences allow you to set up your Rimage 2000i to produce the best possible label on your discs. Through printing preferences, you can: •... -
Page 19: Access Printing Preferences
Operate the Rimage 2000i Access Printing Preferences You must access the Disc Color Printer 480i Printing Preferences window to set up your printing preferences. Use one of the following procedures to access the Disc Color Printer 480i Printing Preferences window through the Windows Start menu or through CD Designer. -
Page 20: Create, Edit, Or Delete A Watermark
Rimage 2000i™ User Guide Create, Edit, or Delete a Watermark This functionality allows you to create a watermark to print on your disc. You can also edit an existing watermark or delete an a watermark that you have previously created. -
Page 21: Set Color Options
Operate the Rimage 2000i Set Color Options This functionality allows you to toggle between color and grayscale printing, select the type of color space your labels require, and adjust some color attributes. Access Printing Preferences. Refer to page 15. Select the Color tab. -
Page 22: Align The Ink Cartridges
Rimage 2000i™ User Guide • If you use hub-printable discs without a stacking ring: Measure the inner diameter of the printable surface. Tip: Most discs like the one shown above have the following printable areas: • Outer Diameter 118 mm •... -
Page 23: Center The Image On The Disc
Center the Image on the Disc The Rimage 2000i provides two ways to center the image on the disc. You can use the Auto Centering method or the Manual Centering method. The following procedure describes both methods. The Auto Centering method is accurate to within +/- 0.5 mm. - Page 24 Rimage 2000i™ User Guide 100763_M...
-
Page 25: Maintain The Rimage 2000I
Use only non-abrasive cleaners to wipe down the surfaces of your Rimage 2000i. • Do not pour cleaner directly onto your Rimage 2000i. Instead, apply the cleaner to a lint-free cloth first. • When you spray compressed air, make sure that no liquid drips into your system. -
Page 26: Remove Dust From The Rimage 2000I
Printer instructions on page 27. 11/32" nut driver Note: The printer is aligned at the factory. 5/32" Allen wrench Remove Dust from the Rimage 2000i Required tools: • Can of compressed air • Torx T10 screwdriver Press the recorder buttons to open the recorder trays. - Page 27 Maintain the Rimage 2000i Remove the back panel. Remove the Torx T10 screws (Qty. 6) that secure the back panel. Left Side While firmly grasping the top of the back panel, lift Panel and pull back to remove it. Slide the left side panel straight back and off of the system.
-
Page 28: Clean The Ink Cartridges
Select OK. The Preferences window closes. Replace Consumables This section provides information about replacing the fan filter and ink cartridges in the Rimage 2000i. Replace the Fan Filter The fan filter is a consumable item. You must change the fan filter every month. Use the following procedure to change the fan filter. -
Page 29: Replace The Ink Cartridges
Maintain the Rimage 2000i Replace the Ink Cartridges Use the following procedure to change the ink cartridges in your Rimage 2000i. Important! You must use the appropriate ink cartridges in one of the configurations listed in the Ink Requirements section. -
Page 30: Diagnostic Tests
Rimage 2000i™ User Guide Diagnostic Tests This section provides the information needed to access, select, and perform Rimage 2000i diagnostic tests. Before you begin, make sure that the Rimage 2000i is not in an error state. Important! Perform only the diagnostic tests provided below. Do not attempt to perform other diagnostic tests without the assistance of a Rimage trained technician. -
Page 31: Align The Printer On The Rimage 2000I
Maintain the Rimage 2000i Align the Printer on the Rimage 2000i The printer is aligned at the factory. However, the printer can come out of alignment during shipping. If the lift arm is not picking or placing discs on the printer tray properly, or if you receive clamping errors, you need to align the printer. Use the following procedure to align the printer. - Page 32 Rimage 2000i™ User Guide Access the printer. Open the printer service door to access the hex nuts at the rear of the printer. Note: You may need to prop this door open or have someone hold the door for you.
- Page 33 11. Press and hold the operator button until [EXIT TEST MODE DIAGNOSTIC] displays on the operator panel. 12. When [EXIT TEST MODE DIAGNOSTIC] displays on the operator panel, release the operator button. Note: If [PAUSE…] displays on the operator panel, press and release the operator button. [RIMAGE 2000i READY] displays on the operator panel.
Need help?
Do you have a question about the 2000i and is the answer not in the manual?
Questions and answers