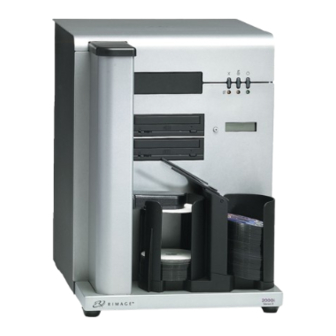
Rimage Desktop 2000i Reference Manual
Replace a recorder
Hide thumbs
Also See for Desktop 2000i:
- User manual (192 pages) ,
- Knowledge base (43 pages) ,
- Alignment manual (6 pages)
Advertisement
Quick Links
Rimage Desktop Family
Replace a Recorder on a Rimage 2000i (USB)
Use this procedure to replace a recorder on a Rimage 2000i™ with a USB configuration.
Rimage approved parts must be used for this process. The product warranty may become void if parts not approved by Rimage are
used; equipment or parts are tampered with, misused, neglected, or modified in any respect without the written consent of Rimage.
Before you begin:
1.
Stop or pause all jobs.
2.
Power off the Rimage 2000i.
3.
Disconnect the power cord from the power outlet.
Remove the Recorder
1.
Disconnect the cables from the back of the system.
Caution! Some cables in this system are
latched. Equipment damage may occur if
cables are not disconnected appropriately.
•
FireWire cable (if present)
•
USB cable
•
Power cord
2.
Remove the back panel from the Rimage 2000i.
a.
Remove the Torx T10 screws (Qty. 6) that
secure the back panel.
b.
While firmly grasping the top of the back
panel, lift and pull back to remove it.
3.
Slide the side panels (Qty. 2) straight back and off
the system.
112174_D
Required Tools:
•
T10 Torx screwdriver
•
5/64" Allen wrench
•
Pencil
Side Panels
© 2008, Rimage Corporation
Operator
FireWire Cable
(if present)
USB Cable
Power
Cord
1
Advertisement

Related Manuals for Rimage Desktop 2000i


Summary of Contents for Rimage Desktop 2000i
- Page 1 Use this procedure to replace a recorder on a Rimage 2000i™ with a USB configuration. Rimage approved parts must be used for this process. The product warranty may become void if parts not approved by Rimage are used; equipment or parts are tampered with, misused, neglected, or modified in any respect without the written consent of Rimage.
- Page 2 Note: These marks serve as a rough guide when positioning the new recorder. Remove the Allen screws on each side of the system. Slide the recorder out the front of the Rimage 2000i. Important! If you are replacing the bottom recorder, remove the input/output bin before you remove the recorder.
- Page 3 Replace a Recorder on a Rimage 2000i (USB) Install the Recorder From the front of the Rimage 2000i, insert the new recorder into the system. Tip: Use the pencil marks you made on the side of the system as a rough guide for positioning the recorder.
- Page 4 If no service pack software was included with the recorder, be sure you have the most recent service pack already installed. Service packs and instructions are available at www.rimage.com/support.html. Navigate: Product Family > Support – Rimage product > Downloads tab.
Need help?
Do you have a question about the Desktop 2000i and is the answer not in the manual?
Questions and answers