Table of Contents
Advertisement
E-1686
friendly pool filter systems available. Jacuzzi is a leader in providing
superior products, combining easy installation and simple service.
with many years of pool enjoyment. Ideal for above-ground or inground
pools, your filter system with the Ring-Lok filter and Ring -Lok pump,
allows you to easily clean the filter grids and the pump strainer basket
without any tools.
the necessary information for you to install your new pool system and
easily maintain the equipment.
12401 Interstate 30 P.O. Box 8903 Little Rock, AR 72219-8903 Telephone: (501) 455-1234
D.E. Filter System
Owner's Manual and Installation Guide
Congratulations! You have purchased one of the most user-
This filter system manufactured by Jacuzzi Bros. will provide you
This step-by-step installation and maintenance guide will provide
1/99
Advertisement
Table of Contents

Subscribe to Our Youtube Channel
Related Manuals for Jacuzzi Avalanche


Summary of Contents for Jacuzzi Avalanche
- Page 1 Owner’s Manual and Installation Guide Congratulations! You have purchased one of the most user- friendly pool filter systems available. Jacuzzi is a leader in providing superior products, combining easy installation and simple service. This filter system manufactured by Jacuzzi Bros. will provide you with many years of pool enjoyment.
-
Page 2: Table Of Contents
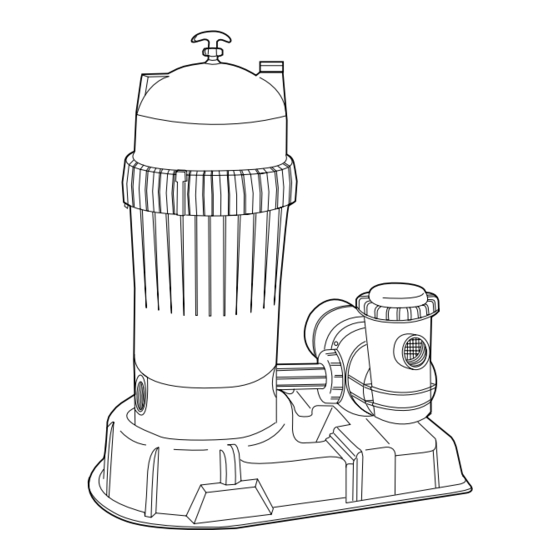
Introduction: INSIDE: Setting Up your Equipment......4-5 Winterizing Your Filter System.......21 Plumbing The System To Your Pool....6 Water Maintenance..........21 Starting Your System........7-8 Filter System Parts Breakdown......22 Filter Regeneration........9-11 Troubleshooting.........23-24 Cleaning The Pump Strainer......12-13 Manufacturer’s Warranty.........25 Cleaning The D.E. Grid Cassette....14-20 ○ ○ ○ ○ ○ ○ ○ ○ ○ ○ ○ ○ ○ ○ ○ ○ ○ ○ ○ ○ ○ ○ ○ ○ ○ ○ ○ ○ ○ ○ ○ ○ ○ ○ ○ ○ ○ ○ ○ ○ ○ ○ ○ ○ ○ ○ ○ ○ ○ ○ ○ ○ ○ ○ ○ ○ ○ ○ ○ ○ ○ ○ ○ ○ ○ ○ ○ ○ Warns about hazard that CAN cause serious personal injury and property damage if ignored. - Page 3 What you should have: Contents of carton: Pump D.E. Filter Grommet Nut Bolt (pump mount) (pump mount) 1 2 3 1 2 3 1 2 3 1 2 3 1 2 3 1 2 3 1 2 3 1 2 3 1 2 3 1 2 3 Base...
- Page 4 Setting up your system: Step 1 Install threaded end of interconnect pipe into the filter “INLET.” Tighten until O-ring seals against filter. NOTE: Be sure union nut is placed on inter- connect pipe before it is threaded into filter. Threads on union nut should face away from the filter.
- Page 5 Setting up your system: Step 4 Push the grommet nuts into the pre-drilled holes in the system base. Use the illustration at the right to ensure the correct holes are used. Position the pump on the base and connect the union nut on the interconnect pipe to the pump discharge and hand tighten only.
- Page 6 Typical above-ground pool connection:...
- Page 7 System startup: CAUTION: Water acts as a coolant for the seal. Do not operate your pump until it has been filled with water (primed). IMPORTANT: This filter is a diatomaceous earth (D.E.) type filter and requires D.E. in order to operate.
-
Page 8: Filter Regeneration
System startup: Step 4 Open air bleed valve to release any additional trapped air. When a steady stream of water appears, close the valve. Step 5 Pour D.E. mixture into pool skimmer slowly to allow D.E. to be pumped into the filter for coating. -
Page 9: Filter Regeneration
Filter regeneration: NOTE: Regeneration of the D.E. filter is done to extend the filter cycle before cleaning of the grid cassette becomes necessary. If a 10 p.s.i. increase is indi- cated by the filter pressure gauge, follow the filter regeneration steps below. If filter Ring-Lok is removed or adjusted under pressure, the filter cover may blow off, causing injury or major property damage. - Page 10 Filter regeneration: Step 3 When full stroke is obtained, slowly move handle up and down 4 to 5 times, then return wiper blades to bottom position of stroke. Step 4 Plug pump into 3 prong grounded electrical receptacle. Note pressure reading. If pressure gauge reading increases 10 p.s.i.
-
Page 11: Cleaning The Pump Strainer
Cleaning the pump strainer: To avail electrical shock, unplug the pump before performing any service or maintenance. If filter Ring-Lok is removed or adjusted under pressure, the filter cover may blow off, causing injury or major property damage. Step 1 Unplug the pump cord. - Page 12 Cleaning the pump strainer: Step 4 Lift the basket out of the strainer and remove the debris. Reinstall the basket. Step 5 Clean the o-ring on the clear strainer lid and re-lubricate with petroleum jelly. Also, clean all surfaces that come in contact with the o- ring to assure a good seal.
-
Page 13: Cleaning The D.e. Grid Cassette
Cleaning the D.E. grid cassette: To avoid electrical shock, unplug the pump before performing any service or maintenance. If filter Ring-Lok is removed or adjusted under pressure, the filter cover may blow off, causing injury or major property damage. Step 1 Unplug the pump cord. - Page 14 Cleaning the D.E. grid cassette: Step 4 Press down on yellow safety latch and rotate the large Ring-Lok nut counter-clockwise. Using both hands continue to unscrew the Ring-Lok nut. Remove and set aside. Step 5 Remove the cover by pulling upward on the handles, rocking gently if necessary.
- Page 15 Cleaning the D.E. grid cassette:...
- Page 16 Cleaning the D.E. grid cassette:...
- Page 17 Cleaning the D.E. grid cassette:...
- Page 18 Cleaning the D.E. grid cassette: Ensure plastic spacer is inserted into collar on the support plate. NOTE: Some models have a plastic buckle in place of the velcro. Once the straps are in place, pull upward on the buckle to tighten the straps.
- Page 19 Cleaning the D.E. grid cassette: Step 19 Align wiper rod to fit through hole in top of the cover. Place the cover on the filter body and press firmly downward until the cover comes to a stop against the filter body. TIP: It is easier to replace the filter cover if the air bleed valve is open.
-
Page 20: Water Maintenance
Winterizing the filter system: To avoid electrical shock, unplug the pump before performing any service or maintenance. If filter Ring-Lok is removed or adjusted under pressure, the filter cover may blow off, causing injury or major property damage. Step 1 Unplug the pump cord. - Page 22 of your equipment makes him the best qualified source . Reassemble...
-
Page 23: Manufacturer's Warranty
JACUZZI LIMITED WARRANTY Jacuzzi Bros. Division (JBD) warrants its products to be free of defects in material and workmanship for a period of 1 year from date of purchase or 3 years from date of manufacture, whichever comes first; Jacuzzi Bros. also provides additional warranty coverage on specific products as specified herein.
Need help?
Do you have a question about the Avalanche and is the answer not in the manual?
Questions and answers