Table of Contents
Advertisement
Quick Links
Advertisement
Table of Contents

Related Manuals for NetComm NP920


Summary of Contents for NetComm NP920
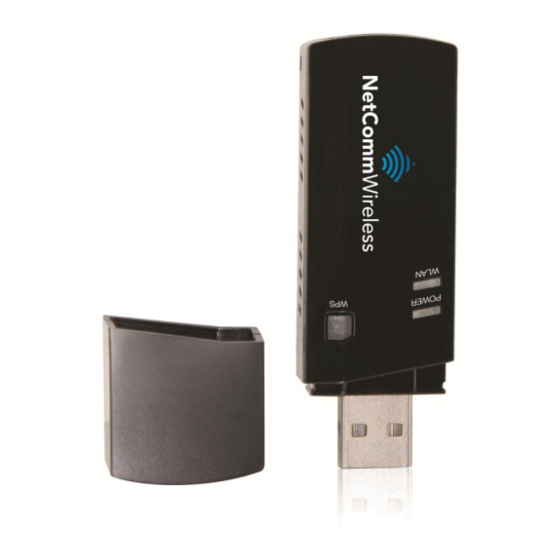
- Page 1 NetComm Wireless NP920 Dual Band WiFi USB Adapter User Guide...
-
Page 2: Table Of Contents
Contents Preface ..........................3 Important Safety Instructions ....................3 Introduction ........................... 4 Overview ........................... 4 Features ..........................4 Package Contents ......................5 Minimum System Requirements ..................5 LED Indicators ........................5 Installation ..........................6 Connecting the USB Adapter ....................6 Installing the Driver and Configuration Utility ................ -
Page 3: Preface
Copyright©2012 NetComm Wireless Limited. All rights reserved. The information contained herein is proprietary to NetComm Wireless Limited. No part of this document may be translated, transcribed, reproduced, in any form, or by any means without prior written consent of NetComm Wireless Limited. -
Page 4: Introduction
802.11n wireless technology to dramatically increase the overall throughput of the wireless LAN by supporting link rates as high as 300 Mbps - an improvement of nearly six times the throughput of standard 802.11g. The NP920 is also interoperable with standard 802.11a, 802.11b and 802.11g devices, and fully supports industry standard compliant security and Quality of Service (QoS). -
Page 5: Package Contents
Package Contents Your NP920 package contains the following items: 1 x NP920 Dual Band WiFi USB Adapter 1 x Quick Start Guide If any of the above items are damaged or missing, please contact your dealer immediately. Minimum System Requirements... -
Page 6: Installation
In the case where your computer does not automatically install the driver for the USB adapter, you may need to manually install it. Please visit the Downloads section of the product page on the NetComm Wireless website to download the driver. - Page 7 After restarting your computer, insert the USB adapter into an available USB port. The Found New Hardware Wizard appears. Select Yes, this time only and click Next >. The wizard confirms that it has found the driver for the device and prompts you to install it. Select Install the software automatically (Recommended) and click Next >.
-
Page 8: Enhancing The Performance Of The Wifi Usb Adapter
After a moment the wizard informs you that it is complete. Click Finish. The wireless utility icon appears in the system tray at the bottom right corner of your screen. Enhancing the Performance of the WiFi USB Adapter To get more performance out of your WiFi USB Adapter, you will need to modify a few settings. Open My Network Places by right-clicking on the My Network Places icon on your desktop and selecting Properties. - Page 9 Right-click on the Wireless Network Connection and select Properties.
- Page 10 Click the Configure button. Select the Advanced tab. Ensure that IBSS Mode is set to 802.11a/b/g/n Auto.
- Page 11 Set IBSS Link Indication to Legacy. Set Xpress ™ Technology to Enabled. Click OK to save your changes.
-
Page 12: Connecting To A Wireless Network
Connecting to a Wireless Network Connecting to a network without encryption To connect to an unencrypted wireless network: Double-click on the Broadcom Wireless Utility at the bottom right corner of the screen to show the Wireless Network Wizard. The available networks are displayed in a list. You can click Refresh to scan for new networks. Find the unencrypted connection in the list and left-click it once then click Next... - Page 13 Click Connect to connect to the unencrypted wireless network. To view the status of the connection, double-click on the icon. Note: If your network card does not connect to a wireless network, the Connect to a network window appears after clicking the utility icon.
-
Page 14: Connecting To An Encrypted Wireless Network
Connecting to an encrypted wireless network To connect to an encrypted wireless network: Double-click on the Broadcom Wireless Utility at the bottom right corner of the screen to show the Wireless Network Wizard. The available networks are displayed in a list. You can click Refresh to scan for new networks. Find the encrypted connection in the list and left-click it once then click Next. - Page 15 Click Connect to connect to the encrypted network. To view the status of the connection, double-click on the icon. Note: If your network card does not connect to a wireless network, the Connect to a network window appears after clicking the utility icon.
-
Page 16: Wireless Utility
Wireless Utility You can use the Broadcom Wireless Utility to perform specific network tasks or operations or view network information. Below is a list of some of the functions of the utility. Manage your wireless networks and create network connection profiles. Connect to any of the available networks for which you have created a connection profile. -
Page 17: Adding A Connection Profile
Adding a connection profile When you use the wizard to connect to a network, a profile for that network is automatically created for you. You can also add a new connection profile by clicking the Add button on the Wireless Networks tab of the utility and running through the setup wizard. -
Page 18: Removing A Connection Profile
The Wireless Network Connection Settings window opens allowing you to modify the authentication key, set a removal time and more. When you are done making changes, click OK to save your settings. Removing a connection profile With the Broadcom Wireless Utility open and the Wireless Networks tab selected, left-click the profile of the connection you want to edit, then click the Remove button. -
Page 19: Link Status
Link Status In the Link Status window, you can view the status of your network connection. The Network status information on this window is described below: Connection status: Whether the network connection is connected or disconnected. Encryption type: Displays the encryption type that the wireless network adopts. Network name (SSID): Displays the wireless network name. -
Page 20: Site Monitor
Site Monitor In the Site Monitor window, you can view the information of searched networks. The information of searched networks is described below: The infrastructure and ad hoc networks that are available The wireless router or Access Point on each infrastructure network with the highest speed and the greatest signal strength Security settings of all networks The channel on which each ad hoc network or wireless router or Access Point is operating... -
Page 21: Diagnostics
Diagnostics The diagnostics window allows you to perform hardware tests to determine whether the USB adapter is functioning correctly or run connection tests to verify that you can access the internet. Using the checkboxes, select the types of tests you would like to run and click the Run button. The Congestion button allows you to gauge which radio channels are crowded and hence which ones you should avoid in order to reduce interference. -
Page 22: Information
Click the Log button to view both Application Log and Driver Log. Information This window shows hardware and software version information. -
Page 23: Wi-Fi Protected Setup (Wps)
Press the WPS hardware button on your router/access point or if you prefer, press the Start PBC button on the router/access point’s web configuration page. Example of WPS button icon. NOTE: This icon appears on the NetComm Wireless NF2. Within the next two minutes, find the wireless access point SSID using the networking wizard in the bottom right corner of the screen (known as the system tray). -
Page 25: Troubleshooting
Troubleshooting If you experience difficulty with your USB adapter, please read through the following before contacting technical support: Verify whether the wireless network card is installed correctly After the wireless network card is installed, you can verify whether the driver is installed properly. Do as follows: Right-click on my computer icon then choose Manage >...
Need help?
Do you have a question about the NP920 and is the answer not in the manual?
Questions and answers