Table of Contents

Related Manuals for Grizzly G1005Z


Summary of Contents for Grizzly G1005Z
- Page 1 MODEL G1005Z MILL/DRILL OWNER'S MANUAL COPYRIGHT © JUNE, 2006 BY GRIZZLY INDUSTRIAL, INC. WARNING: NO PORTION OF THIS MANUAL MAY BE REPRODUCED IN ANY SHAPE OR FORM WITHOUT THE WRITTEN APPROVAL OF GRIZZLY INDUSTRIAL, INC. #JK8304 PRINTED IN TAIWAN...
- Page 2 ���� ������ �������� �������� ������ ������������ �� ��� ������ ������ ���������� ����������� ��� ������� �� ���� ������������������ ������� �� ����� ���������� ��� ������ ��� ������������ ����� �� ���� ������ ��� ������ �� ������� �������� ������� ��������� ����������� ������������� �� ������ ���...
-
Page 3: Table Of Contents
Feed Shaft Spring Tension ... 30 Electrical Components ... 32 Wiring Diagram ... 33 G1005Z Main Assembly Breakdown ... 34 G1005Z Main Assembly Parts List ... 35 G1005Z Table Breakdown ... 36 G1005Z Table and Labels Parts List ... 37 WARRANTY AND RETURNS ... 38... -
Page 4: Introduction
INTRODUCTION Foreword We are proud to offer the Model G1005Z Mill/Drill. This machine is part of a growing Grizzly family of fine woodworking and metalworking machinery. When used according to the guidelines set forth in this manual, you can expect years of trouble-free, enjoyable operation and proof of Grizzly’s com-... -
Page 5: Machine Data Sheet
Machine Data Sheet Customer Service #: (570) 546-9663 · To Order Call: (800) 523-4777 · Fax #: (800) 438-5901 MODEL G1005Z MILL/DRILL MILLING MACHINE #25 Product Dimensions: Weight... 374 lbs. Length/Width/Height... 36-1/2 x 34-1/2 x 40 in. Foot Print (Length/Width)... 20-1/2 x 13 in. - Page 6 Spindle Supported by Heavy Duty, Tapered Roller Bearings Graduations in Inches The information contained herein is deemed accurate as of 3/18/2007 and represents our most recent product specifications. Model G1005Z Due to our ongoing improvement efforts, this information may not accurately describe items previously purchased. 1-1/2"...
-
Page 7: Identification
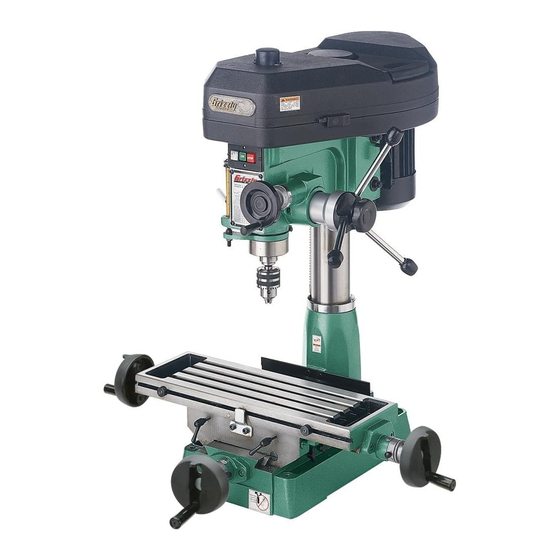
C. Return Spring Assembly D. Quill Lock E. Depth Stop G. Micro-Downfeed Handwheel H. Motor Pivot Lock K. Table Handwheels M. Gib Screws N. Longitudinal Locks G1005Z Mill/Drill Identification Figure 1. G1005Z Identification. ON/OFF Swtich Downfeed Handles Pinion Hub Lock Knob Longitudinal Stops... -
Page 8: Section 1: Safety
�� ���� ������ ��������� ��� ���� �������� ���������������������������������������������� ��� �������� ����� ���� ������ ��� ������� ������� ����� ����������� ����� ��������� ��� �������� ������������������������������������� �� ����� ������� ��������� ���� ����� �� ����� ��� ��������� �� ��������� ����� �� �������� ������������������ ������������������������������������ ��������� ����������� G1005Z Mill/Drill... - Page 9 ����������������������������� ��� �������� ��������� ���� ������ ����������������������������������������� �������������������������������������������� ������������������������������������� ��� ���� ���� ������ ��� �� ����� ��� ���� ��������� ������ ����� ���������� G1005Z Mill/Drill ��� ������ ��������������������������������������� ����� ���� ���������� ��������� ������� ����� ����������������� ��� ����� ������ ����� ��������������������� �������������������������������������������...
-
Page 10: Additional Safety For Mill/Drills
SPINDLE SPEEDS. Select the spindle speed that is appropriate for the type of work and material. Allow the mill/drill to gain full speed before beginning a cut. STOPPING SPINDLE. DO NOT stop the spindle by hand. Allow it to come to a stop by itself. -
Page 11: Section 2: Circuit Requirements
220V Circuit ... 15 Amps G1005Z Mill/Drill Plug Type The Model G1005Z comes prewired with a NEMA 5-15 plug. If you wish to rewire the motor to 220V we recommend using the following plug (see Figure 2 for an example): 220V Plug &... -
Page 12: Grounding
Use at least a 16 gauge cord that does not exceed 50 feet in length! • The extension cord must also contain a ground wire and plug pin. • A qualified electrician MUST size cords over 50 feet long to prevent motor damage. G1005Z Mill/Drill... -
Page 13: Section 3: Set Up
Solvent Cleaner ... As needed • Rags for cleaning ... As needed Unpacking The Model G1005Z was carefully packed when it left our warehouse. If you discover the machine is damaged after you have signed for delivery, please immediately call Customer Service at (570) 546-9663 for advice. -
Page 14: Inventory
Some hardware/fasteners on the inventory list may arrive pre-installed on the machine. Check these locations before assuming that any items from the inventory list are miss- ing. Figure 3. G1005Z Inventory. NOTICE G1005Z Mill/Drill... -
Page 15: Clean Up
Remove this protective coating with a sol- vent cleaner or citrus-based degreaser such as Grizzly’s G7895 Degreaser. To clean thoroughly, some parts may need to be removed. For opti- mum performance from your machine, make sure you clean all moving parts or sliding contact surfaces that are coated. -
Page 16: Mounting
Mounting The Model G1005Z must be mounted to a workbench or stand before it can be safely used. If mounting to a stand, follow the mounting instructions included with the stand. We recommend using the Grizzly Model G5943 stand, which can be found in SECTION 5: ACCESSORIES on Page 25. -
Page 17: Test Run
Troubleshooting on Page 27. If you still cannot remedy a problem, contact our Tech Support at (570) 546-9663 for assistance. G1005Z Mill/Drill To test run the machine: Make sure you have read the safety instruc- tions at the beginning of the manual and that the machine is setup properly. -
Page 18: Section 4: Operations
-16- Installing/Removing Tooling The Model G1005Z is supplied with both an R8 face mill arbor, for use with the included 2 mill, and a JT6 drill chuck. Using Clean Tapers When installing any tapered tooling, always ensure... - Page 19 While holding the arbor, unscrew the drawbar until the arbor comes free. G1005Z Mill/Drill To install end mill tooling: UNPLUG THE MILL/DRILL! Insert the appropriate-sized R8 collet into the spindle, ensuring that the collet keyway aligns with the pin inside the spindle.
-
Page 20: Table
Longitudinal Stops Longitudinal Locks Figure 12. G1005Z table components. Longitudinal Feed: The longitudinal feed, or X-axis, is moved by handwheels at either end of the table. These handwheels will move the table in both direc- tions side to side. One complete revolution of the handwheel moves the longitudinal feed 0.100". -
Page 21: Graduated Dials
"zeroed." Note: You will not need to adjust for back- lash as long as the table keeps moving in the same direction. G1005Z Mill/Drill Micro-Downfeed Handwheel The micro-downfeed handwheel (Figure 13) is used when vertical milling accuracy is required. -
Page 22: Quill Lock
Depth Stop The Model G1005Z has a depth stop that allows you to lower the drill bit or milling tool to the same point every time. The depth stop consists of a stud attached to the... -
Page 23: Choosing Milling Speeds
Stainless Steel Titanium Plastics Wood Figure 16. Cutting speeds for HSS cutting tools. G1005Z Mill/Drill Failure to follow RPM and Feed Rate Guidelines may result in ejected parts or broken tools. Parts ejected at high speeds can cause serious injury! - Page 24 A l u m i n u m M i l d S t e e l ����� ���� ��� � ��� ��� ���� ��� ���� ��� � ��� ��� ���� ��� ���� ��� �� ���� ��� ���� ��� G1005Z Mill/Drill...
-
Page 25: Changing Speeds
Changing Speeds The belts in the head of the mill/drill must be rearranged to change speeds. A chart on the belt cover shows the belt positions needed to make the mill/drill run at the desired speed. To change speeds: UNPLUG THE MILL/DRILL! Loosen the motor lock screw (shown in Figure 19), so the motor is free to pivot. -
Page 26: Drilling Guidelines
Drilling Guidelines The Model G1005Z is designed for drilling holes in wood, plastics or metal. Basic operation consists of lining up your drill bit with the intended hole location, turning the mill/drill ON, and using the downfeed handles to move the spinning drill bit into the workpiece. -
Page 27: Section 5: Accessories
H2347 Figure 22. Our most popular safety glasses. G5943—Stand for Model G1005Z Mill/Drill This companion stand for the Model G1005Z Mill/ Drill features a snap-style door handle and raised lip to guard against coolant splashes. Figure 23. G5943 Stand for G1005Z. -
Page 28: Section 6: Maintenance
• Mill/drill is clean and lubricated. Cleaning Cleaning the Model G1005Z is relatively easy. Remove excess cutting fluid and chips, and wipe off the remaining moisture with a dry cloth. Treat all unpainted cast iron and steel with a non-stain- ing lubricant after cleaning. -
Page 29: Section 7: Service
7. Test, repair or replace motor. 1. Decrease spindle speed. 2. Use smaller drill bits/cutters and reduce feed rate and spindle speed. 3. Replace bad belts, align pulleys, and re-tension. 4. Test power plug and receptacle for good contact and correct wiring. -
Page 30: Operation
Page 30. 3. Loosen jam nut, and slightly turn out screw where the quill binds. Retighten jam nut and recheck for binding and looseness at all spindle locations. 1. Adjust the quill screw. 2. Replace the quill and/or bearings. G1005Z Mill/Drill... - Page 31 2. Tighten spindle lock. 3. Check that clamping is tight and sufficient for the job. Make sure mill/drill vice is tight to the table. 4. Use appropriate RPM and feed for the job. 1. Make sure table locks are fully released.
-
Page 32: Depth Stop Calibration
Depth Stop Calibration The Model G1005Z comes fitted with a depth stop to use when drilling multiple holes at the same depth. The scale on this depth stop can be calibrated if it ever becomes incorrect. To calibrate the depth stop: 1. - Page 33 " (see Figure 29). screw approximately ⁄ G1005Z Mill/Drill Pull the cover outward just enough to disengage the spring-cover lock slot from the locking lug. Note: It is important to keep a good grip during this step.
-
Page 34: Electrical Components
Electrical Components Figure 30. G1005Z Junction Box. -32- G1005Z Mill/Drill... -
Page 35: Wiring Diagram
�� ����� ������� � ���� � �� �� � � � � � � �� �� �� �� �� �� G1005Z Mill/Drill Wiring Diagram ������ �� �� � � � � � � � � � �� �� �� ��... -
Page 36: G1005Z Main Assembly Breakdown
G1005Z Main Assembly Breakdown -34- G1005Z Mill/Drill... -
Page 37: G1005Z Main Assembly Parts List
G1005Z Main Assembly Parts List REF PART # DESCRIPTION P1005001 HEAD BODY P1005002 CHUCK ARBOR BOLT 7/16-20 P1005003 SPINDLE LOCKNUT 34 X 16 P1005004 SPINDLE PULLEY P1005005 OUTER BEARING PLATE PS04 PHLP HD SCR 1/4-20 X 1/2 P1005007 SPINDLE TAPER SLEEVE SET... -
Page 38: G1005Z Table Breakdown
G1005Z Table Breakdown -36- G1005Z Mill/Drill... -
Page 39: G1005Z Table And Labels Parts List
MUST maintain the original location and readability of the labels on the machine. If any label is removed or becomes unreadable, REPLACE that label before using the machine again. Contact Grizzly at (800) 523-4777 or www.grizzly.com to order new labels. G1005Z Mill/Drill... -
Page 40: Warranty And Returns
WARRANTY AND RETURNS Grizzly Industrial, Inc. warrants every product it sells for a period of 1 year to the original purchaser from the date of purchase. This warranty does not apply to defects due directly or indirectly to misuse, abuse, negligence, accidents, repairs or alterations or lack of maintenance. - Page 41 ���������������������������������������������������������������������������������� � ������������������������������������������������������������������������������������ ����� ����������������������� ������ � ������������������������ ���� ��������������������� ���������������������������� ������ ������������������������ ���������� � ���������������� ���������������������������� ������������������������������� ��������������������������� ��� ��������� ����������� �� ����� �� � ��������� ������ �� ���� �� ���� ��� ��������� �������� �� ���� �� ������� ������ �������� ��� ��������� �� ������� ��� ����������� �� �������� ������������� ���...
- Page 42 ���������������������� ���������������������� ����������������������������������� ����������������������������������� ������������������������������������� �������������������������������������� ������� ����������� ���� ���� ��� ���� ����������� �� ���������� �������������������������������������� ����� ����� ����...
- Page 44 ��� ������ ��� ���� ���� ������� ����� ��� ������� ����� ��� �������� ��� ������� � � � ���� ����� ��� � � �������� ������ ��� � ����� ������ � �� ��� �������� ������� � ������ �������� ������ ������� ������ �� ����� ������...
Need help?
Do you have a question about the G1005Z and is the answer not in the manual?
Questions and answers